What Does a Muscle Do?

At my Restorative Exercise certification training in spring of 2014, Katy Bowman, the founder of R.E. posed a question to our group – “What do muscles do?” Her answer – “they respond.” To be honest I didn’t give her comment much thought at the time, but since that day her words have come back to me time and time again and the truth of them has been born out of my experiences working with clients and in my own body.

What do we typically think of when we want to affect a muscle? Generally either stretching it or strengthening it. If I want to stretch a muscle, what do I really want to happen? I want that muscle to change it’s length. Specifically, I want that muscle to be longer that it currently is.

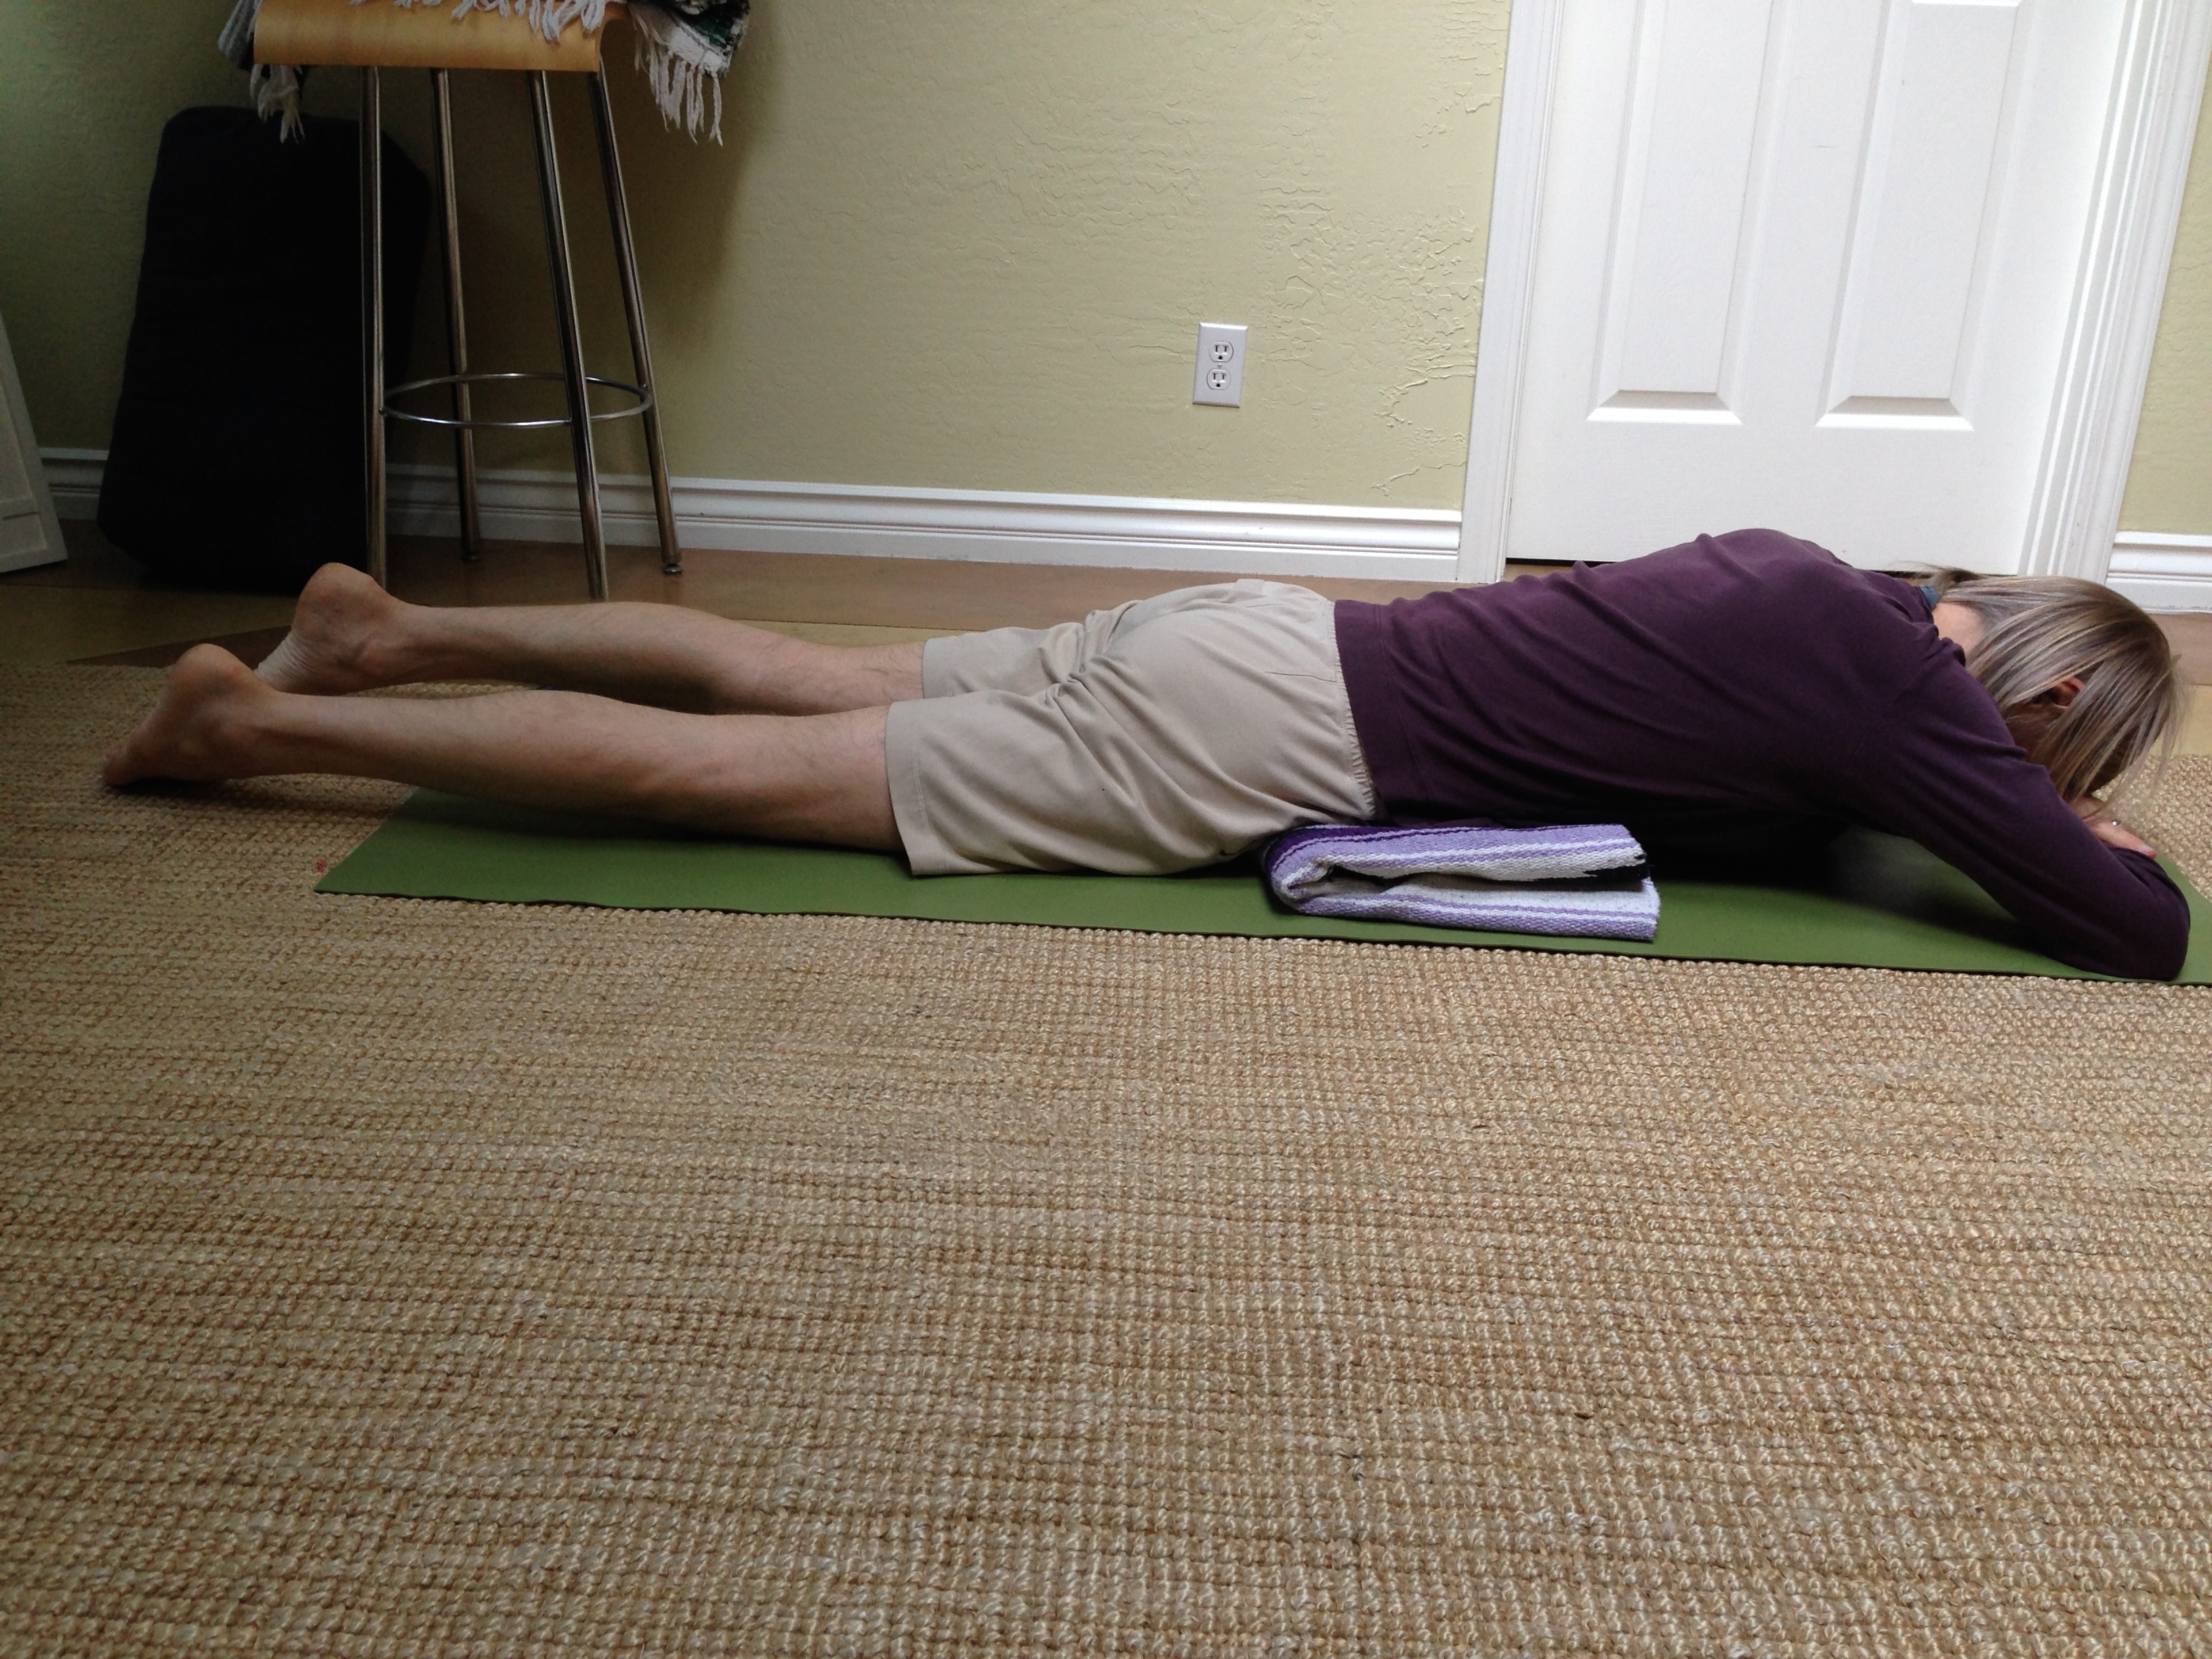
Let’s say I find out I have tight hamstrings and that having tight hamstrings is not a good thing so I decide I’m going to stretch them. I stand and bend forward and try to reach the floor, pulling strongly on the muscles in the backs of my legs. It certainly feels like I am stretching my hamstrings, but usually I am stretching the muscles in my back even more. In fact, because of the difference in the way these 2 groups of muscles are meant to function, the way that the hamstring muscles and the muscles in my lower back “respond” in this scenario can be very different than I intend.

bending2

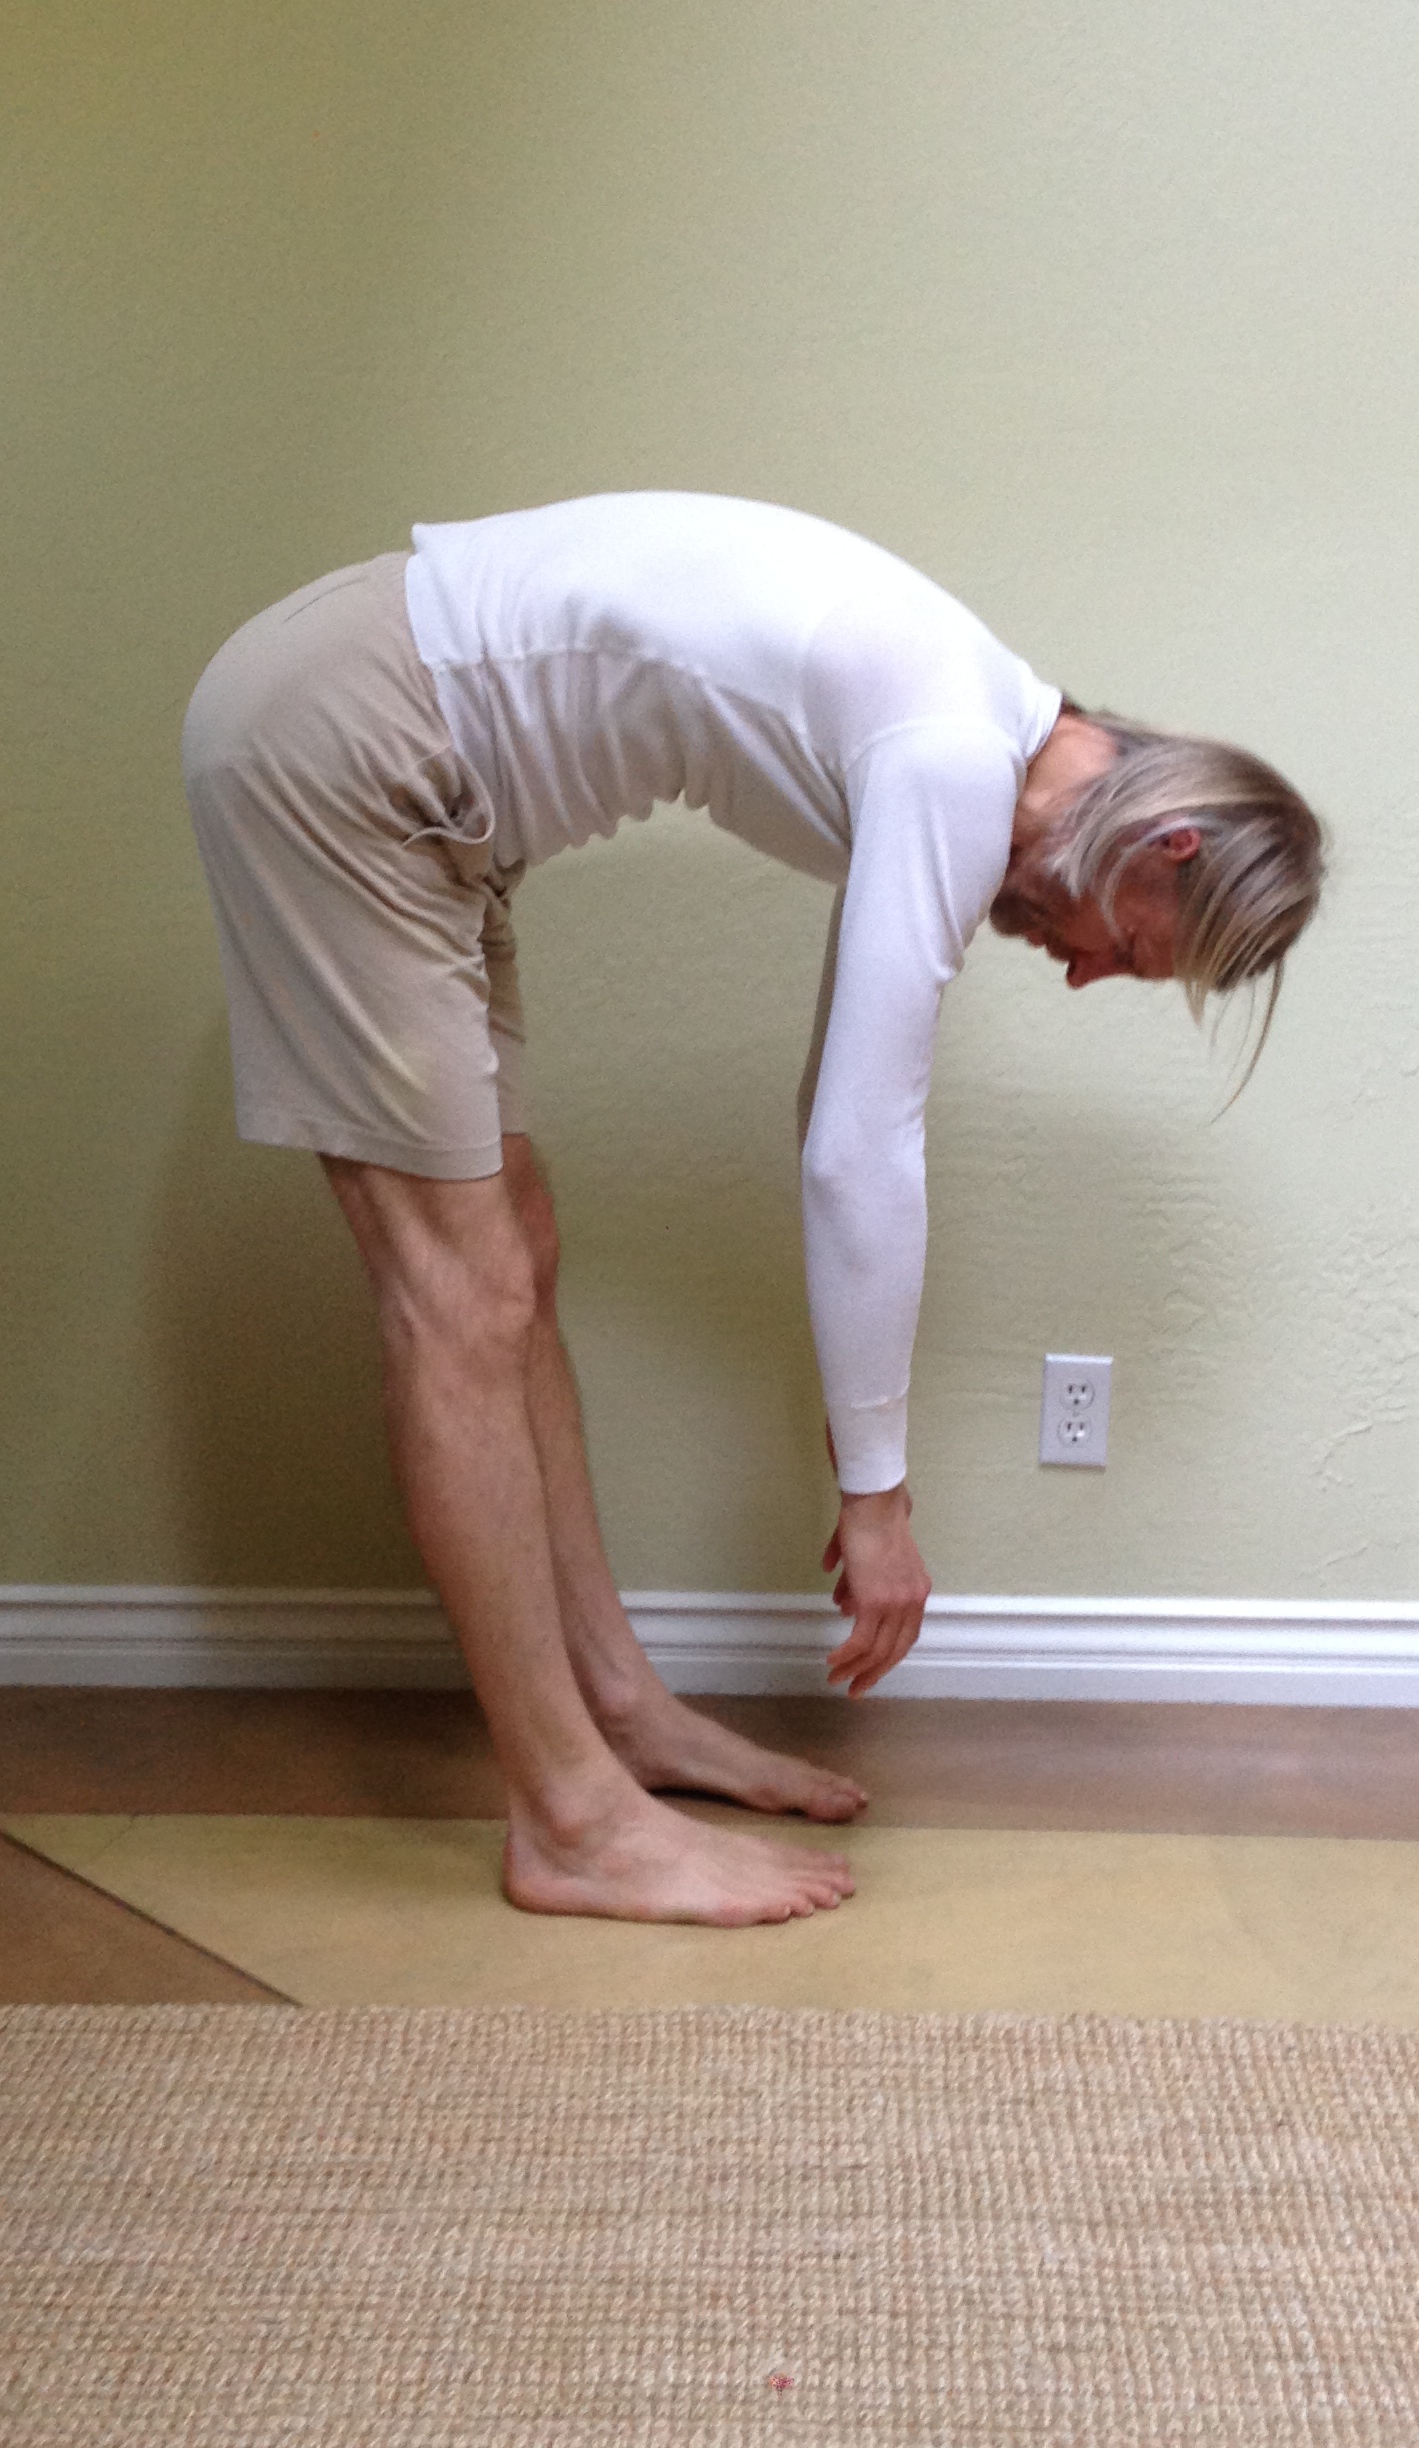
Bending from the lower back

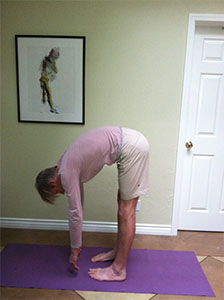
The hamstrings consist of three muscles located on the back of the thigh which are called the semimembranosus, the semitendinosus, and the biceps femoris. The primary job of the hamstrings collectively is to extend the hip joint (pull the femur back relative to the pelvis) and flex (bend) the knee. When the knees are kept straight and the hips are flexed as in a standing forward bend, the hamstrings do the job of hip extension by acting as the main muscles that support the weight of my upper body as it moves forward and down. In other words, as I flex my hips to bend forward the hamstrings apply a counter force in the opposite direction, that of hip extension, to help carry the weight of my pelvis, trunk and head.

In this example, the muscles in my lower back have a job to do as well, particular the erector spinae whose job it is to help stabilize my spine and prevent it from distorting to the point that it puts undue stress on the spinal joints. These muscles work in combination with my hamstrings and my gluteal (buttock) muscles to enable me to bend forward without damaging the very important and essential tissue contained within my spinal column, namely the spinal cord.

Thus the job of my hamstrings in a forward bend, as well as those of the lower back, is to “respond” to that movement by acting as a kind of breaking mechanism, carrying the load of my trunk. Of the two muscle groups, the hamstrings are the bigger and stronger and therefore should be encouraged to do more of the work in a forward bend. For the hamstrings to respond this way I need to emphasize bending more from my hips and minimize the bend from my lower back. When the hamstrings are tight they don’t allow for much movement from the hips before they can no longer respond to my motion of bending forward.

figure 4

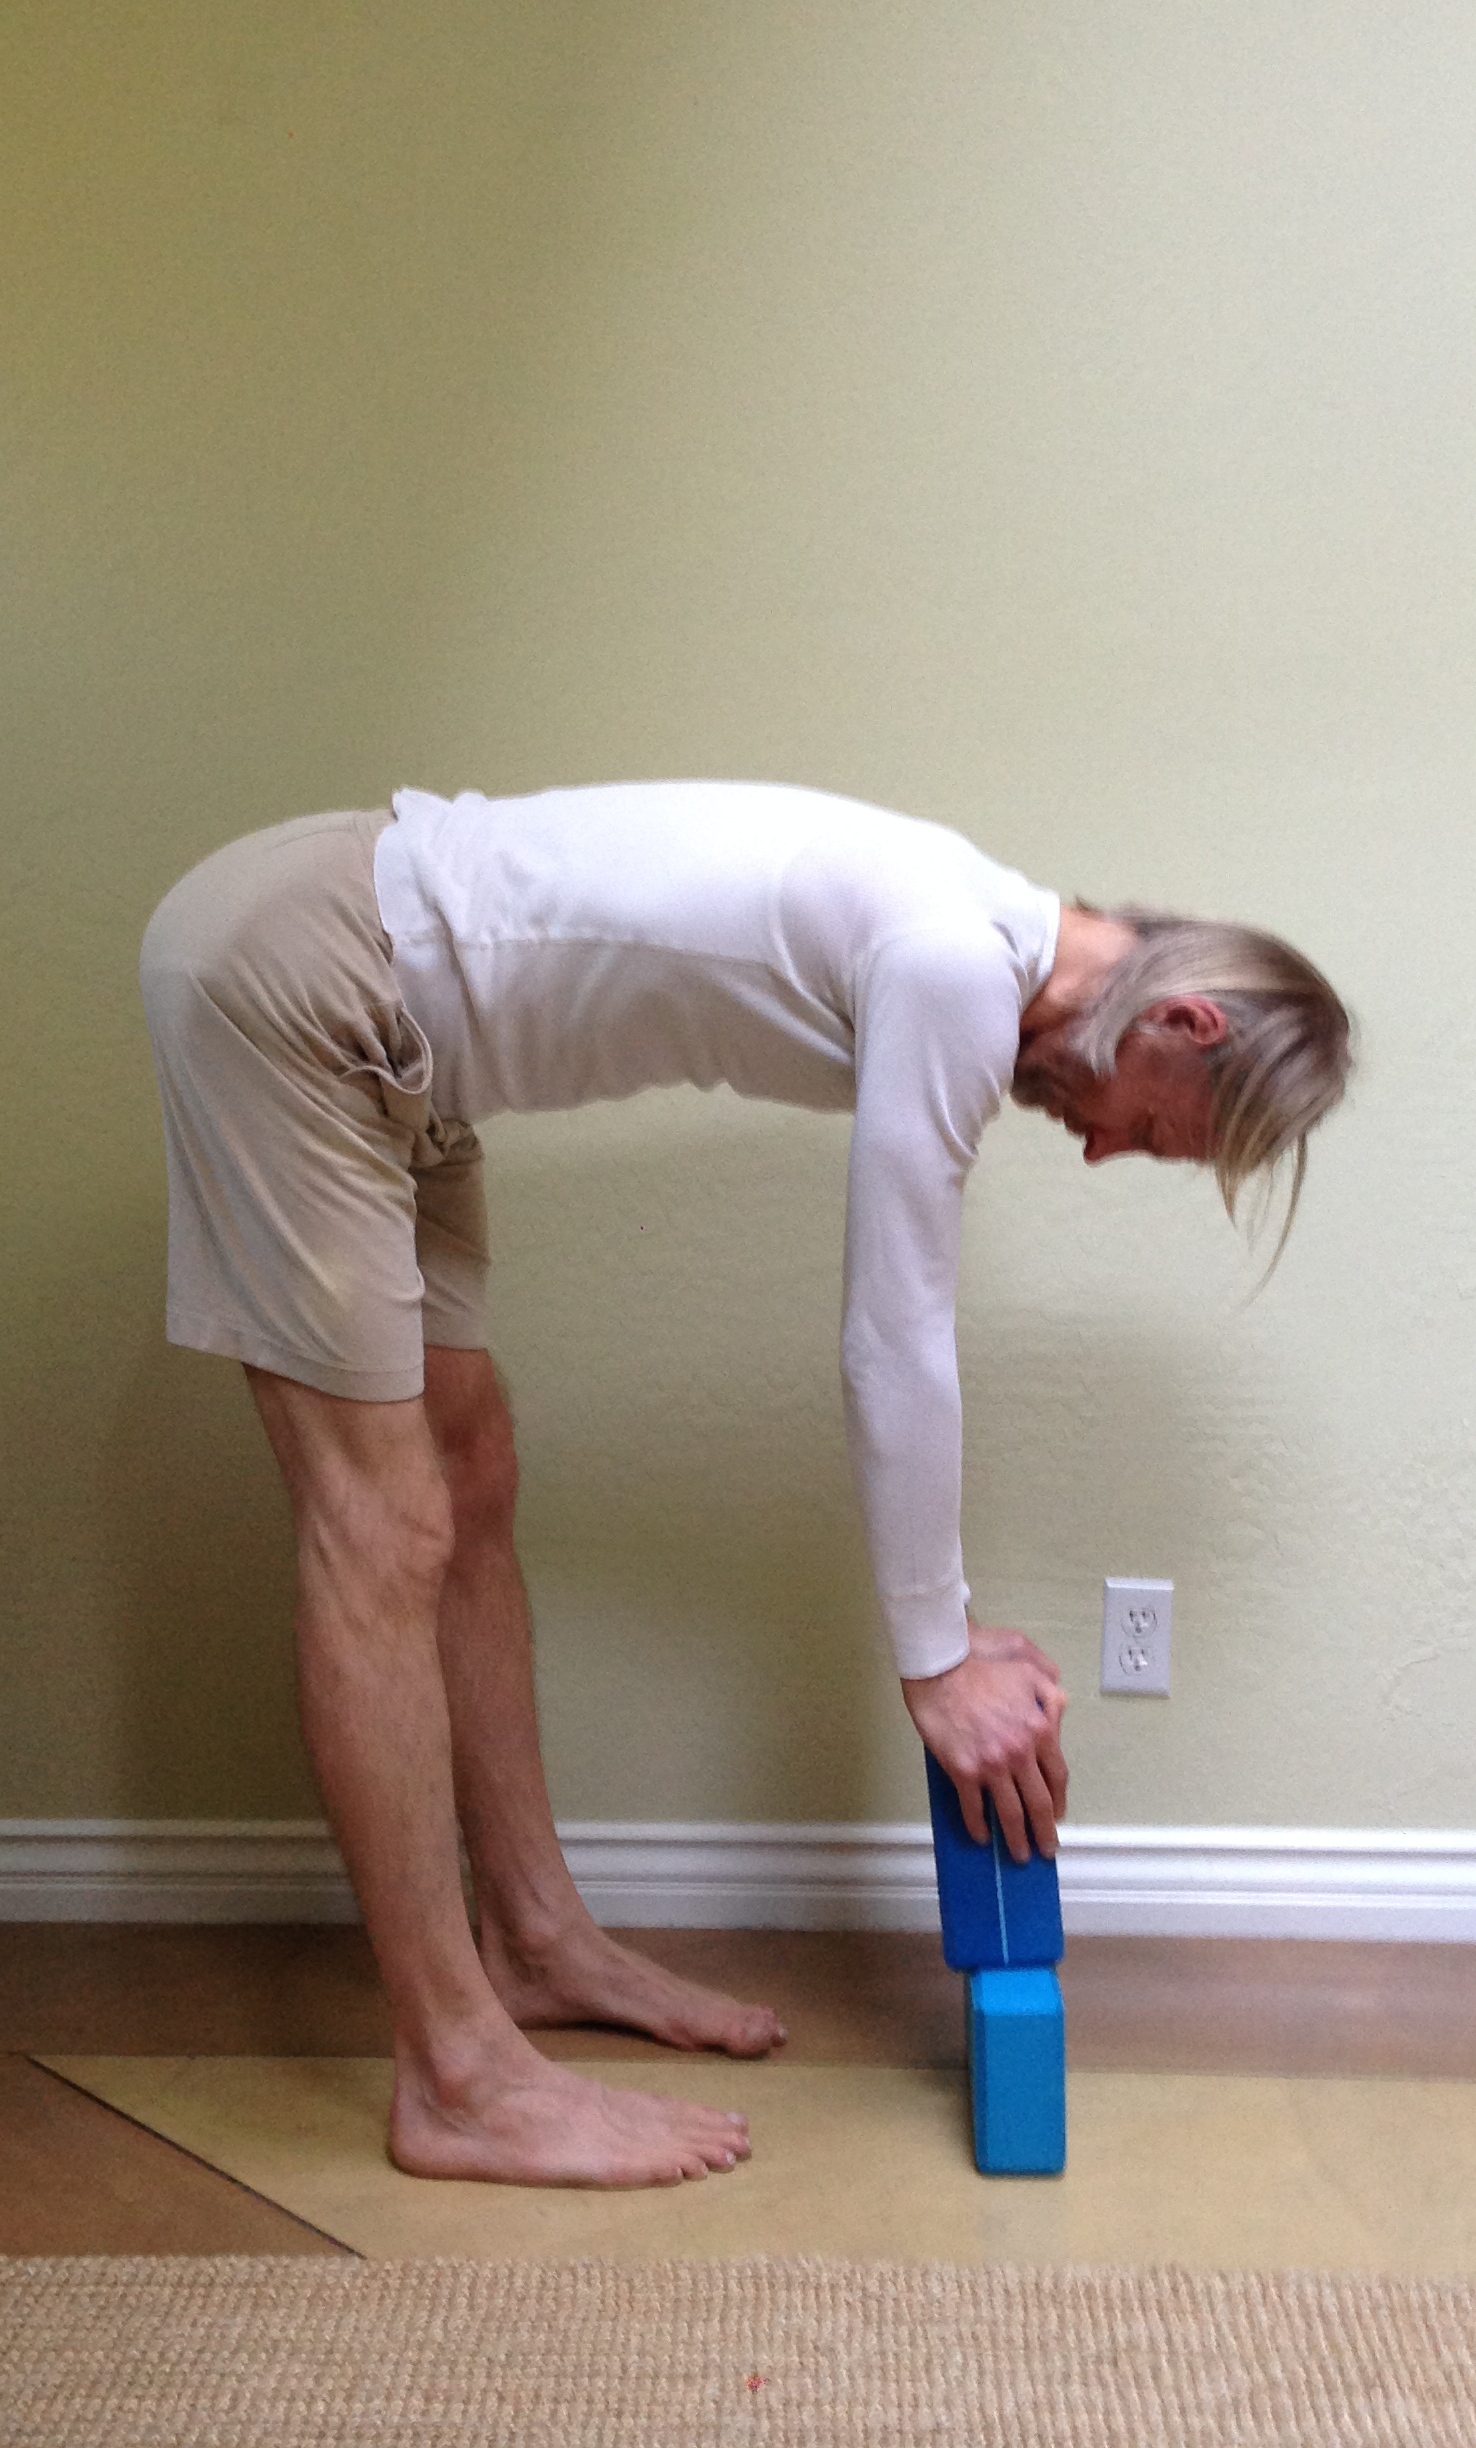
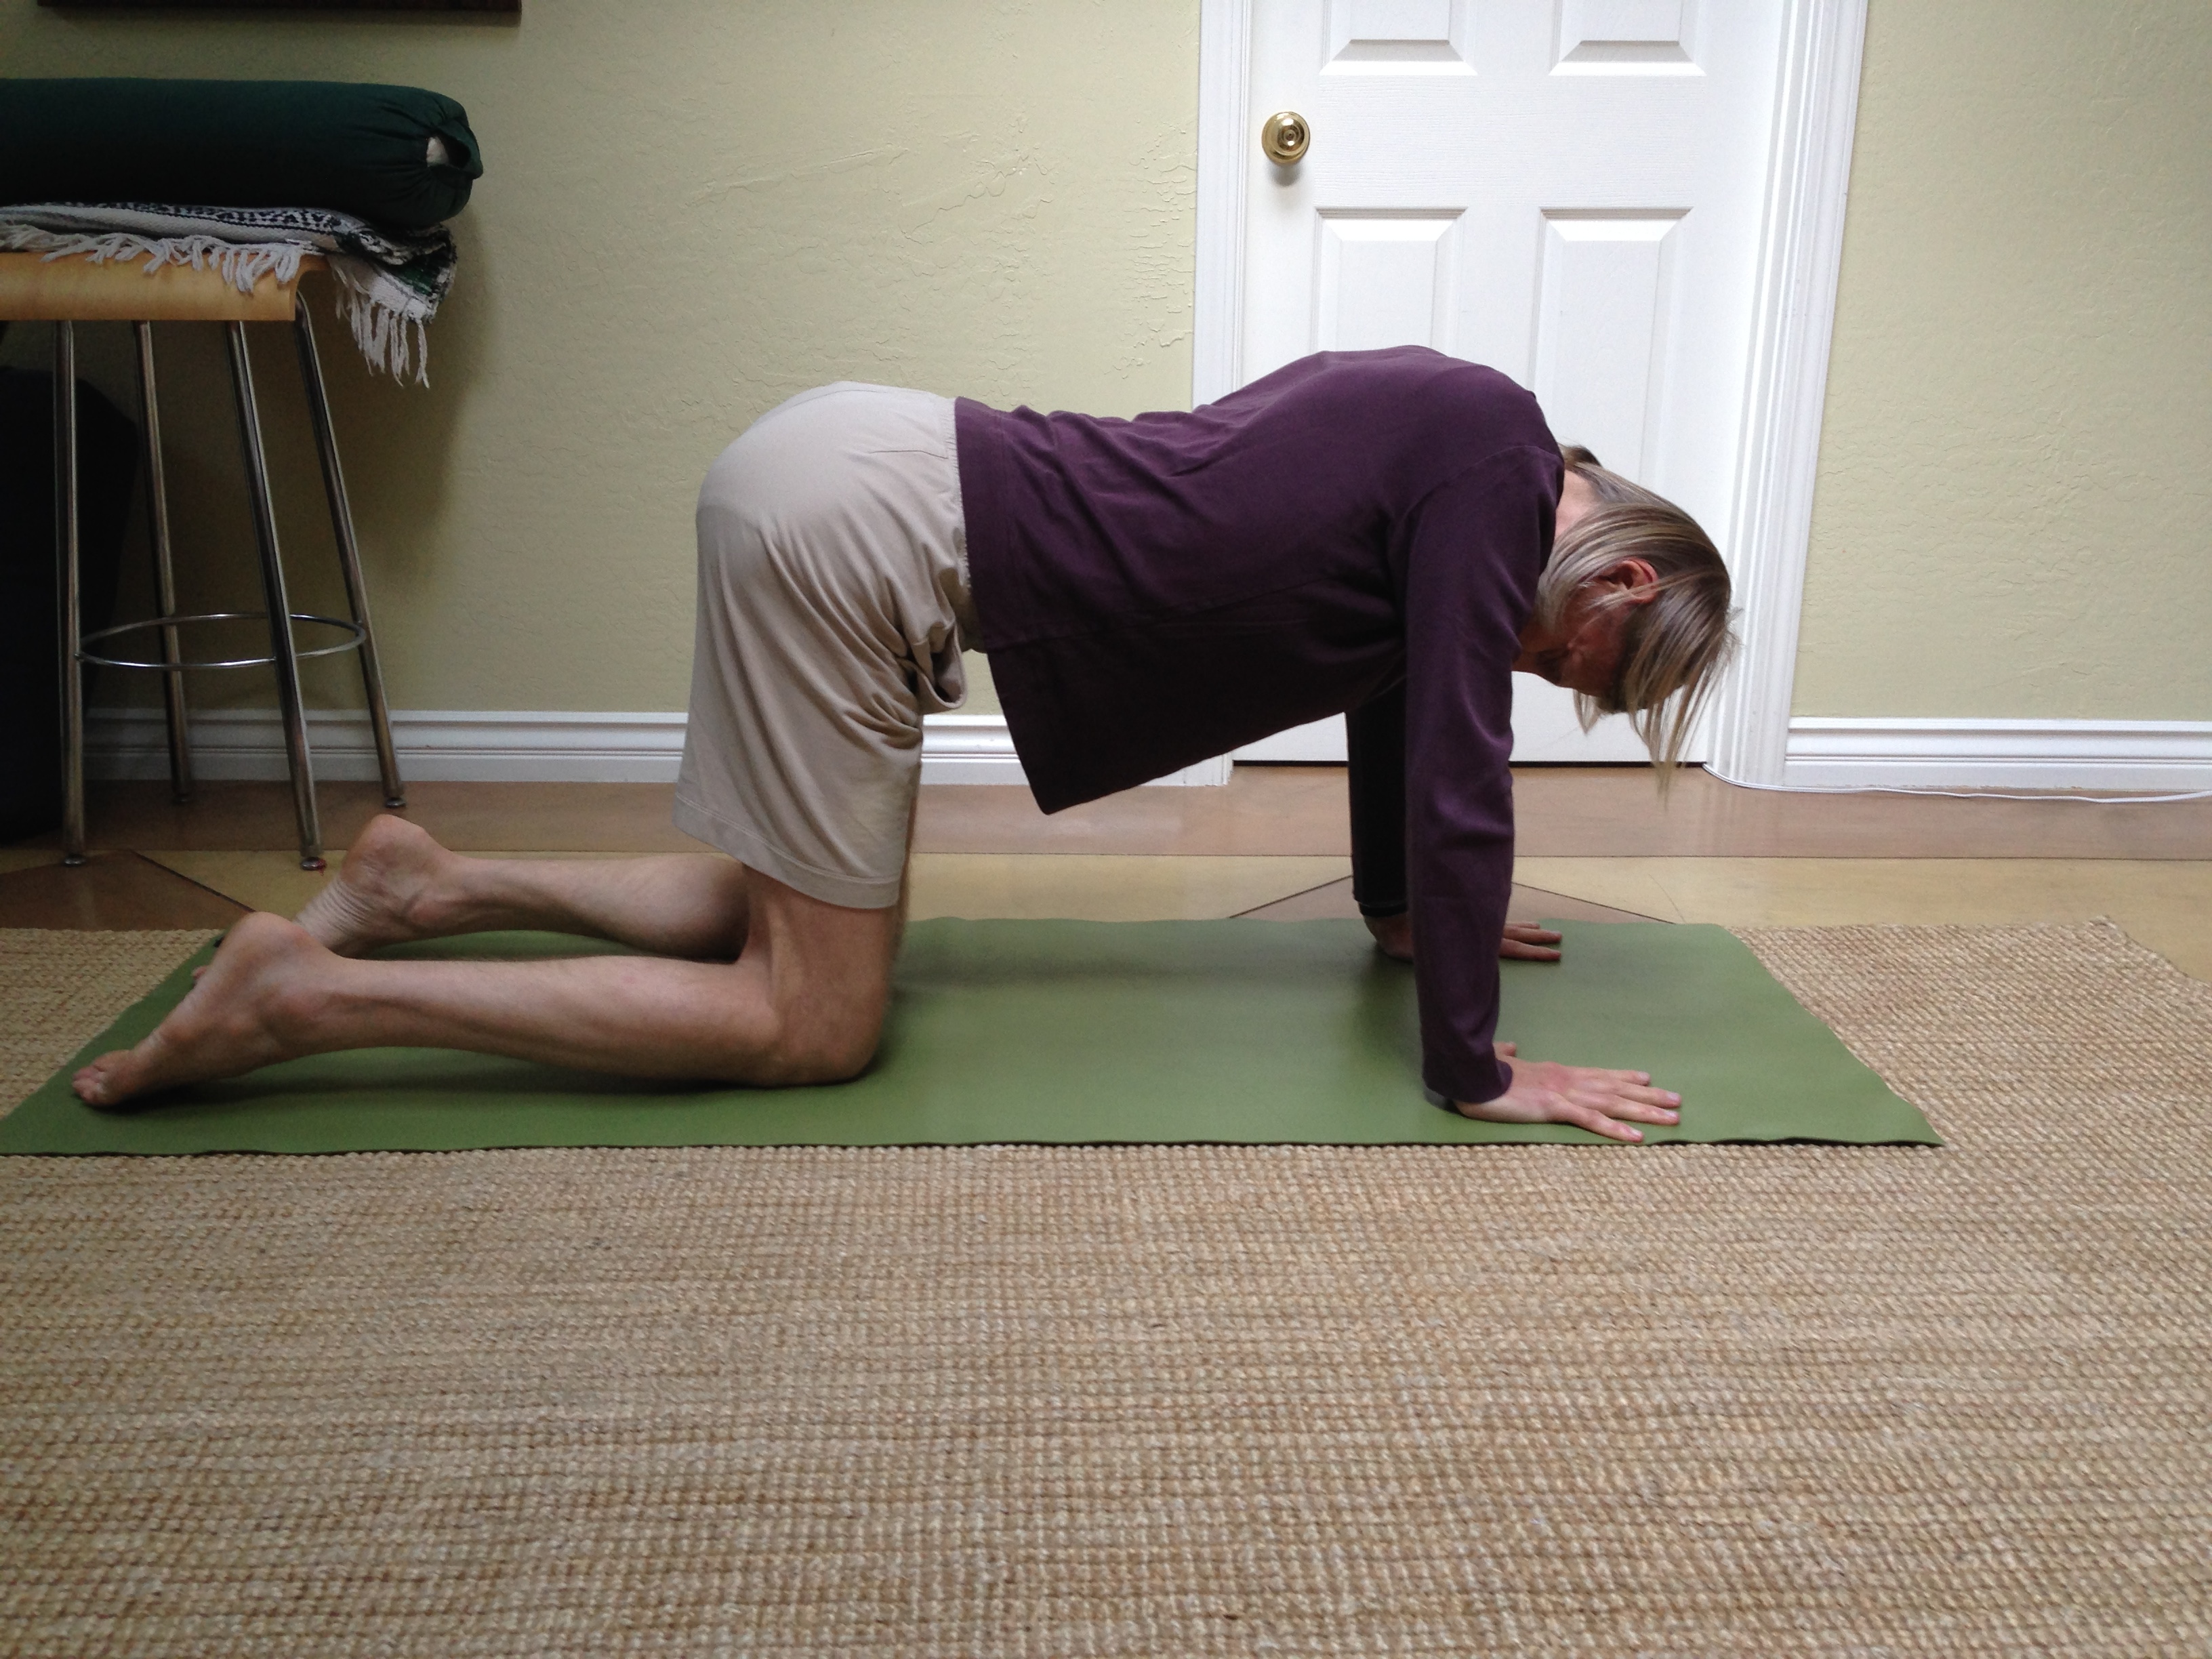
Bending forward from the hips

If I keep bending forward, even when the hamstrings cannot respond anymore, then my lower back has to carry the load instead. My head and trunk are pretty darn heavy and therefore this puts a lot of stress on my back. If I keep doing my forward bend this way not only will I eventually hurt my back, but I will also not make much progress in increasing the length of my hamstrings. That’s because when I bend well beyond the range of my hamstring length the hamstrings cannot respond anymore and therefore will not increase their length. Meanwhile the muscles in my low back will respond, and quite appropriately, to the consistent excessive loading I’m putting on them by getting weaker less able to effectively do the job of maintaining a functional position of my lower spine that keeps the joints healthy, mobile and pain free.

This is just one of many possible examples of the way in which muscles respond to the input we give them in both helpful and not so helpful ways. Therefore when I recognize that I have a muscle that hurts or that is too tight or too week, before I go about stretching or strengthening I should consider what I may already be doing that is causing the muscle to respond as it is.

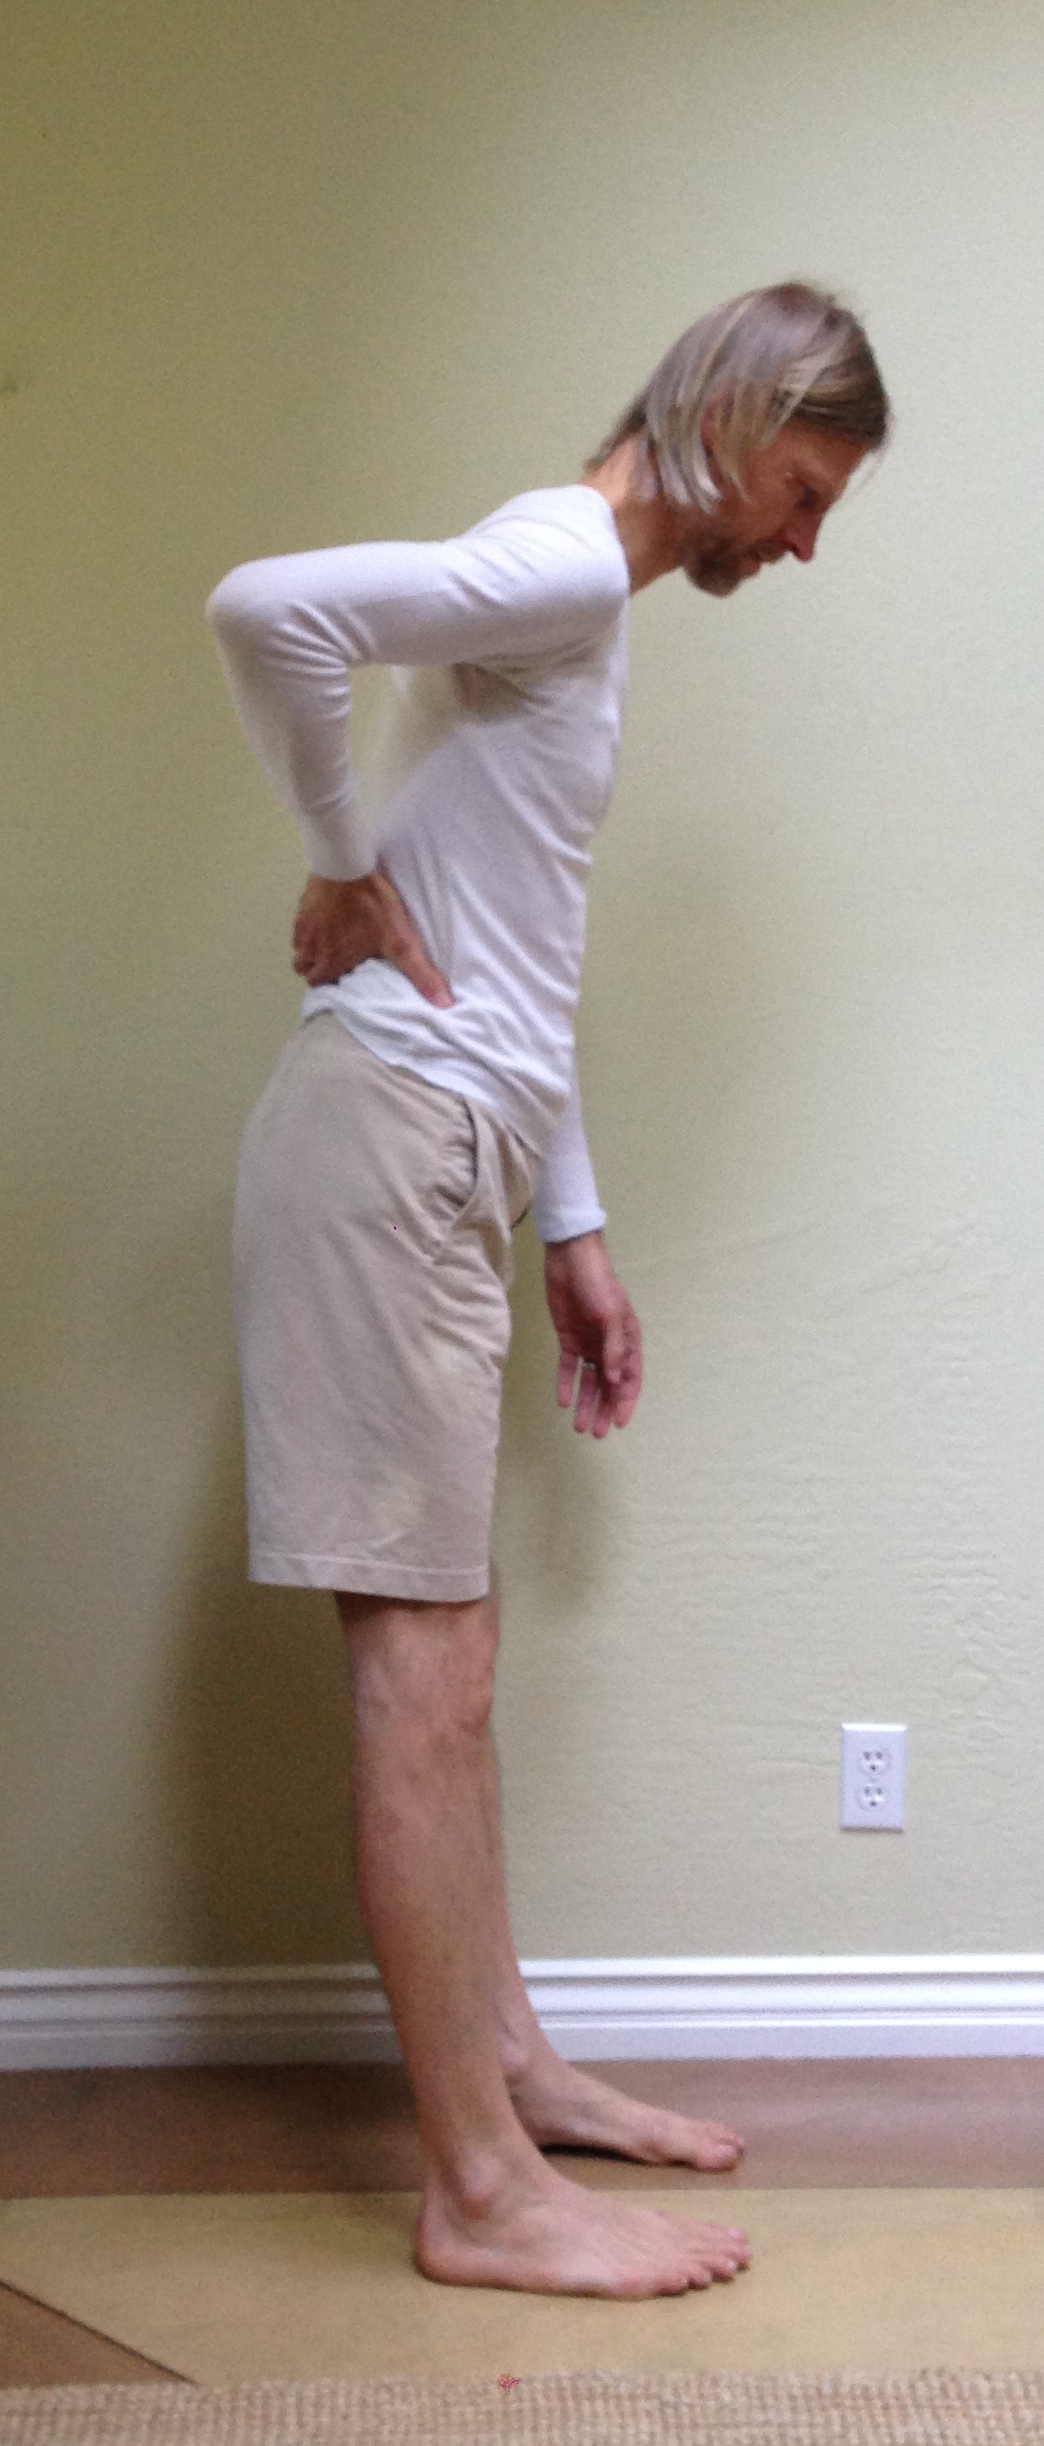
In the example of my hamstrings, I need to consider how much time I spend sitting or wearing shoes with heels or standing with my pelvis tucked. Any of these “activities” will result in shorter hamstrings because when I engage in these very common activities I am effectively telling my hamstrings to shorten. My tight hamstrings are just responding appropriately to the message I’m sending!

shoulders back

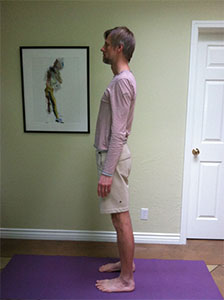
Standing with tucked pelvis

What is a Hip Opener? (part 3)

In the previous post we looked at hip extension from a prone position.  One important feature of extending the hip this way is that it is extended with active, muscularly driven movement.  Active hip extension has the important benefit of stregthening the hip extensor muslces.  Another benefit to active hip extension (versus passive) is that it is somewhat safer because we have to use whatever strength our hip extensors have to overcome the tension in the antagonist hip flexors.  This avoids overstretching the hip flexors and minimizes stress on the lower back.  Finally, doing active hip extension allows us to better assess the ROM of our hips and therefore establish a more accurate baseline from which to make progress.

Active hip extension does, however, have one major disadvantage, and if you’ve worked on either or both of the postures I presented in part 2 you would have noticed this rather quickly.  It is difficult to hold these postures long enough to facilitate rapid progress.  Therefore I’d like offer a way of increasing hip extension passively that is both safe and effective as well as somewhat pleasurable to do.

The posture below is demonstrated in the video you see above.  I recommend reading the description first and then watching the video after for clarification.

Lie down on your back with your knees bent and your feet on the floor.  Place your feet pelvis width apart (about 6 inches) with the shin bones vertical and the knees directly over the ankles.  If either or both of your knees don’t bend this much, only bend the knees as much as is comfortable for your most limited knee.  Tuck your chin in toward the top of your throat and legthen the back of your neck until you can feel that the head is not at all tilting backwards.  If you find it difficult to keep the chin in, place a folded blanket under the base of the skull to increase the height of the head.  Make the blanket high enough that it removes any posterior tilt from the skull.

Place a standard size yoga block in between your knees and hold it.  Without dropping the block, slowly lift the pelvis up off the floor and place a second block on its side under your pelvis.  If you cannot lift the pelvis high enough to fit a standard size block without dropping the block between your knees then a standard size block is too hight for you.  Use a half block or some equivalent height instead.  You should feel absolutely no pain in your back!  If you do feel pain in your back, decrease the height until you no longer feel back pain.  If you cannot lie this way with the pelvis elevated and without back pain seek help from an experienced teacher.

Once you have the pelvis elevated and supported, making sure the support is only under the pelvis and not under the lumbar spine, remove the block from between your knees.  Then notice the way the pelvis automatically rolls back a little toward the rib cage.  This keeps your lumbar and thoracic spine neutral.  Avoid actively rolling the pelvis back (i.e. tucking the pelvis).  Simply allow the pelvis to roll back to the extent that it is naturally inclined.  If the pelvis doesn’t roll back this way at all, try moving the support under the pelvis a little closer to your feet.

Next, keeping your foot in contact with the floor, move your left foot gradually out away from the support, keeping it in line with the hip.  Remain aware of the position of the pelvis relative to the rib cage and notice if at any point moving the leg starts to pull the pelvis out of its position.  When you reach such a point, pause there and let the weight of your leg gently pull on the hip flexors.  In the beginning you may not feel much.  As you practice more your sensitivity will increase and you will perceive the sensation of loading on the hip flexors in the groin and in front of your hip. You will also being to perceive the sensation of these musles letting go.  This is your cue to start gradually moving your foot further away from your hip.

Stay for 20-30 seconds.  Then bring the foot back to its original position and try this with the right leg.  After you’ve done each leg once, lift the pelvis up remove the block under it and come down.  If you feel any pain in your back upon lifting the pelvis up off the block it is telling you that you have used too much height.  Try decreasing the height and repeating the sequence described in the preious 2 paragraphs.

When you’ve found a height you can use to do one repetition without experiencing any pain after, then you’re ready to begin more repetitions and with longer holds times.  Repeat the above 2-3 times on each leg, first for 20-30 seconds and then over the course of a couple of weeks working up to a minute on each leg.

Eventually you’ll reach a point where you’ll be able to stretch each leg all the way out without any response from the pelvis.  When you reach this point the next step is to increase the height of the block under the pelvis.  When you feel you’re ready to do this, increase the height by turning the block on its side.  Avoid placing the block on its end or making the block so high that you are forced to arch your lower back.  Using too much height may lead to a back injury and will not be as effective in increasing your hip extension as will extending the hip while maintaining a neutral spine.

Conisider doing this passive hip extension in combination with active hip extension to see how one improves the other.  You may also enjoy combining these hip extension postures with the standing forward bend described in “What is a Hip Opener, Part 1” to see how increasing the length of the hip flexors with hip extension helps them to contribute more to your hip flexion.  However you use these postures, enjoy the increase in ease and freedom of movement these postures give to your hips!

What is a Hip Opener? (part 2)

A hip opener is a posture meant to increase a particular range of motion or multiple ranges of motion in the hip joint.  The most important aspect of such a posture is that the hip be targeted and that the force applied to the hip to create the opening not be diverted into the lower back or the knee.  Hip extension is one ROM of the hip that often gets neglected because of the ease with which many of us use the joints in the lower spine to do motions that would otherwise be done from the hip.  Working on hip extension is therefore extrememly hepful and important not only for health and function of the hips but also that of the lower back.

Improving hip extension will help prepare the body for backbends as well as help to support healthy gait mechanics. The simplest way to work on hip extension is from a prone position. Lie face down on the floor and find a comfortable position for you head, perhaps resting your forehead on a blanket or on your forearm. Check and see if the pubic bone and the frontal most aspect of the 2 ilium (the A.S.I.S. or anterior superior iliac spine) are resting on the floor. If the pubic bone doesn’t easily rest on the floor, try placing a folded blanket just above it on the 2 A.S.I.S.. The idea is to tilt the pelvis back a bit to bring the pubic bone in contact with the floor (see figure 1).

figure 1

figure 1

If the 2 A.S.I.S. are not able to rest on the floor when the pubic bone is in contact with the floor the blanket support will offer something for the 2 A.S.I.S. to rest against. Whatever the case, getting the pubic bone in contact with the floor is crucial. Once you have it down, then lift your right leg off the floor while keeping the knee straight. Make sure the pubic bone stays in contact with the floor. This is hip extension (see figure 2).

figure 2

figure 2

Hold the position for a few seconds, making sure that the pelvis doesn’t roll to one side when the leg is lifted. Lower the right leg and try it with the left leg. If your feel pain in your back and/or on either side of the sacrum (on the back of the pelvis) when doing hip extension as described above, try pushing the pubic bone down into the floor with moderate force and then lifting the leg again. If this doesn’t at least reduce if not resolve the pain then suspend working on hip extension this way and move on to the next option (see figures 3-5 below). If you can lift each leg with your pubic bone remaining in contact with the floor and without pain in your back, then try doing this in front of a mirror so you can see how much hip extension you actually have. How high does the leg lift before your pubic bone starts to lift as well? 6 inches? 10 inches? 1 inch? See what you’ve got currently so you have a baseline from with to assess progress.

Repeat this method of extending the hip 3-4 times on each leg, feeling the muscles in the back of the hip and thigh working to lift the leg. Continue to keep the knee straight and the pubic bone in contact with the floor. If your low back starts to hurt as you’re holding the leg up, decrease the height of the leg until the pain goes away and continue. As long as you’re not experiencing back pain, begin increasing the time of hold to 20-30 seconds. Then rest a few breaths and come up.

If your back hurts when you try the above, no matter how high or low you lift the leg, then try the following instead. Come to your hands and knees with your fingers and thumbs spread, your wrists directly over your hands and your knees directly under your hips. If you knee caps are sensitive to pressure, have your knees on a blanket for more cushion. Allow the pelvis to rotate forward and your back to arch as much as is comfortable. Try not to actively arch the back but let the arch happen by relaxing the abdomen toward the floor (see figure 3). Then, using your abdominal muscles, lift your lower front ribs up away from the floor and pull them in toward the spine until you feel the middle of your spine round out slightly. Be careful not to tuck your pelvis when you do this.

figure 3

figure 3

You can use a mirror to get feedback. You should see a clearly concave lumbar spine and a clearly convex thoracic spine. If upon looking at your image in the mirror you find it’s hard to tell where the lumbar ends and the thoracic begins, continue to lift the lower ribs up and in toward the spine until you can begin to see the junction of lumbar and thoracic. Then lift up the portion of the thoracic spine in between the shoulder blades by pushing your palms into the floor with your arms held straight. Try to feel the rhomboids, the muscles that connect your shoulder blades to your spine, becoming longer and more active(figure 4).

figure 4

figure 4

Now push down through your left knee until your left hip engages and your right knee begins to lift off the floor. Be conscious of lifting the right knee up by using the left hip and not by using the muscles in your lower back. Once the right knee is lifted, stretch the leg out behind you until the knee is straight. Keeping the left hip active and the right knee straight, gradually lift your right thigh toward the ceiling (figure 5). Avoid arching your back and dropping your lower ribs toward the floor. Also be sure to keep the upper thoracic spine lifted and the shoulder blades wide. Hold the leg up for 10-15 seconds, then lower the leg and repeat on the opposite leg. Repeat each side 3 times.

figure 5

figure 5

This is also hip extension and this version will typically work for everyone and is particularly helpful for those who’s hip extension is limited. The exception is anyone who cannot bear weight on their hands this way. If this includes you then seek help from an experienced teacher to work on your hip extension.  There are many postures that can be used to increase hip extension in addition to the above.  In the part 3 I will discuss another of my favorites!

What is a Hip Opener? (part 1)

Considering how often they are requested, “hip openers” have to be one of the more desirable categories of postures offered at any yoga class, and for good reason. Any student of yoga wants more open hips as the benefits of increasing the mobility of the hip joints are numerous. Increased mobility of the hips can relieve hip, low back and knee pain, as well as improve leg strength, balance and pelvic floor function, to name just a few. More mobile hips are also essential for performing more advanced postures.

But common approaches to opening the hips taught in yoga classes frequently range from ineffective to downright injurious. Considering the fact that hip replacement surgery is becoming commonplace in the western world, the dubiousness of the “hip opening” often offered to yoga students is unfortunate to say the least. Especially when, as you’ll see here, a little knowledge and a bit of know how is enough to allow anyone who’s interested to increase the mobility of their hips safely and effectively.

So what is a safe and effective way of hip opening? It starts with seeing where our body is actually at and understanding where we want it to go and how to get it there. So first we need to look objectively at the range of motion our hips currently have. Next we need to learn to see what is a movement of the hip joint and what is a movement of some other part of the body. Finally, we need to learn ways of increasing our range of motion (ROM) that maintain the integrity of the hip joints and do not place inappropriate loads on the spine or the knee.

The hip joint has 6 different ranges of motion. These are flexion, extension, external rotation, internal rotation, adduction and abduction. Flexion involves the thigh bone or femur moving toward the front of the pelvis or the pelvis rotating toward the front of the femur. This is the ROM that is most crucial for doing a forward bend. Extension is the opposite of flexion. In hip extension the femur moves toward the back of the pelvis. Extension is the ROM used primarily in back bends, but it is also important for walking.

External and internal rotation are the femur rotating away from or toward the opposite leg respectively. Adduction and abduction are the femur moving laterally (as opposed to rotating) towards and away from the opposite leg respectively. Adduction also describes when the femur moves across the midline of the body and beyond the the opposite leg and hip. All of these ROM’s are important in both standing and seated postures.

Of all of the ROM’s of the hip I mentioned above, flexion is the movement our hips do most often. Flexion is the primary movement done in forward bends, but it’s also the hip motion we do every time we sit and we should but don’t necessarily do every time we reach forward to pick something up or use the sink or the toilet (we often bend the spine instead of the hip). Therefore improving our hip flexion will not only help our forward bends in yoga but also help us with the everyday activities that, when our hip ROM is limited, put constant stress on our knees and lower backs.

Let’s start by looking at how much hip flexion we have. Stand with your feet separated about 5-6 inches and parallel. If possible, stand profile to a mirror so that you can see the shape of your spine. If you tend to get lower back pain when bending forward, put a chair or stool in front of you so you can take some support from it. Next, move your hips back just a little, that is, just until you begin to perceive the pelvis tilting forward (see figure 1). Now look at the shape of your back in the mirror. The lower part of the spine or lumbar spine should be somewhat concave. If you don’t have a mirror, you can try feeling the shape of your spine with your finger tips(see figure 2). If the lumbar does not curve in but rather rounds out, lift your sit bones and your tailbone up away from your feet until you’ve restored the concave shape. This is hip flexion.

figure 1

figure 1

figure 2

figure 2

Once you have established a concave lumber position in this very modest forward bend, continue to move your hips back and lift your sit bones up to increase hip flexion. Still using the mirror or your finger tips, notice when your pelvis can no longer tilt forward and the shape of your lower back starts to change. When it does you have reached the end of your ROM of hip flexion and have begun flexing your lumbar spine instead (see Figure 3). If you do this enough it will eventually cause back pain and may compromise the integrity of the spinal joints. Conversely, if you can learn to maintain your lumbar curve more often it will help develop the ROM in your hips you need to do deep forward bends safely.


figure 3

figure 3

Now lift your trunk slightly back up until you have restored the concave lumbar position. To establish a marker, see how far your hands are from the floor. You might use yoga blocks, for example, to see how far you are. Are you one block? Two blocks? A block and a half? Get an objective measure you can use as a baseline you can refer to later and evaluate progress (See Figure 4). Then come up from your forward bend, preferably with your knees straight. If your back hurts coming up with the knees straight then bend your knees to come out. As you hip ROM improves and your legs get stronger you will gradually find it easier to come out of this forward bend without bending your knees. This is another measure you can use to monitor your progress.

figure 4

figure 4

To work on increasing your ROM of hip flexion, repeat the above but begin to hold the position for a period of time. Start with holding the fully hip flexed position with your still concave lumbar for 20-30 seconds. Repeat it 3-4 times. In time you’ll find you can increase your time in the posture and with increased time you’ll see progress. Your hip flexion with increase and your forward bends will improve!


Stay tuned!  Next we’ll look at hip extension.

Balance and Yoga

In part one of the introduction to B.K.S. Iyengar’s classic book ‘Light On Yoga’ Iyengar spends 2 1/2 pages offering various definitions of yoga.  One that I particularly like describes yoga as “…a poise of the soul which enables one to look at life in all it’s aspects evenly.”  Considering this definition some other words come to mind which further suggest the meaning of yoga – “balance”, “control”, “calm”, “equanimity”, “grace”.  Of these, I’d like to suggest that “balance” is the most fundamental component of any yoga practice.

The word “balance” can have very different meanings depending on how it’s used.  For example, if “balance” is used as a verb it suggests something we do to acheive stability. . .poise.  If I say to you, “balance on one leg!,”  your mental and physical effort is directed into maintaining your position with one leg lifted.  Standing on one leg can be challenging for many of us, but sometimes the effort to do it results in something very different from stabiltiy or poise.  In fact, our effort to “balance” often results in an increase of tension in the body and mind that not only doesn’t help with balance but in fact impairs it.  When we try to “do balancing” rather than recognizing and rectifying the cause of our instability our ability to balance remains elusive.

Recognizing and rectifying the cause of our instability requires that we train the mind not just to see what we need to do to acheive stability, but also to see what we are already doing that is promoting instability.  As a human being with a mind I am very prone to habits.  Perhaps I have a habit of standing with my hips pushed forward.  I may do this so often that I don’t even see that I’m doing it until I have occasion to stand with my hips backed up over my ankles.  Then my mind sees that I was pushing my hips forward and likely has been for some time.  This recognition is the essential step to breaking the habit and changing what I do.

From the standpoint of balance, standing with my hips pushed forward is perhaps the most reliable thing I can do if I want to have difficulty balancing.  Standing this way turns off the lateral and posterior hip muscles that are built and positioned for supporting my full weight without undue stress on my joints.  Try standing and putting your hands on the lateral and posterior hip with the hips pushed forward.  You can easily feel that the muscles are not working to hold you up.  This helps the mind to see objectively what you are doing and how it is affecting your ability to stand with stability.  In other words, this recognition by the mind is essential for you to balance.

The word “balance” can also be used as a noun in which case the meaning will be quite different.  “Balance” as a noun means not something I do but rather something I have.  Taking the earlier example, if I simply say to you, “stand on one leg,”  it suggests something very different than “balance on one leg”.  If you stand on one leg, your effort will be directed toward standing rather than balancing.  This will automatically lead to greater stability.

In the earlier example of standing with the hips pushed forward, the word “standing” is really the wrong word.  Standing with the hips pushed forward is not really standing but rather falling forward and being held up by the quadraceps.   Before you can have the quality of balance you must first stand.   If your ability to stand, whether it be on one leg or two, is well developed then the whole notion of “balancing” is a non-issue.  Your standing is stable and therefore you are stable.  You have that quality.

In yoga we seek to move beyond balance as something we do or something we have and realize that is it something we are. We seek to reveal balance as simply one aspect of our nature.  Discovering correct alignment of the body through recognition by the mind (such as seeing that we habitually “stand” with our hips pushed forward and then backing the hips up and actually standing with the hips aligned over the ankles) is an important part of this.

As a human being with a body and a mind, I am subject to the universal laws which govern life, including the laws of physics which govern my physical movements.  In practicing yoga I am teaching the mind to recognize these laws and the body to express itself with respect to them.  When this happens, I am doing yoga, and control, calm, equanimity and grace manifest automatically.

The Importance of Alignment

I was first introduced to alignment in the context of yoga.  The Iyengar Yoga system in particular is often characterized as emphasizing “alignment” in postures.  It’s only recently, however, with the study of biomechanics, that I have begun to understand better what alignment really means and why it’s so important.

Katy Bowman, M.S., whose work I’ve been studying describes our alignment as being distinct from our posture.  She points out that posture is cultural while alignment is based on objectivity.  For example, some women I have talked to about posture and alignment have told me that their parents encouraged them not “to stick their butts out.”  This view of posture is purely subjective as it is based a particular point of view.  Alignment must be objective and must therefore be based solely on identifiable objective markers.

One such marker is the alignment of the hips relative to that of the knees and ankles.  When standing in a bio-mechanically functional alignment the hip joints must sit directly over the center of the knees and the center of the outer ankle bones.  Most of us tend to stand with the hips pushed forward of the knees and ankles.  This tends to rotate the pelvis back (posteriorly) such that the pelvis sits a little “tucked”.  To correct this misalignment we must back our hips up until our hip joints align over the outer ankle bones.  When the hips are backed up this way it not only brings the pelvis and hips into a more functional alignment with the legs, it also tends to correct the “tuck” of the pelvis and rotate the pelvis back to neutral.

Figure 2

Figure 2

When I ask students to back their hips up this way, they usually say they feel like they are “sticking their butt out,”  something some have been deliberately trying NOT to do!  This is partly because they’ve gotten so accustomed to having their hips forward and their pelvis tucked that this misaligned position feels normal and the new position feels “strange” or “wrong” relative to what they are used to.

This example is a strong argument for using objective markers when aligning our bodies.  We cannot rely on what “feels right” to us.  When it comes to our own bodies we are not all that objective.

Besides the fact that it just feels right to push the hips forward, there’s another reason we tend to stand with our hips pushed forward – it’s easier!  Standing with the hips forward is essentially us sitting loosely into the front of our hip joints.  We often do the same thing to one side, swaying the hip out to act as a fulcrum to support our weight.  This puts a great deal of stress on our hip joints and will eventually lead to pain.  It takes a lot less effort to stand this way because the bones are in a position that doesn’t require (or to some extent even allow) important stabilizing muscles in our hips to work.  When we back the hips up and align the hip joints with the outer ankles bones, it suddenly takes a lot more effort to stand!

This alignment of the hip joints helps a great deal in yoga with many of the standing postures.  In the posture “samasthithahi,” for instance, where I am standing with my feet “hips width” apart (as opposed to “tadasana” where the feet are kept together), judging the position of the hips relative to the knees and ankles can be done by using a belt with a buckle as a plum bob to tell if my hips are lined vertically up over the outer ankle bones (see the diagram above).   When I get the hips aligned I can feel that I’m anchored through the heels and the legs and hips are active and alive while I have a distinct sense of depth and space in the groin.  Re-establishing neutral pelvis also does wonders for the function of the pelvic floor and is an essential step in the practice of the mula bandha.

Most importantly, aligning the hips properly in a yoga posture brings life into the posture.  And this is not just true for samasthitahi but can be applied in many of the standing postures including trikonasana, parsvakonasana and ardhachandrasana to name just a few.  In fact, this bringing of life into the postures can be manifested in just about any yoga posture when I can establish a better anchored and neutral pelvis.

Bio-mechanically sound alignment in yoga postures not only makes them better postures, it also helps us avoid injury and derive more benefit from our postures. So it’s worth the time and energy in a yoga practice to improve our alignment.

But ultimately, it’s our day to day activities that have the biggest impact on our health and function.  Therefore alignment should not be limited to the domain of yoga but be a feature of how I stand, sit, walk and move throughout the day.  In fact, the better my alignment in these every day activities the better my yoga postures will also become.

Yoga, Exercise and Health

People often ask me how I started doing yoga. Basically, I started doing it for exercise.  20 years later my relationship with yoga has evolved, but it sill provides me with my primary outlet for what is essentially exercise – a physical activity that helps me stay healthy.  And while I also do yoga as a kind of meditation practice, training my mind to be attentive and present, the many health benefits I’ve experienced doing yoga remain a significant motivation for me.

Yoga can be used as effective therapeutic tool for a wide variety of health issues.  Either personally or with my students I have applied yoga as a modality for reducing or  eliminating back pain, knee pain, neck pain, shoulder pain, headaches, colds, indigestion, exhaustion, depression and anxiety to mention just a few.  And while there is certainly a lot more to yoga than exercise and health, it’s not a bad place to start.

Yet for yoga or really ANY activity or exercise program I am doing for health reasons to be effective I need to be clear about one thing: what is health? The definition of health can be quite broad.  For the purposes of this post I’m going to limit the scope of this discussion on health to that of a given individual person.  I will also not go into a discussion of digestive health.  This is not because I don’t don’t consider it to be important,  but because health of the digestive system is mostly related to diet and this is a topic for another post.  If I may simply say for now that diet and exercise are the keys to good health and we set aside diet for later, how does exercise contribute to health?

Let’s suppose that I am eating a good diet but I’m still having health problems, what am I missing?  We’ve all heard the expression “you are what you eat.”  The “you” in this expression is the physical body, which is made up of a variety of different tissues which can be further broken down into a variety of different specialized cells.  Each of these cells is like a tiny specialized “you” in that they need food and oxygen to live, work and reproduce.  Each cell also produces wastes that it needs to eliminate so that these wastes don’t impair the cell’s ability to function and replicate properly.

A somewhat more accurate expression might be “you are what you eat and the air you breath.”  The little “you’s,” your cells, need both nutrients from the food you eat and oxygen from the air you breath and they receive these via blood flow to the tissues.  When my blood flow is good and my diet is good, then the cells of my various tissues receive a good supply of nutrients and oxygen and the wastes from cellular metabolism are removed in a timely fashion.  When my blood flow is not good my cells are not fed properly and their wastes accumulate and impair the health of the tissue.  Therefore if my diet is good but my blood flow is not good my tissues are not necessarily benefiting from my good diet.

Certainly on the physical level, and to a great extent the psychological level as well, the degree to which a person is healthy is determined by the health of that person’s tissue, and the degree to which a person’s tissue is healthy depends on the degree to which that person’s tissue receives good blood and lymph flow.  A major function of the muscles in our body is to pump blood and lymph into and out of the tissue.  For a given muscle to function well as a pump that muscle must be able to contract and relax well.  Therefore the degree to which a tissue receives good blood flow is determined largely by the degree to which our muscles can contract and relax well.

Few would argue with the assertion that for a person to be healthy that person’s cardiovascular system must be healthy and functioning well.  In the U.S., heart disease is the leading cause of death.  To promote cardiovascular health and therefore health and longevity we are encouraged to strengthen our hearts with cardiovascular exercise.  The logic of this view is that if the heart is strong and can pump blood more effectively, then it can deliver more oxygen to tissues and better support the health and function of those tissues.

Unfortunately the above view of cardiovascular health ignores the role of other muscles in the body and their relationship to cardiovascular health.  Most of the oxygen carrying blood in our bodies resides in the smaller vessels known as capillaries.  The vast majority of these capillaries and therefore blood in general resides in our muscle tissue.  When muscles contract and relax they pump blood from these capillaries into and out of the surrounding tissues.  In fact our muscles have the capacity to pump much more blood than our heart.  For this to happen, however, our muscles need to contract and relax well.  The better a muscle contracts and relaxes the better it pumps and the more it helps to support the health of its tissue and the tissues around it.

For each muscle in the body there is a mechanism which involves that muscle, the brain and the nervous system that determines that muscle’s length.  The brain and nervous system record and maintain each muscle at a particular length and often, this length is far from optimal.  Muscles that are at an optimal length are strong and flexible.  Muscles that are not at an optimal length tend to be weak and tight and these muscles don’t contract and relax well and therefore don’t pump blood and lymph effectively.  Such muscles and the tissues surrounding them do not receive good blood flow and this impairs the health of these tissues.  Cardiovascular exercise will do little to address this issue as most forms of cardiovascular exercise such as running or cycling make our muscles tighter.

My experience doing yoga therapy over years has shown me that, most of us have muscles that are simply too tight to be effective blood/lymph pumps.  This leads to degradation of tissues which eventually leads to pain which eventually leads to further degradation and more serious health problems.  Luckily with a bit of know how and some reasonable effort we can increase muscle length and improve our pumping system.  To do so most of us need to emphasize postures and activities that emphasize increasing muscle length, such as stretching, rather than activities that emphasize muscle contraction such as weight training.  The good news for those wishing to be “stronger” is that longer muscles are stronger muscles in that they can contract more quickly and more strongly and also have more resilience and better recovery when subjected to stress.

Furthermore, for a muscle to be strong it needs to be working in the first place.  In my practice I see an almost universal tendency for clients to come to me with postural tendencies where simply by virtue of the position they are holding their bones, many large and important structural muscles are not being asked to do any work.  If I stand or sit or walk with my bones aligned poorly, that is, in a way where many postural muscles that are designed to contribute to my movement are not working, then these postural muscles are not contacting and relaxing and pumping blood and lymph.

In addition, when important postural muscles whose job it is by design to support me when standing, sitting and walking don’t do that job, then the stress of these activities falls to my joints.  When this is the case I put undue stress on my joints and they are subjected to significantly more wear and tear than they would be if my postural muscles were working properly and my bones better aligned.

From the standpoint of those interested in yoga this is good news as much of what we do in yoga involves increasing muscle length and muscular action with an emphasis on alignment.  However, when doing yoga we need to be clear that we are lengthening the muscles that need lengthening and activating the muscles that need activating and not using the natural mobility of our joints as a substitute.  This is the reason that understanding alignment in postures is so important.  Deliberate and intelligent alignment of our bones in a posture will make the difference between a posture that promotes health and one that creates problems.

For those who don’t do yoga, alignment is still an important element of any activity, particularly one intended to promote health.  In fact, if we practice sound alignment during our regular daily activities then everything we do can be in support of better health.  I recommend that everyone, even those who do yoga, practice alignment principles when standing, sitting and walking since these are the activities we spend most of our time doing.  If we incorporate good alignment and bio-mechanics into our daily activities then gradually all of our movements become health promoting movements, including those like in yoga that are intended to be.

What I’m Teaching Now

After teaching yoga now for nearly 20 years my teaching has undergone quite a few changes, but there have been 2 major shifts.  The first was when I stopped teaching Ashtanga Yoga (as taught be Pattabhi Jois, may he rest in peace) and started teaching in a way that most students have characterized as “Iyengar Yoga.”  I have never received any formal certification in this system, but for about 13 years my teaching has drawn heavily on my studies with Ramanand Patel who holds a senior level teaching certificate in Iyengar Yoga and studied closely with B.K.S. Iyengar for many years.

The second major shift in my teaching started over a year ago and is continuing now.  For more than a year I have been studying bio-mechanics and the work of Katy Bowman, MS.  I have found that what Katy teaches, which incidentally I consider to be somewhat out of the realm of yoga, has a lot to say about how to practice yoga and how to teach it.

Those of you who take my classes have seen this shift happening.  It has not been easy as it has forced me to reconsider nearly every instruction I give in every posture.  It has, however, begun to transform my work in a profound way.  This has been especially true when doing therapeutic work.  I am seeing much better results working with the wide variety of health issues that clients present to me every day.  I am also better able to help clients translate the work they do with me at Sadhana Therapies into better health and function in their daily lives.

Part of the challenge with this change is to begin to describe what I’m doing, perhaps name it.  I’m not going to rush into this as the name is very important and will no doubt contribute to setting the tone for the future of our business.  For now, I am just going to call what I”m teaching “yoga” and leave it at that.  But here’s a bit more info on the kind of “yoga” I’m teaching now.

The yoga I am currently teaching focuses on “Yogasana” or the study and practice of yoga postures or “asana” for promoting optimal physical, mental and spiritual wellbeing.  While any number of a vast array of classical yoga postures may be employed this way, it is the more basic, foundational postures that are the most essential for success.

Foundational postures tend to be the most similar to the postures we use in our daily life and can therefore have the greatest impact on health and function.  Simply standing, walking and sitting in a well aligned, mindful way can have a huge impact on our health on a variety of different levels.  When sound bio-mechanics and mindful awareness are applied to daily activities it can mean the difference between an activity that builds our strength, stability and flexibility and one that damages our joints, weakens our muscles and bones, degrades our function and shortens our lifespan.

Any activity that we take up for the purpose of our health must therefore be bio-mechanically sound.   Bio-mechanically sound posture and movement must also have the effect of either reducing the impact of stress on our health or support our ability to better respond to and recover from it.  This is especially true of yogasana.  Yoga postures can be approached, modified and sequenced to enhance alignment and support function and therefore reduce and even reverse the effects of stress, both on and off the mat!

Of course, the impact of stress is not limited to the physical body.  Very often the mental effects of stress are an even bigger issue.  It is with respect to managing mental stress that yogasana really shines.

Above all else, yoga is a tool for training the mind.  Yogasana is an important part of this as it begins to develop our mind’s ability to pay attention to and perceive the feedback it receives from our body through the senses. Yogasana also builds our capacity for discernment which helps us to act willfully and intelligently, rather than simply Re-acting. It is by way of this attentiveness that the mind can begin to see itself more clearly and through discernment that it begins respond in situationallly appropriate ways.

Discernment also enables the mind to see its patterns which is the first step toward changing those patterns.  This leads to the kind of growth which we might call “spiritual.”  Whether we want to cultivate this kind of growth, or not, is a question each of us must eventually answer at some point when doing yoga.  This kind of growth requires a lot of honesty with ourself.  And this may be a subject for a different post.

At the very least we should be honest with ourselves about why we are doing yoga.  If health is the reason, alignment and bio-mechanics have a lot to offer any yoga student.