The course is APPROPRIATE FOR BEGINNERS who are in reasonably good health.
This content of this course is intended to prepare a student of ANY LEVEL for practicing yoga in a way that is safe, effective and health promoting.
If you have concerns about whether the course is appropriate for you, PLEASE CONTACT ROBERT with your questions and concerns.
Anyone who pays the course fee is eligible for a discount on individual sessions (contacts me for details)
If you would like additional help during or after the course, I am available for one to one 30 or 60 minute sessions.
I’ve been teaching yoga now for over 25 years and have been studying and practicing yoga for closer to 30 years, and while I can’t claim to have made every mistake possible as a teacher and a student, I’ve certainly made my fair share. As one of the greatest teachers I’ve ever had the privilege to study with, the late Swami Dayananda would say, when we make a mistake the mature response is to ask ourselves “what can I learn from this?”
Learning from mistakes
Answering that question in most circumstances is never easy, but in yoga it can be particularly hard. Yoga is challenging and complicated, and there are very few teachers who have the special combination of knowledge, experience, insight and skill to effectively guide students in the right direction. Thus a common theme during my tenure as a yoga student and teacher has been a failure to understand what I should learn from my mistakes, and therefore a tendency to keep making them.
I spent many years in a fairly advanced yoga class with a teacher who does have that special combination of abilities, but even in that environment I saw students who’d been practicing for decades making mistakes that I’d been making and that I understood needed to be corrected. Ultimately I realized that I needed to take a new approach to yoga if I was going to learn the lessons I needed to learn and find my way forward.
When I began studying bio-mechanical alignment I realized something very important about yoga. When we as students start learning yoga, typically in a group class with an instructor whose abilities are unknown to us, we bring all of our bad habits into the class. It’s up to the teacher to reveal these habits and provide us with alternatives to them. It turns out that very few teachers are skilled at doing this, not because they don’t have the interest but because they typically don’t have the right training.
DNS & Yoga
Upon discovering Dynamic Neuromuscular Stabilization (DNS) I realized I’d found a methodology that fit yoga like a glove. The early developmental movement patterns that DNS employs through specific postures and movements are not new to us. The patterns that DNS helps to reawaken in us have, for the majority of us, always been there. This means that the changes we seek in our breath, body and mind are to a great extent a revealing of what’s already there and don’t require us to learn something completely new.
Over the past few years I have been tirelessly developing an approach to yoga that is fresh and exciting while rooted in a place fundamental to who we are as humans living in the world. Every day I find myself not so much learning something new but finally grasping postures and principles that I’ve had bits and pieces for a long time but was missing the key piece I’d needed for the unifying whole.
Learning DNS while relearning yoga has been endlessly engaging and enlightening for me as a student and as a teacher, and I am thrilled to have the opportunity to share it with you. This course is a culmination of decades of study and work. I hope you will consider taking it and recommending it to your friends and family.
https://www.alignmentlab.net/wp-content/uploads/2023/08/Alignment_Web_Logo-300.jpg00Robert Brookhttps://www.alignmentlab.net/wp-content/uploads/2023/08/Alignment_Web_Logo-300.jpgRobert Brook2020-05-09 22:46:112023-08-11 14:53:22DNS & YOGA 5 Class Intro Series – Digital Version NOW AVAILABLE!
When you think of your diaphragm you probably think of it as something that helps you breath and not much more than that. But your diaphragm is actually one of your major back muscles! Because of its attachments to the spine, ribs and sternum, the diaphragm is integral in supporting the joints and disks of the back and in keeping your spinal column upright and stable.
How do we keep this muscle strong and healthy?Diaphragmatic breathing. When we inhale and the diaphragm contracts, it moves downwards, not upwards like we might imagine. This downward movement creates an expansion of the lower ribs, waist, lower back and front of abdomen.This expansion is caused by pressure that builds with the downward movement of the diaphragm in the abdominal cavity called intra-abdominal pressure (IAP).
Optimal IAP causes a relatively even, 360 degree expansion of the abdominal cavity. To visualize this,imagine a circle expanding evenly into an even larger circle. The inner circle is the abdominal cavity while the outer circle is abdominal wall. The optimal expansion of IAP sends a signal to abdominal wall, formed by the trunk muscles including many of the abdominal muscles, to gently contract against this pressure. When these muscles respond appropriately to IAP, the abdominal muscles expand (stretch) and contract (resist) at once. This response maintains the pressure so that your organs, joints and disks are protected.
A healthy back is one that is upright without excessive lordosis (arching in) or kyphosis (rounding out). When we consider the essential role of the diaphragm in developing and maintaining a healthy spine, it is abundantly clear that diaphragmatic breathing is a necessity for spinal health.
So why is it that so many adults don’t breath diaphragmatically? As adults we may adopt one of several different dysfunctional breathing patterns. This is mainly due to 3 factors:
1) Cultural ideas about posture and breathing:
It’s common for many of us to have been exposed to certain ideas and expectations regarding our posture. We may have been told we need to “stand up straight” or “open up our chest.” Dysfunctional habits such as pulling our shoulders back or taking deep chest breaths to improve our posture often manifest as a result of misunderstandings about how and why to improve posture, and these habits often lead to chronic chest breathing rather than diaphragmatic breathing.
2) Breathing in and out of our mouth
When we mouth breath, the air is not pulled down as deeply into the lungs because the diaphragm does not fully contract. Mouth breathing is not only shallow breathing, it also recruits the upper back and neck muscles and this can, over time, contribute to chronic tension in the neck and shoulders.
3) Tightening the abdomen to “flatten the stomach” and brace the lower back.
For those with lower back pain, tightening the rectus abdominus, or our main abdominal “tucking muscle,” might be relieving, temporarily. But remember, in order for you diaphragm to support your back you need to have the appropriate amount of IAP. For the right amount of IAP, your abs need to need to be able to expand on inhalation. Also remember that your diaphragm needs to be able to move downward to create IAP, and it can’t do that if your abs are held tight. “Sucking it in” creates a dysfunctional tension that will only make your back tighter and weaker with time.
So how do you strengthen your diaphragm in a way that is good for your back? Just like with any other muscle it takes practice to re-learn how to use the diaphragm properly and time devoted daily to challenging it and making it capable of responding when called upon.
A very basic posture called “3 Months Supine” is a great way to start improving the function of your diaphragm and restore your abdominal responsiveness. Watch the video below for some simple cues on how to perform this very powerful and fundamental posture.
Diaphragmatic breathing will change your life.It has changed mine.
For more instructional videos and supporting content, follow us on Instagram at robertbrookyoga.
https://www.alignmentlab.net/wp-content/uploads/2023/08/Alignment_Web_Logo-300.jpg00Robert Brookhttps://www.alignmentlab.net/wp-content/uploads/2023/08/Alignment_Web_Logo-300.jpgRobert Brook2020-01-26 01:24:342020-01-26 14:40:08Your Diaphragm is a Back Muscle!
As I continue to explore the various ways that Dynamic Neuromuscular Stabilization (DNS) informs my movement and that of my clients, I continue to be impressed with how well DNS complements my practice and my teaching of yogasana (yoga postures). Classical yogasana are varied and complex, but they are always informed by the movement skills we bring to them. If those skills are limited or flawed in some way, so too will the be postures. When our movement skills are intelligent and aware those qualities will also be expressed in our asana and they will help us to bring our postures to life.
Thus far, after more than 25 years of study and practice, I have not yet found an approach to yoga that complements my practice and my teaching and that facilitates deeper knowledge of the subject the way that DNS has, and there’s every indication that will continue. As my knowledge and understanding of alignment, movement and asana grows I hope to share more of what I learn with you in the form of the posts and videos that Tiffany and I are creating and making available here on our website.
The following video shows part of sequence I’ve been working on for a while now and one I’ve begun to share with many of you in our sessions. If you are unfamiliar with the content, this video is by no means a substitute for skilled instruction. If you wish to explore the postures demonstrated in the video, I would caution you only to do so if you’re already familiar with these postures and to avoid continuing them if you experience any pain or are recovering from an injury that would make such postures inappropriate. Of course feel free to contact me for help or advice!
https://www.alignmentlab.net/wp-content/uploads/2023/08/Alignment_Web_Logo-300.jpg00Robert Brookhttps://www.alignmentlab.net/wp-content/uploads/2023/08/Alignment_Web_Logo-300.jpgRobert Brook2019-05-28 23:58:202019-06-04 20:09:17Success in Yoga: Applying DNS Principles to Classical Yoga Postures For Better Asana
A quick online search for “strengthen the pelvic floor” reveals a lot about how many of us view the pelvic floor and its role in our health and function. There are any number of recommended exercises for the pelvic floor, some that include products to assist you, and with most advocating an approach that involves isolating the contraction of the pelvic floor muscles. This approach can be helpful for building some basic awareness of the pelvic floor – an important component of developing pelvic floor strength. But this approach is also limited in that it fails to address the broader and more essential role of the pelvic floor in facilitating alignment and functional movement.
The Pelvic Floor Does Not Work in Isolation
The pelvic floor muscles coordinate with several deep muscles in the trunk in order to stabilize the lower trunk and maintain the integrity of the pelvic organs, preserving continence and sexual function. These deep trunk muscles work synergistically with the pelvic floor and include the diaphragm, psoas, spinal muscles and the deep abdominal muscles. Collectively these muscles act as a flexible cylindrical, called the Thoraco-lumbar cylinder or TLC, with the pelvic floor forming the bottom of the cylinder. In addition to the muscles themselves we have a fascial layer that acts as a web-like connection between them. This facial layer interweaves the trunk and pelvic floor muscles and helps give the trunk and pelvis its shape and tone.
Diaphragmatic Breathing is Essential for Pelvic Floor Strength
This fascial connection between the trunk muscles and the pelvic floor assures no individual muscle will work properly unless there is appropriate movement and engagement in all of the muscles that form the cylinder. In other words, the pelvic floor muscles never contract in isolation, rather they co-contract in response to the movement of the diaphragm and the subsequent abdominal response needed to support the trunk. This means that in order to strengthen the pelvic floor we must breath diaphragmatically, and to maintain consistent optimal pelvic floor tone we must breath diaphragmatically throughout the day and especially during any exercise or activity.
The Role of Intra-abdominal Pressure
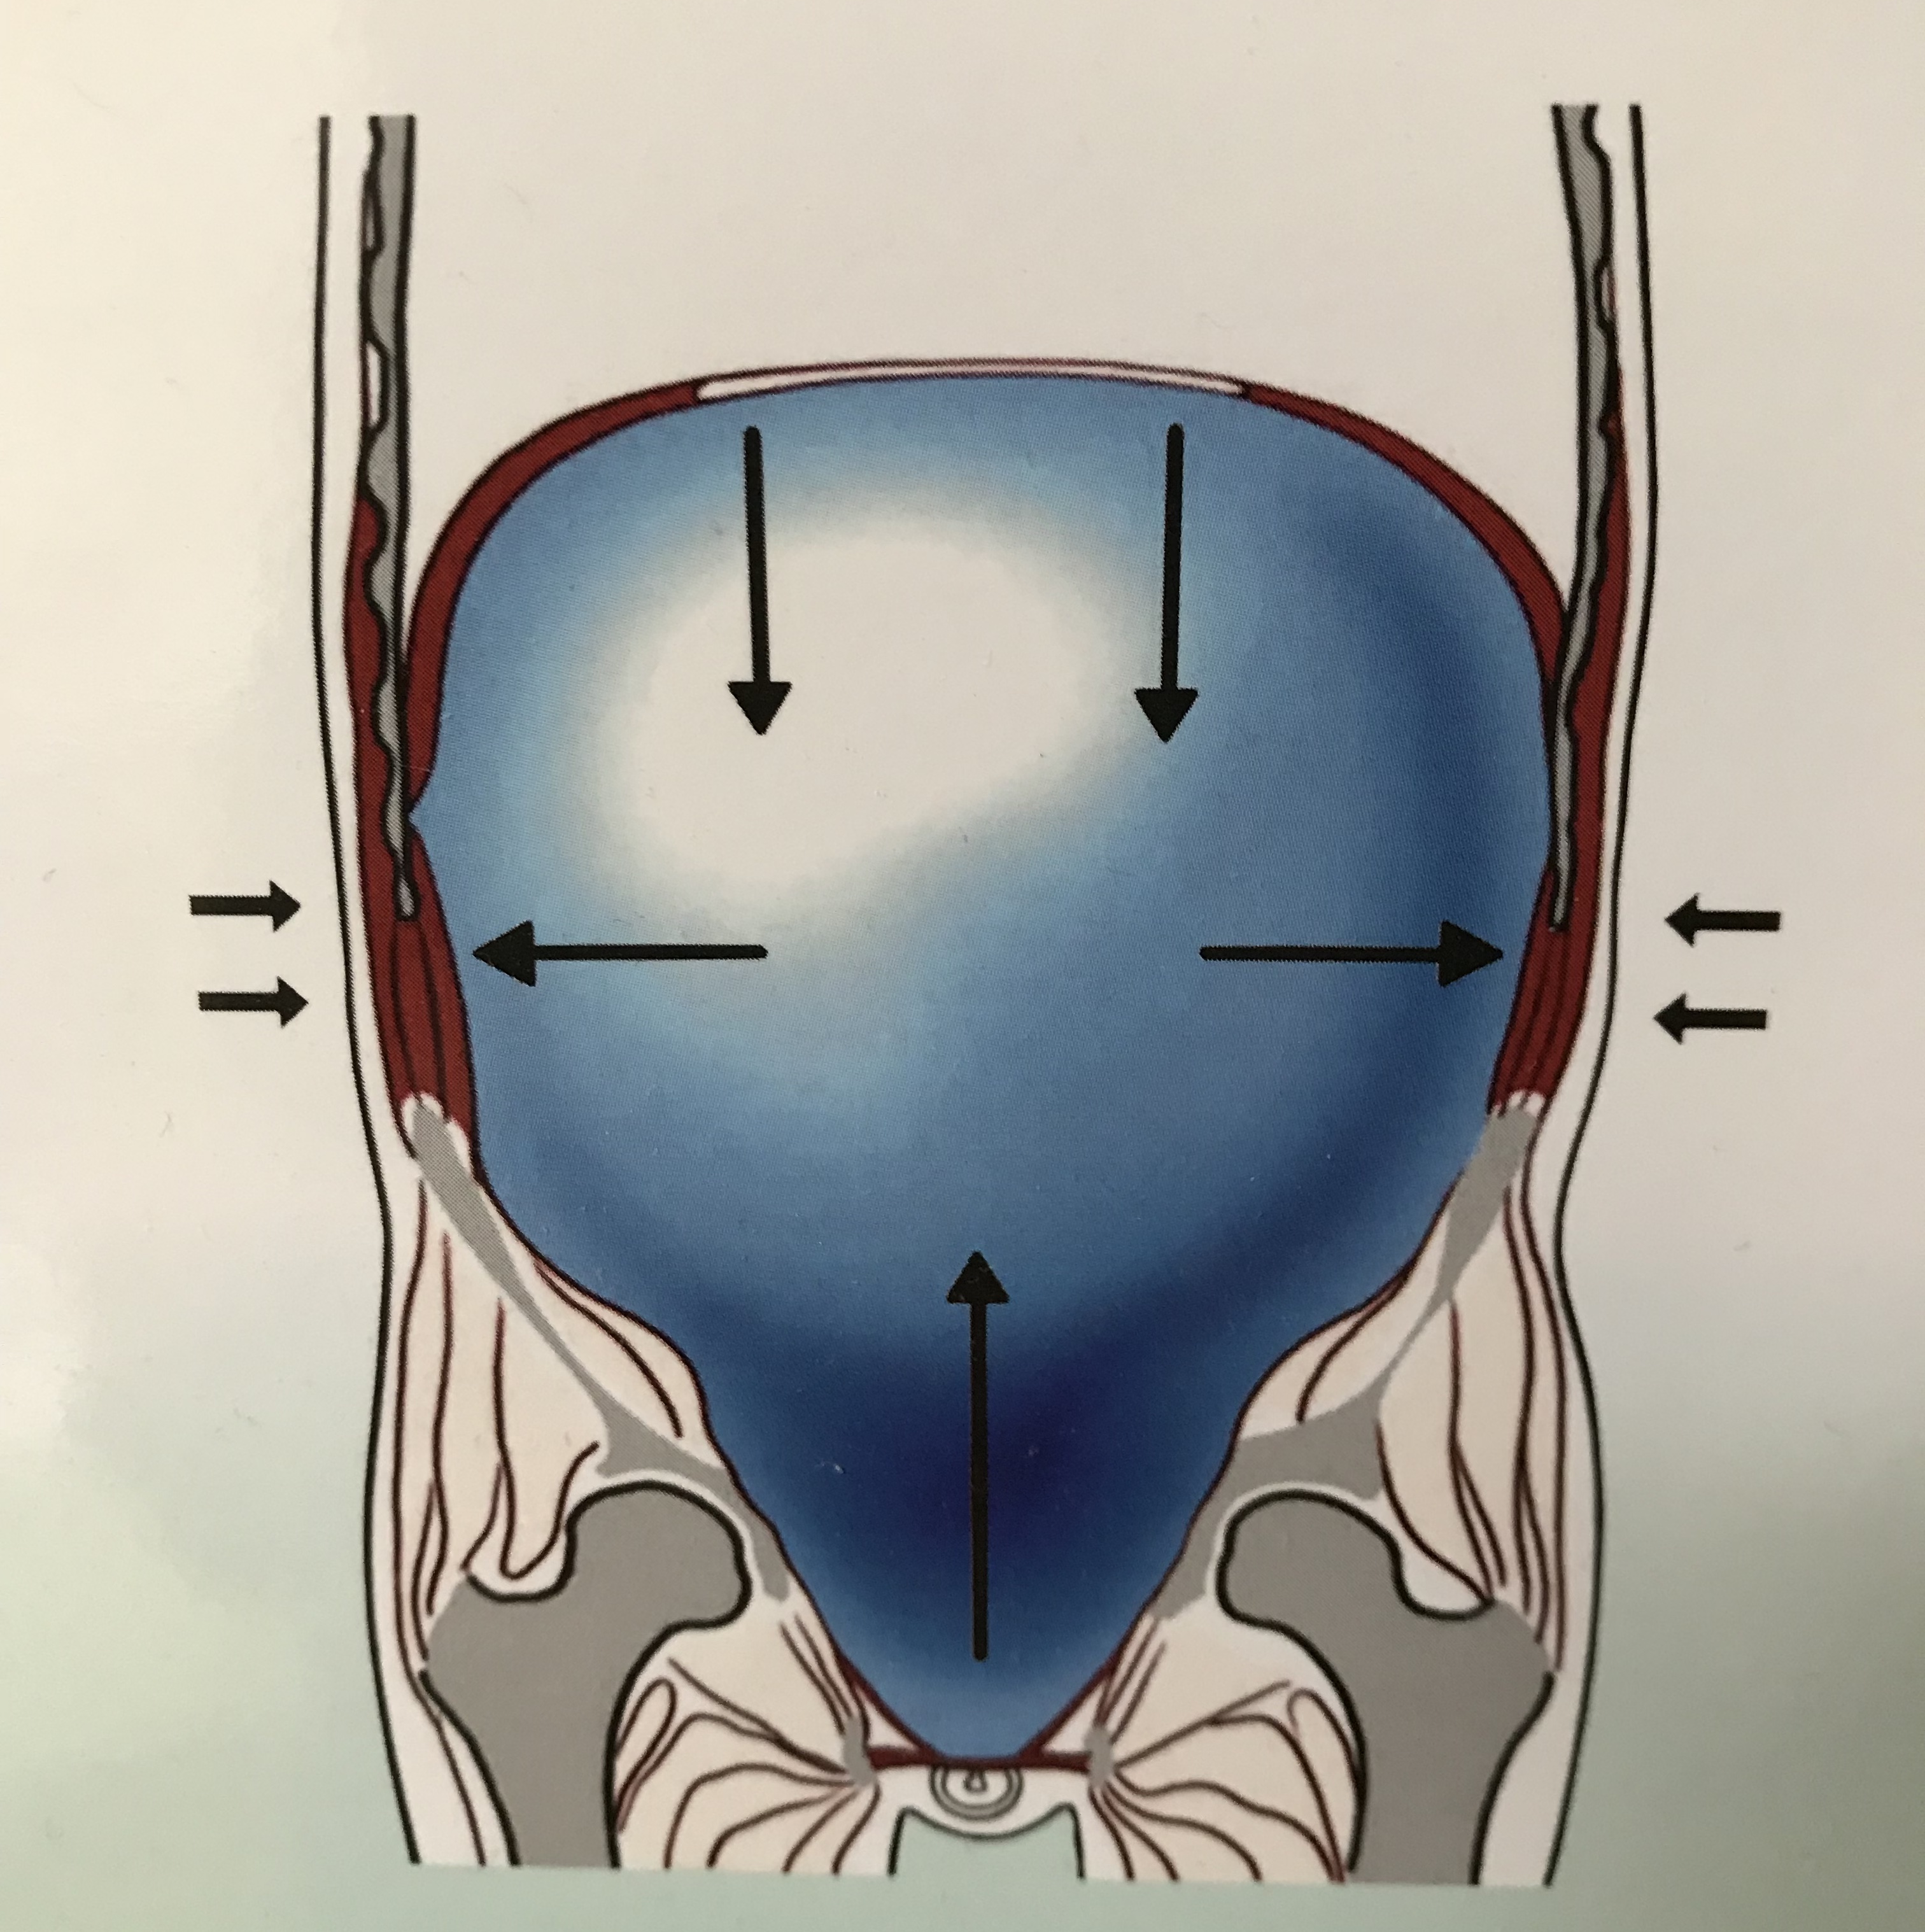
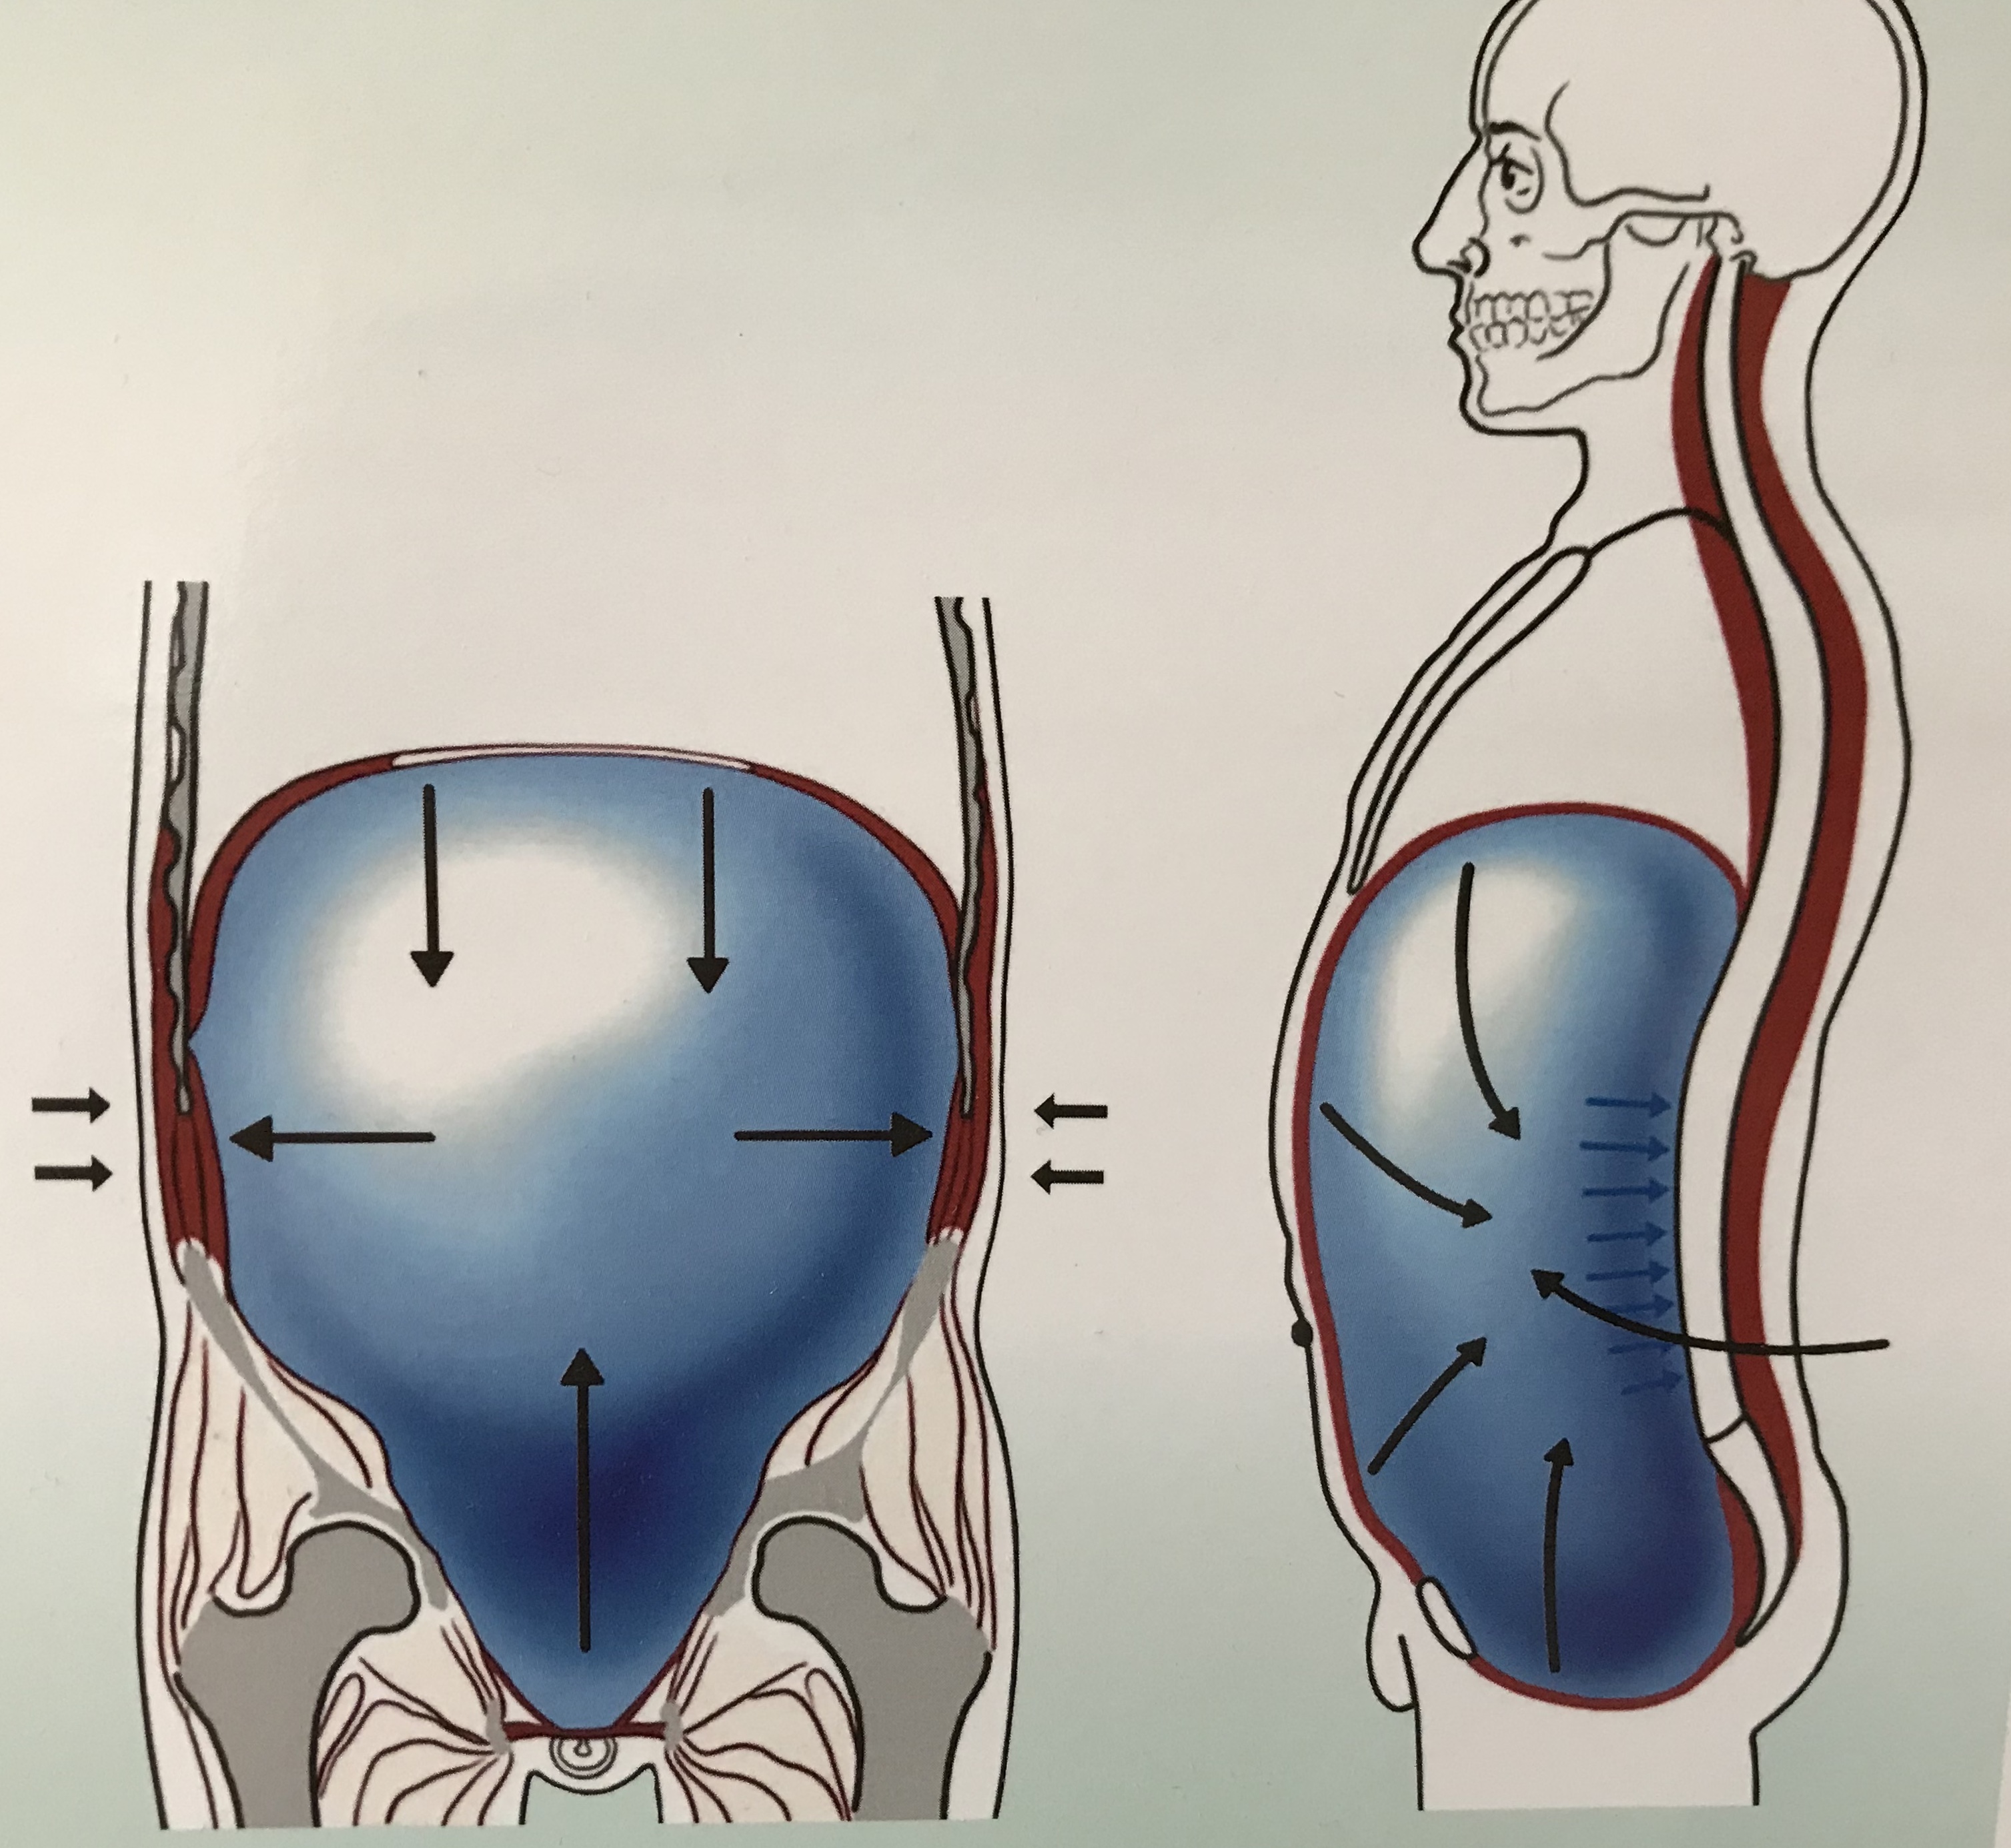
When we breath diaphragmatically, pressure is created inside the TLC which is similar to the pressure created inside a ballon filling with air. This pressure is called intra-abdominal pressure (IAP), and under ideal circumstances the muscles forming the TLC all respond to this pressure by contracting against it. This response should be relatively equal throughout the walls of the cylinder and serves to contain, maintain and regulate the IAP. Maintaining IAP helps us avoid stress on the pelvic and abdominal organs, spinal muscles and vertebral joints. Thus the pelvic floor has the important role of regulating IAP by helping to maintain relatively constant control of the cylinder, and in this way the relative tone of the pelvic floor directly influences the strength and function of the whole lower trunk.
If we do not breath diaphragmatically then we do not create proper IAP, and without proper IAP there simply cannot be the coordinated contraction of all the muscles of the cylinder necessary for trunk stability. In other words, there will be no response in the pelvic floor muscles if we are not breathing correctly.
Picture this: upon inhalation the pelvic floor widens to support the downward pressure created by the diaphragm. Then upon exhalation the pelvic floor co-contracts with the diaphragm and moves slightly up into the pelvis while the diaphragm moves back up into the ribcage. This coordinated movement between diaphragm and pelvic floor has a gentle squeezing effect on the spinal column and disks, keeping them plumb and lengthening the spine.This protects the joints of the spine from wear and tear and prevents damage to the disks.
Before beginning any pelvic floor specific strengthening exercises, diaphragmatic breathing with correct intra-abdominal pressure must be mastered!
For some people diaphragmatic breathing may be challenging at first, particularly if there is a a lot of tension in the trunk muscles. For others, years of chest breathing and/or shallow breathing can also make the trunk muscles weak and the back muscles too tight, preventing the alignment of the pelvis and ribcage necessary for diaphragmatic breathing to occur. Very often in these circumstances the pelvic floor muscles themselves are too tight, and this tension increases the tendency for pelvic floor disfunction.
Signs of and Contributors to Pelvic Floor Tension
Signs of a tight pelvic floor include lower back pain, incontinence issues, prostate and or bladder issues, prolapsed organs, and impairment of sexual function. Typically a tight pelvic floor is accompanied by certain muscular habits that manifest in conjunction with the pelvic floor tension. Habits that contribute to pelvic floor tension include clenching the lower glutes, tucking the pelvis, and sucking in the abdominal wall.
We live in a busy, stressful world and all of us are subject to potential stressors daily. An overactive stress response, either accompanying or even caused by long term habitual chest breathing is another important cause to be considered with pelvic floor disfunction (PFD). In such cases an effective approach to stress reduction is an essential component to any remedy.
Many of us have jobs that require a lot of sitting, either at the office and/or in the car on the way and home again. Those of us in this group are especially at risk of developing pelvic floor disfunction because long term sitting increases pelvic floor tension. The employment of a standing desk can help in these instances, but a more careful look at how we’re standing, or sitting, is an important part of any long term resolution.
Ignoring calls of nature because of busyness or distraction can be yet another source of stress that directly contributes to pelvic floor tightness and disfunction in a very obvious way. “Holding it” can become a habit that should be taken seriously, especially if PFD has already manifested.
Less obvious but no less important a contributor to PFD are cultural influences and images that present alignment pattens that we may try to emulate. Patterns such as a military posture with its arched lower back and tight glutes, as well as images from the fashion industry presenting beauty in the form of female bodies with forward hips and tucked pelvises no doubt reinforce patterns in younger people who are already developing these patterns through excessive sitting and staring at screens. Limiting screen time and setting healthier examples with our own alignment and movement habits are important considerations when managing this issue with our children.
Even in the wellness/fitness industry we are regularly presented with images of “healthy” bodies with sucked in over developed abdominals that are bulging and tight. We must remember that muscles that are too tight are also too weak to be functional.In order for a muscle to function well, it must have its full range of motion and be able to both contract well AND relax well. This is important to keep in mind not only with respect to aesthetics, but also with respect to steps we might take to mange pain. Bracing with the abs to manage back pain or PFD, for instance, is one of many habits that may be contributing to rather than solving our PFD.
A psoas release is a simple yet extremely effective way to help to begin to release many of the habits that contribute to PFD:
Once you begin to breath diaphragmatically and freely throughout the day and you combine it with a daily practice of letting go of dysfunctional tension habits, you will be ready to practice more specific pelvic floor re-training and strengthening. Because of the inter-connected fascial webbing, strengthening your pelvic floor muscle necessitates the ability to feel and develop responsiveness to the co-contraction of the muscles of the thoracolumbar cylinder.
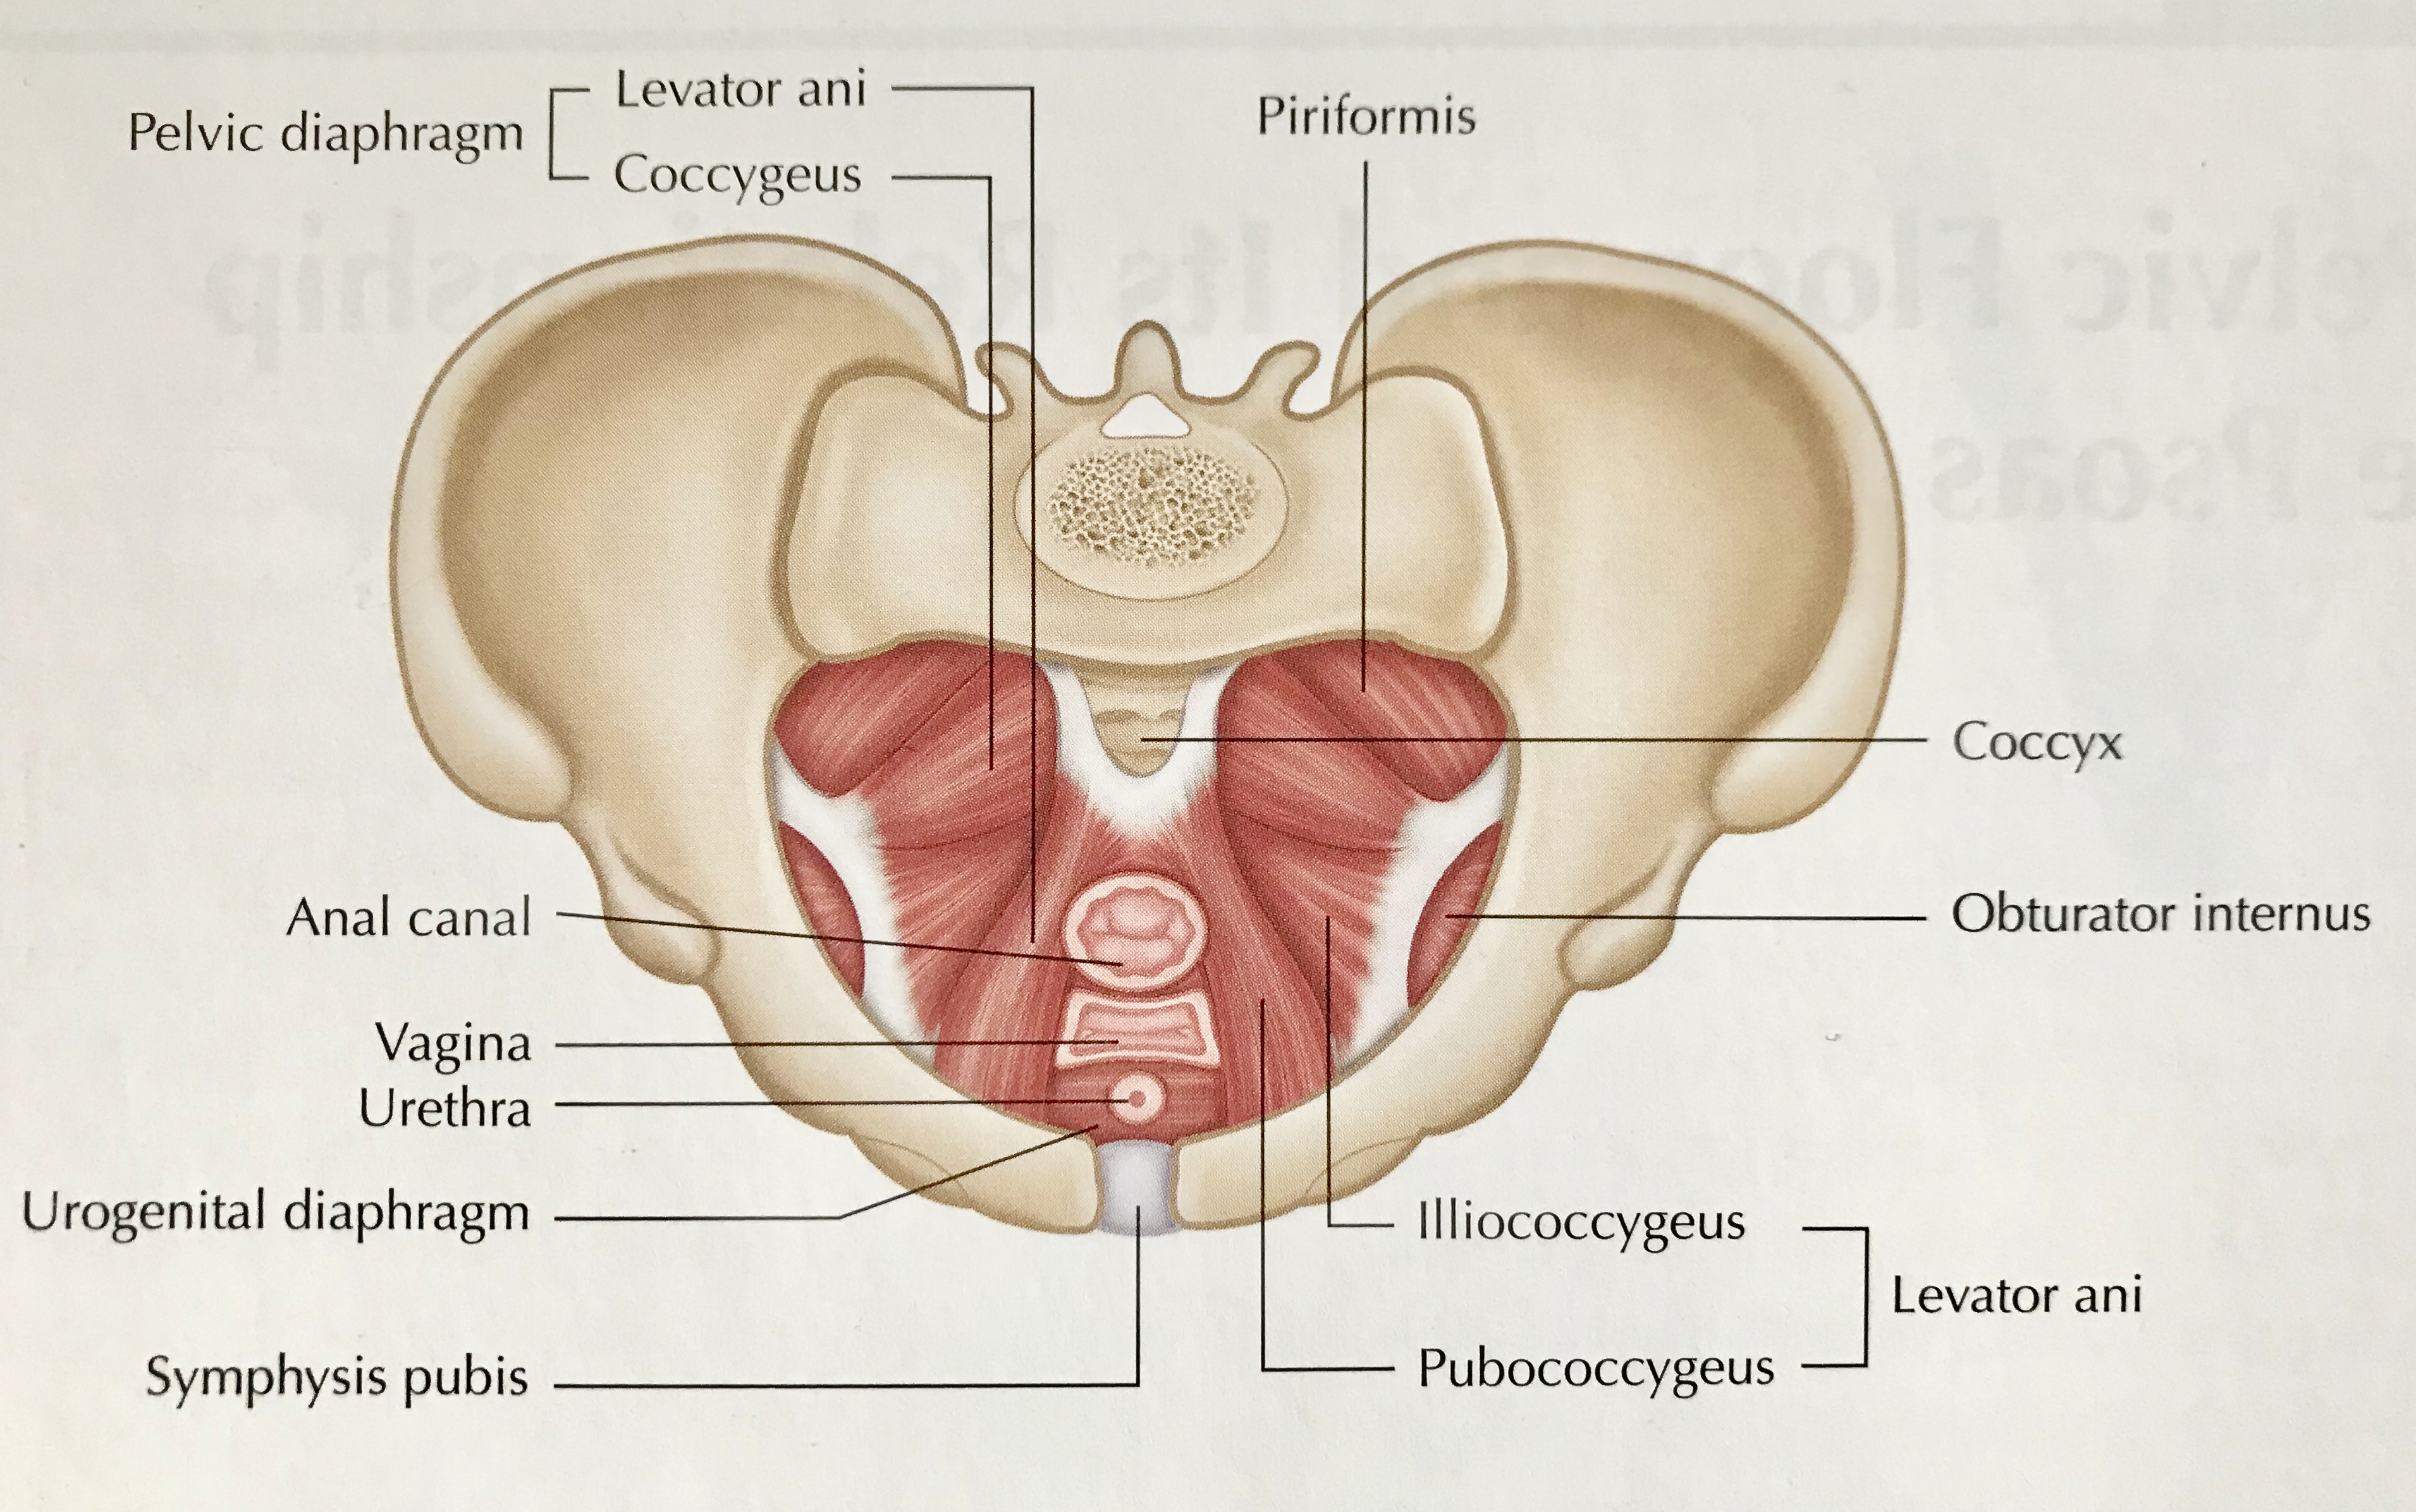
Since the pelvic floor muscles are hard to feel, it can help to have a basic understanding of their anatomy to visualize and increase awareness of them. The pelvic floor muscles connect the pubic bone to the tailbone and each ischial tuberosity (sitting bone) to the other, and these muscles reside in three detailed layers.
Again, pelvic floor muscles are part of a deep myofascial grouping (close to bones and deep in the body), and because they are deep within the body these muscles are hard to sense. The function of these deeper muscles can also appear more subtle than that of the large superficial muscles like the quadriceps or gluteals which are much easier to feel and to activate.
But the deeper muscles of the trunk contain a larger amount of proprioceptive nerves than the superficial muscles, and these nerves help our body respond to changes in movement and loads quicker than our superficial muscles can – even quicker than we can respond with our thoughts. This is why symptoms of mild incontinence often occur with quick motions like jumping, running, and sneezing. Each of these motions requires the deeper muscles to be strong and responsive in order to manage the increased loads these and other movements may place on the pelvis and lower trunk. Strong and responsive trunk and pelvic floor muscles serve to prevent excessive loading of the bladder and urethra which might otherwise cause leaking.
To help you feel how these muscles co-contract together, here is a simple exercise:
In part 2 of this post we will look further at how to further strengthen the pelvic floor with more dynamic movements that involve bending, lifting and walking. Stay tuned!
https://www.alignmentlab.net/wp-content/uploads/2023/08/Alignment_Web_Logo-300.jpg00Robert Brookhttps://www.alignmentlab.net/wp-content/uploads/2023/08/Alignment_Web_Logo-300.jpgRobert Brook2019-05-21 20:13:342019-05-21 20:13:34A Deeper Look at Pelvic Floor Strength and How to Build It – Part 1
Side angle posture is one of the more challenging standing postures because of the strength that it takes to keep the many loads it places on the body well distributed. I believe the cues in this video are helpful for improving and ultimately mastering the posture.
https://www.alignmentlab.net/wp-content/uploads/2023/08/Alignment_Web_Logo-300.jpg00Robert Brookhttps://www.alignmentlab.net/wp-content/uploads/2023/08/Alignment_Web_Logo-300.jpgRobert Brook2018-10-05 01:03:352018-10-22 22:12:42Extended Side Angle Posture (utthita parsvakonasana): Set Up and Cues
Since expanding my training into DNS I’ve refined my approach to every yoga posture that I do and teach. Much of these refinements have come in the way I set up each posture. This video demonstrates a set up for triangle posture and provides some additional instructions for performing the posture that build on the set up.
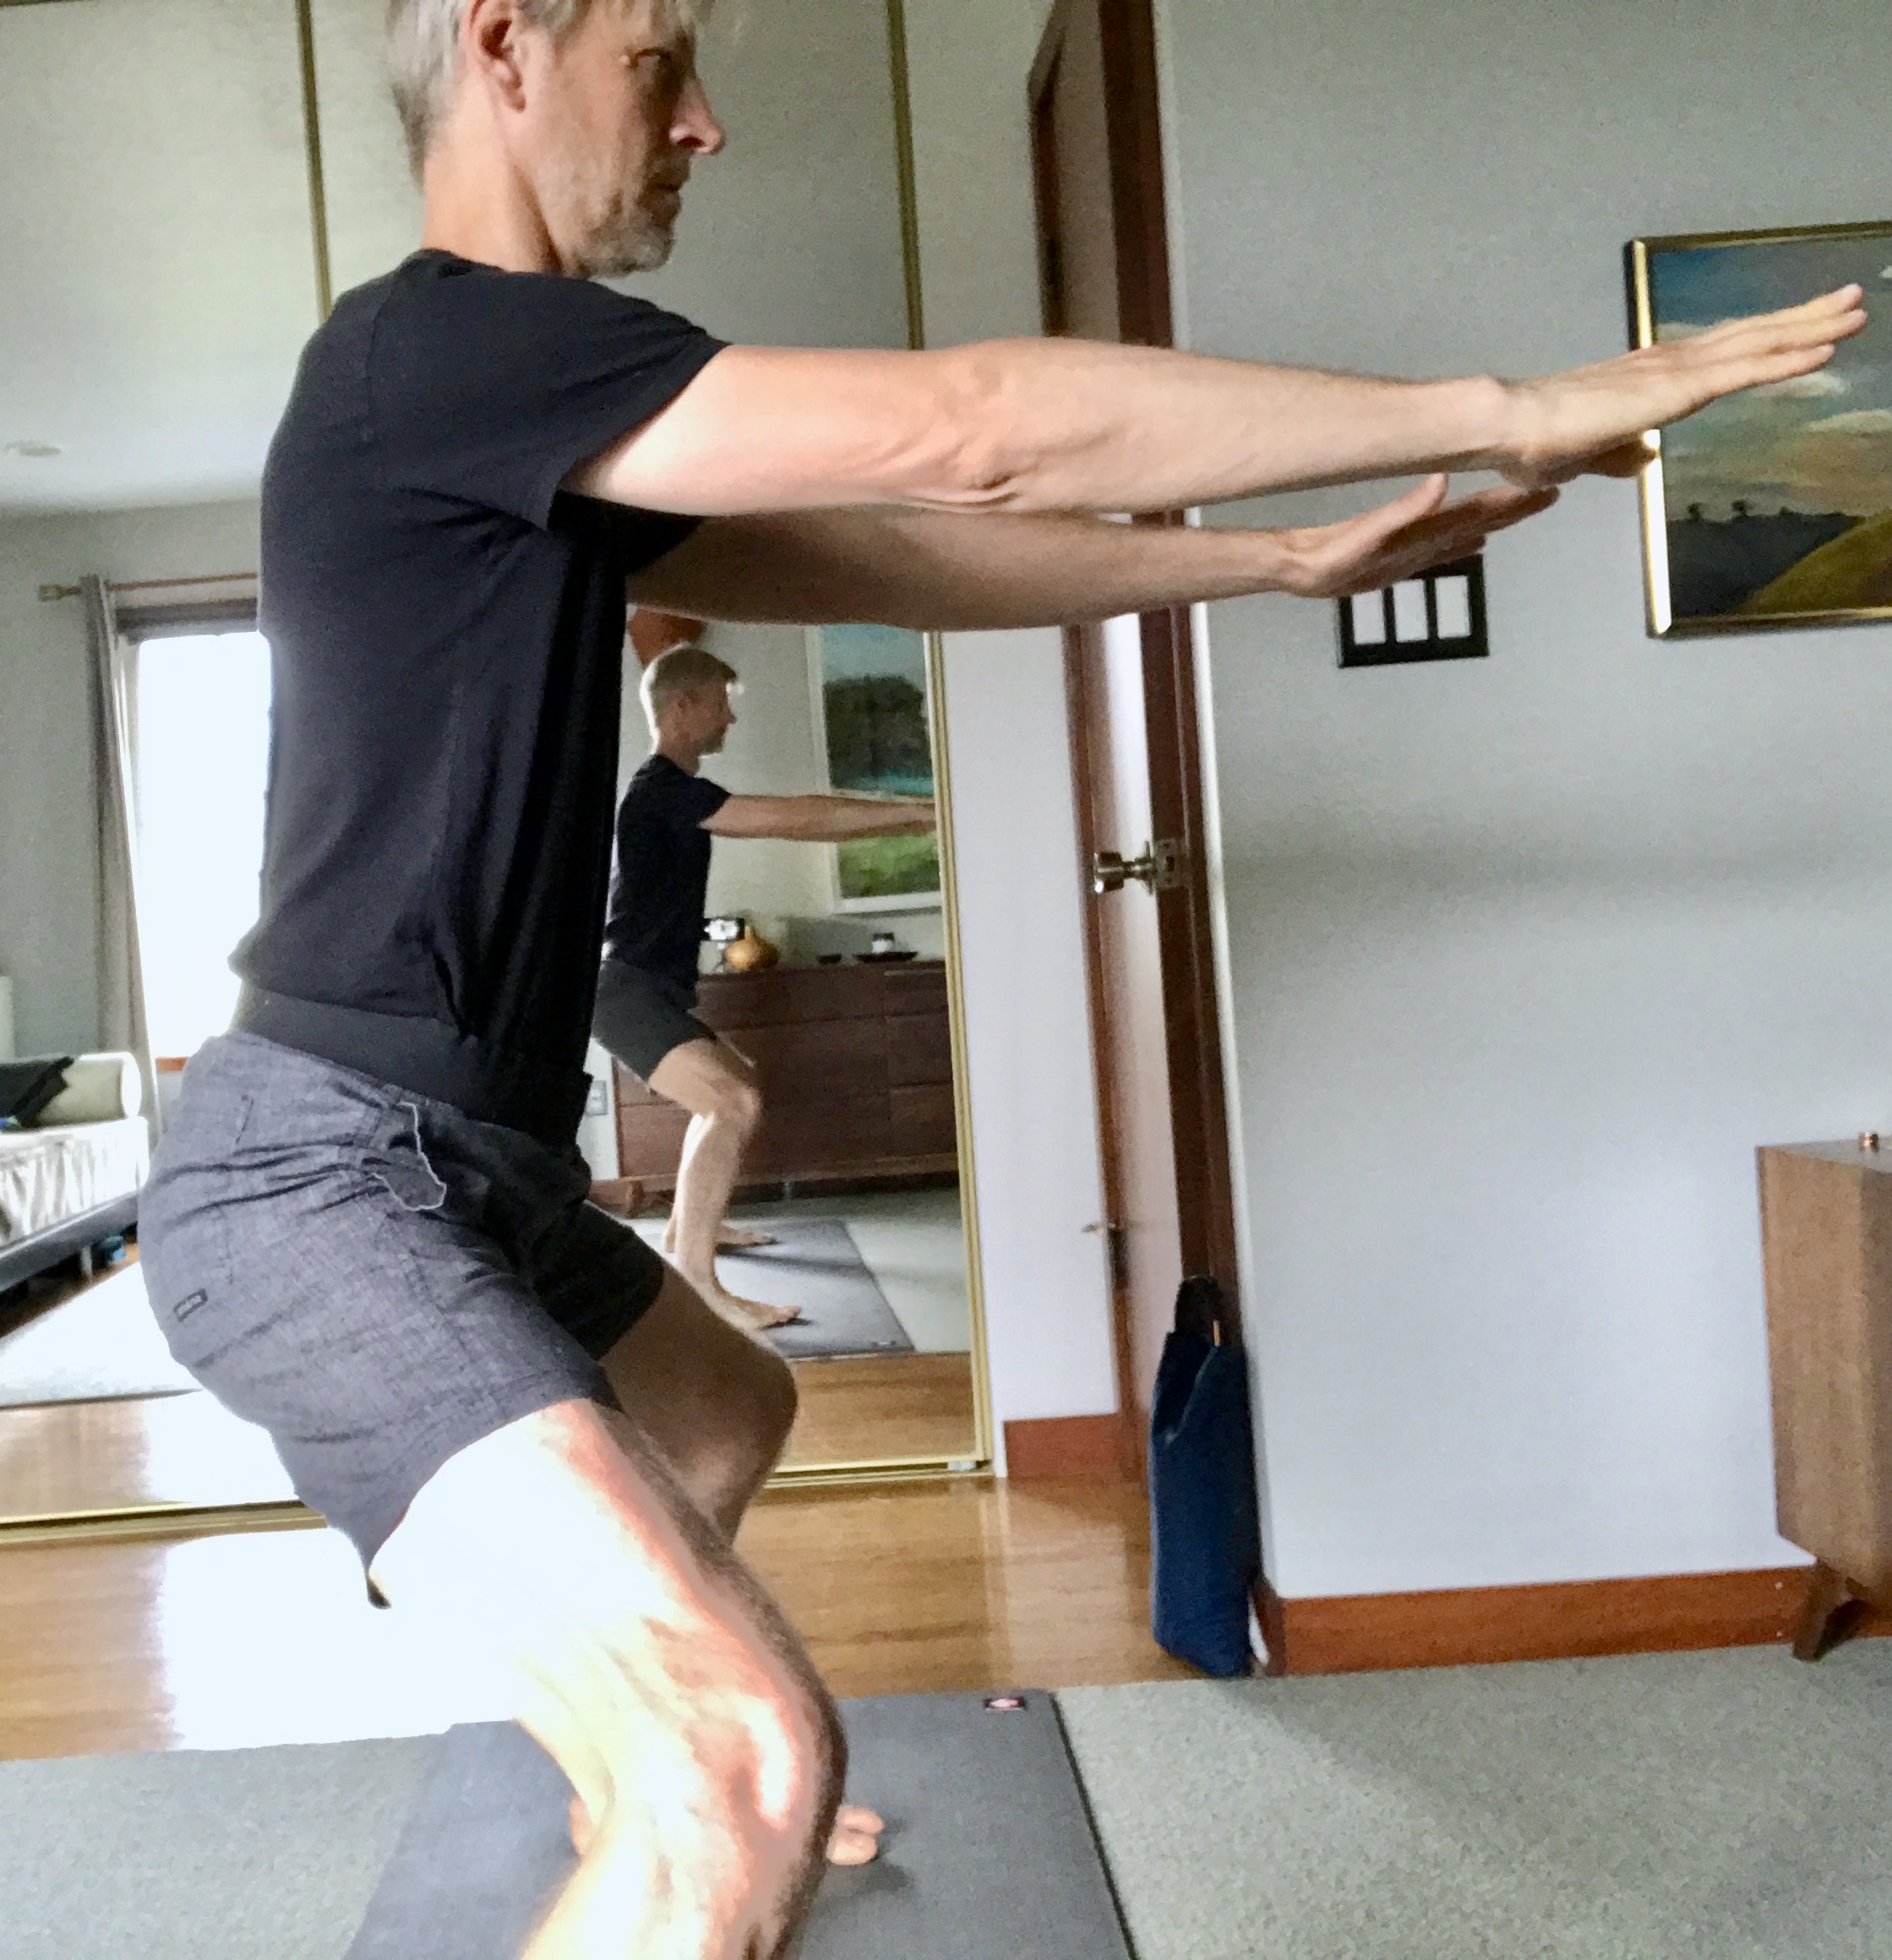
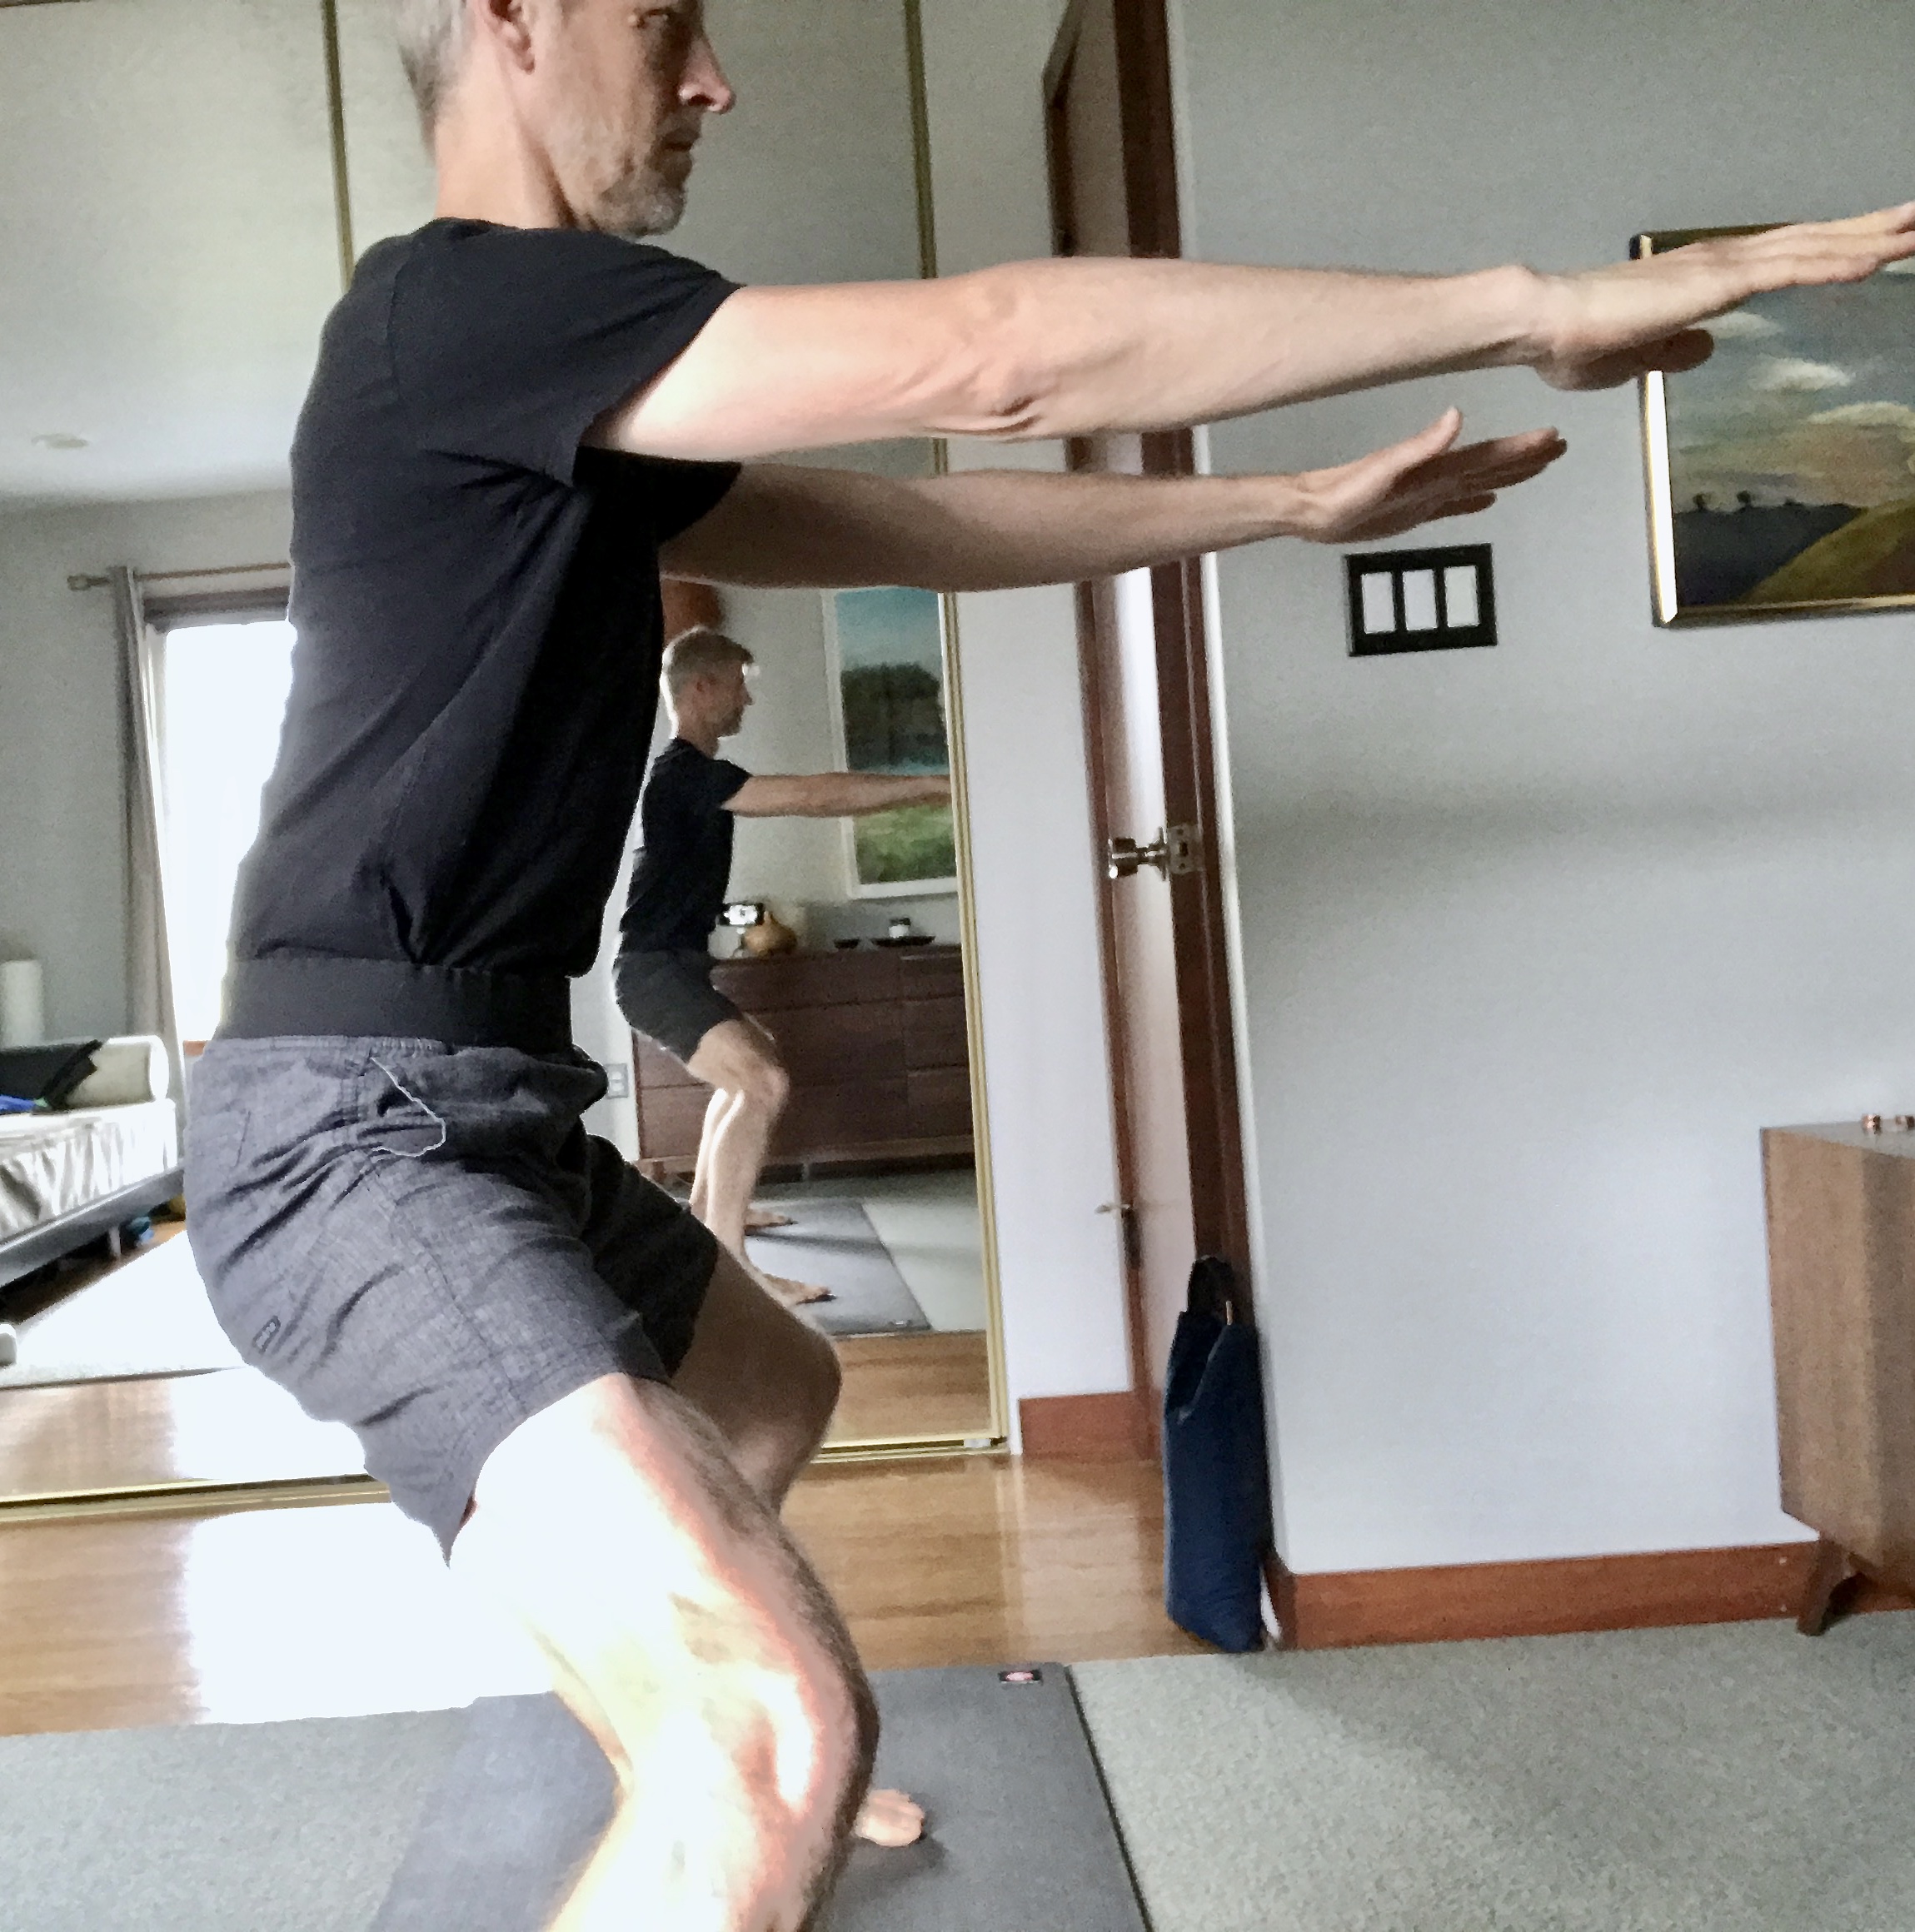
The entry and exit points I use for Triangle posture and other standing postures is a posture I call the “Wide High Squat.” This posture is shown in the two photos below. The “Wide High Squat” facilitates some important alignment elements that include organizing the shoulder girdle, aligning the head and upper thoracic and aligning the pelvis and the ribcage.
In order to clarify a key element of this posture, the photos here show before and after versions. In the first photo I have moved my hips back with a small amount of bend in the knees to facilitate a maneuver I call “uprighting the pelvis.” This maneuver aligns the pelvis with the ribcage so I can begin to stabilize the lower trunk. In this first photo I have not yet “uprighted,” thus the anterior or forward tilt in the pelvis and the hyper extension of the lumber spine.
In the second or “after” photo I have now “uprighted” by posteriorly tilting the pelvis and removing the excessive lordosis in the lumbar spine. This allows me to distribute my intra-abdominal presser evenly in the lower trunk and pelvis. I can then begin to activate the stabilizers in my abdomen, waist and lower back and pelvis to maintain the intra-abdominal pressure as I move to initiate and perform Triangle.
Notice I have NOT moved my pelvis forward, only rotated it posteriorly. This is the key! If the pelvis translates forward when you attempt to upright it, you’ve failed to upright from the hips and you won’t be able to stabilize properly, If this happens, nothing else you do in Trikonasana will really work. You must upright the pelvis for success in this and other standing postures!
https://www.alignmentlab.net/wp-content/uploads/2023/08/Alignment_Web_Logo-300.jpg00Robert Brookhttps://www.alignmentlab.net/wp-content/uploads/2023/08/Alignment_Web_Logo-300.jpgRobert Brook2018-10-05 00:34:392018-10-22 22:11:03Setting Up Triangle posture (utthita trikonasna) with the Wide High Squat
https://www.alignmentlab.net/wp-content/uploads/2023/08/Alignment_Web_Logo-300.jpg00Robert Brookhttps://www.alignmentlab.net/wp-content/uploads/2023/08/Alignment_Web_Logo-300.jpgRobert Brook2018-07-13 22:05:192018-07-13 22:05:19Applying DNS to Revolving Triangle Posture
This short video gives guided instructions for learning some DNS principles and using early developmental movements as a warm up for any movement practice you choose. I like to use this sequence as preparatory sequence before doing classical yoga postures, but it could also be done before a gym workout, a run, a bike ride or a hike.
We’re hoping to offer more video sessions like this and we’d love your feedback. Let us know what you think!
https://www.alignmentlab.net/wp-content/uploads/2023/08/Alignment_Web_Logo-300.jpg00Robert Brookhttps://www.alignmentlab.net/wp-content/uploads/2023/08/Alignment_Web_Logo-300.jpgRobert Brook2018-04-17 19:55:222018-04-17 19:55:22DNS Warm Up
When working with our clients one of the first things we check is their breathing pattern. This is because the way a person breathes can have a big impact on their health, including the health and function of the musculo-skeletal system. Much of the impact of breathing on our health has to do with the role of our diaphragm.
The Diaphragm during Respiration
There are many ways to breathe but the most effective, efficient and relaxing way to breathe involves using our diaphragm. The diaphragm is a dome-shaped muscle that spans the lower border of our rib cage. On inhalation, as the diaphragm contracts, it flattens and moves downward. This downward motion creates a vacum in the chest, helping to pull air into the lungs. When the diaphragm relaxes it moves upward, back into its dome shape, and this upward motion helps us to exhale.
Intra-abdominal Pressure and the Stabilizing Role of the Diaphragm
The downward motion of the diaphragm also creates pressure in the abdomen. This pressure is called “intra-abdominal pressure” and is important for facilitating a stabilizing response in the muscles of our abdomen, low back and pelvis. This highlights the dual role of the diaphragm. Under optimal circumstances it acts as a facilitator of both respiration and muscle-skeletal stabilization.
Often people are taught diaphragmatic breathing by lying down and breathing into the belly, inflating it toward the ceiling. Although this may be a good way to get started, it is an approach which focuses only on the respiratory role of the diaphragm and fails to address its crucial role in stabilizing the trunk and pelvis.
Experiencing Diaphragmatic Breathing and Intra-abdominal Pressure
For the diaphragm to perform optimally in both of it’s roles it is essential that its downward motion be symetrical and that the pressure it creates in the abdomen be distributed evenly. To experience this even distribution of intra-abdominal pressure for yourself, place your hands around the abdomen just below the lower ribs, making contact with the front, sides and back of your body. Your diaphragm sits just above where your hands are touching. Now inhale and feel how the pressure created in your abdomen is pushing gently into your hands.
True diaphragmatic breathing creates intra-abdominal pressure that expands outward into the full circumference of the abdomen. When you breathe in with your hands wrapped around your abdomen, check and see if you feel the pressure moving in all directions. If you feel most or all of the pressure pushing into your belly, then on subsequent breaths try to gently, but consciously, redistribute the pressure into every place your hands are touching, especially into the sides of your waist and into the back.
Another technique for improving diaphragmatic breathing and intra-abdominal pressure involves tying a theraband or a stretchy cloth around your lower ribs and feeling your inhale touch the whole circumference of the lower ribcage. Here you can feel the intercostal muscles between your ribs move. The intercostals assist the diaphragm in playing both its roles and are an important source of load and mobilization of the rib cage, helping to keep these bones healthy and mobile.
Intra-abdominal Pressure and the Pelvic Floor
As I mentioned earlier, when we are truly breathing diaphragmatically the downward motion of the diaphragm will be symetrical and create an even distribution of pressure in the abdominal cavity. But it doesn’t stop there! In fact one important benefit of diaphragmatic breathing is its affect on the pelvic floor. This is because true diaphragmatic breathing and optimal intra-abdominal pressure will move directly downward toward the pelvic floor, loading the pelvic floor muscles and soliciting a response from those muscles that maintains their strength and responsiveness.
To sense the intra-abdominal pressure in your pelvis, place your hands on the front of your belly below your umbilicus (belly button) and above your pubic bone and take a breath. You should feel a gentle pressure increase here. You may also begin to sense a gentle pressure in the floor of your pelvis.
Other Benefits of Diaphragmatic Breathing
Another reason the direction our diaphragm moves is so important is that it helps pull air into the lowest lobes of your lungs. Since the lungs are narrow at the top and wider at the bottom, blood flow into the lower lobes is greater than into the upper lobes and therefore breathing diaphragmatically will allow for more oxygen transfer into the blood. With a big chest breath we are actually taking in less oxygen than if we simply take a small but healthy diaphragmatic breath!
Diaphragmatic breathing also has benefits to our nervous system. The para-sympathic nervous system (rest and digest) is activated by relaxed, diaphragmatic breathing while the sympathetic (fight or flight) is activated by chest breathing. Again, for healthy breathing that big chest breath is not always what we want. It is actually preparing our body to ramp up, promoting a stress response rather than alleviating it.
Diaphragmatic breathing can also help alleviate back pain and reduce back tension. When breathing diaphragmatically, the intra-abdominal pressure solicits a response in the abdominal and lower trunk muscles that gently unloads the spinal joints and strengthens the abodminal muscles. These muscles get a gentle massage and workout just by breathing correctly!
Breathing through Your Nose is Essential
Finally, to get the most out of diaphragmatic breathing it is essential to breathe in and out of your nose. Mouth breathing is shallow and will promote lifting the chest up in lieu of the diaphragm moving down. Since ALL of the benefits of diaphragmatic breathing hinge on the symetrical downward movement of the diaphragm and the even distribution of intra-abdominal pressure then breathing through the nose is key in reaping these benefits.
For guided instruction on the basics of diaphragmatic breathing, check out this video.
https://www.alignmentlab.net/wp-content/uploads/2023/08/Alignment_Web_Logo-300.jpg00Robert Brookhttps://www.alignmentlab.net/wp-content/uploads/2023/08/Alignment_Web_Logo-300.jpgRobert Brook2017-06-14 00:26:112017-06-14 20:19:15The Best Breathing for Reducing Pain and Stress