https://www.alignmentlab.net/wp-content/uploads/2023/08/Alignment_Web_Logo-300.jpg
0
0
Robert Brook
https://www.alignmentlab.net/wp-content/uploads/2023/08/Alignment_Web_Logo-300.jpg
Robert Brook2017-02-09 22:42:282018-05-22 03:06:20Introducing DNS (video #3)
https://www.alignmentlab.net/wp-content/uploads/2023/08/Alignment_Web_Logo-300.jpg
0
0
Robert Brook
https://www.alignmentlab.net/wp-content/uploads/2023/08/Alignment_Web_Logo-300.jpg
Robert Brook2017-02-09 22:38:142018-05-22 03:07:10Introducing DNS (video #2)
Introducing DNS!
Tiffany and I completed our second course in Dynamic Neuromuscular Stabilization (DNS) a couple of weeks ago and it’s already having a HUGE impact on our work with clients. It’s rather uncanny how using even a limited amount of these early developmental postures and movement patterns has such a significant impact on strength, balance, flexibility, joint stability and pain reduction.
Those of you who have worked with us know that we’ll often e-mail you handouts to facilitate the work we encourage you to do on your own. We are sending most folks home with at least one DNS “posture” now and have decided, at least for now, to post videos in lieu of sending handouts.
Here is the first of 3 videos that show 3 different DNS “postures” and provide some instruction for each of them. These videos are not recommended for people who have not yet received one to one or group class instruction from Tiffany and/or myself.
So if you haven’t yet set up an appointment to experience DNS, I would urge you to do so. You won’t be disappointed!
New Years Reminder: Align Yourself Better in 2016
New years resolutions are a tricky business. By making a new years resolution I am stating that I am resolved to follow through with my intentions. If I am truly resolved then I will follow through with my intentions and may enjoy the benefits of my success. If the resolve is lacking then I will likely not follow through and I may instead experience feelings of failure and disappointment.
One could argue also that if I truly have resolve with regards to some intention, say, getting into better shape, then I won’t really need to make a resolution to do that. I just go and get into better shape because my resolve requires that action. I must be careful that my new years resolutions aren’t simply an endless list of the things I’d like to change but lack the skills, the will or the resolve to change.
I’d like to suggest an alternative to new years resolutions: “new years reminders.” I can use the new year to simply remind myself of the changes I’d like to see in my life but have yet, for whatever reason, failed to manifest. I’d also like to suggest that of the many possibilities for new years reminders, BETTER ALIGNMENT be moved up the list!
Why better alignment? Well it’s to do with the fact that our alignment impacts our health in so many ways, physically and psychologically, and that it is the essential first step for many other popular new years reminders including “getting into better shape”, “losing weight” and “reducing stress”, just to name a few.
Improving our alignment has the following benefits with regards to getting into better shape:
- Increases strength and flexibility
- Improves cardiovascular function
- Improves balance and coordination
- Increases bone density
- Decreases pain
- Improves overall health and function
In additon to the above, improving our alignment has the following benefits with regards to weight loss:
- Reduces excess weight at the site(s) of accumulation
- Increases core strength
- Improves digestive health system for better digestion and a decreased tendency for weight gain
- Increases muslce use for increased calorie consumption with activity
And it that weren’t enough better alignment helps to reduce stress in the following ways:
- Improves breathing
- Relaxes chronically tense muscles such as the diaphragm and psoas
- Improvses health of the urinary system for greater ease of function and decreased associated stress
- AND DID I MENTION DECREASES PAIN!!!
So consider making a “New Years Reminder” to develop the alignment skills you have as well as learning new ones. Consider reminding yourself to do the things you’re already doing, walking, standing, sitting, etc. with better alignment and with more of the health promoting effects you want.
What Does a Muscle Do?
At my Restorative Exercise certification training in spring of 2014, Katy Bowman, the founder of R.E. posed a question to our group – “What do muscles do?” Her answer – “they respond.” To be honest I didn’t give her comment much thought at the time, but since that day her words have come back to me time and time again and the truth of them has been born out of my experiences working with clients and in my own body.
What do we typically think of when we want to affect a muscle? Generally either stretching it or strengthening it. If I want to stretch a muscle, what do I really want to happen? I want that muscle to change it’s length. Specifically, I want that muscle to be longer that it currently is.
Let’s say I find out I have tight hamstrings and that having tight hamstrings is not a good thing so I decide I’m going to stretch them. I stand and bend forward and try to reach the floor, pulling strongly on the muscles in the backs of my legs. It certainly feels like I am stretching my hamstrings, but usually I am stretching the muscles in my back even more. In fact, because of the difference in the way these 2 groups of muscles are meant to function, the way that the hamstring muscles and the muscles in my lower back “respond” in this scenario can be very different than I intend.
Bending from the lower back
The hamstrings consist of three muscles located on the back of the thigh which are called the semimembranosus, the semitendinosus, and the biceps femoris. The primary job of the hamstrings collectively is to extend the hip joint (pull the femur back relative to the pelvis) and flex (bend) the knee. When the knees are kept straight and the hips are flexed as in a standing forward bend, the hamstrings do the job of hip extension by acting as the main muscles that support the weight of my upper body as it moves forward and down. In other words, as I flex my hips to bend forward the hamstrings apply a counter force in the opposite direction, that of hip extension, to help carry the weight of my pelvis, trunk and head.
In this example, the muscles in my lower back have a job to do as well, particular the erector spinae whose job it is to help stabilize my spine and prevent it from distorting to the point that it puts undue stress on the spinal joints. These muscles work in combination with my hamstrings and my gluteal (buttock) muscles to enable me to bend forward without damaging the very important and essential tissue contained within my spinal column, namely the spinal cord.
Thus the job of my hamstrings in a forward bend, as well as those of the lower back, is to “respond” to that movement by acting as a kind of breaking mechanism, carrying the load of my trunk. Of the two muscle groups, the hamstrings are the bigger and stronger and therefore should be encouraged to do more of the work in a forward bend. For the hamstrings to respond this way I need to emphasize bending more from my hips and minimize the bend from my lower back. When the hamstrings are tight they don’t allow for much movement from the hips before they can no longer respond to my motion of bending forward.
Bending forward from the hips
If I keep bending forward, even when the hamstrings cannot respond anymore, then my lower back has to carry the load instead. My head and trunk are pretty darn heavy and therefore this puts a lot of stress on my back. If I keep doing my forward bend this way not only will I eventually hurt my back, but I will also not make much progress in increasing the length of my hamstrings. That’s because when I bend well beyond the range of my hamstring length the hamstrings cannot respond anymore and therefore will not increase their length. Meanwhile the muscles in my low back will respond, and quite appropriately, to the consistent excessive loading I’m putting on them by getting weaker less able to effectively do the job of maintaining a functional position of my lower spine that keeps the joints healthy, mobile and pain free.
This is just one of many possible examples of the way in which muscles respond to the input we give them in both helpful and not so helpful ways. Therefore when I recognize that I have a muscle that hurts or that is too tight or too week, before I go about stretching or strengthening I should consider what I may already be doing that is causing the muscle to respond as it is.
In the example of my hamstrings, I need to consider how much time I spend sitting or wearing shoes with heels or standing with my pelvis tucked. Any of these “activities” will result in shorter hamstrings because when I engage in these very common activities I am effectively telling my hamstrings to shorten. My tight hamstrings are just responding appropriately to the message I’m sending!
Standing with tucked pelvis
What is a Hip Opener? (part 3)
In the previous post we looked at hip extension from a prone position. One important feature of extending the hip this way is that it is extended with active, muscularly driven movement. Active hip extension has the important benefit of stregthening the hip extensor muslces. Another benefit to active hip extension (versus passive) is that it is somewhat safer because we have to use whatever strength our hip extensors have to overcome the tension in the antagonist hip flexors. This avoids overstretching the hip flexors and minimizes stress on the lower back. Finally, doing active hip extension allows us to better assess the ROM of our hips and therefore establish a more accurate baseline from which to make progress.
Active hip extension does, however, have one major disadvantage, and if you’ve worked on either or both of the postures I presented in part 2 you would have noticed this rather quickly. It is difficult to hold these postures long enough to facilitate rapid progress. Therefore I’d like offer a way of increasing hip extension passively that is both safe and effective as well as somewhat pleasurable to do.
The posture below is demonstrated in the video you see above. I recommend reading the description first and then watching the video after for clarification.
Lie down on your back with your knees bent and your feet on the floor. Place your feet pelvis width apart (about 6 inches) with the shin bones vertical and the knees directly over the ankles. If either or both of your knees don’t bend this much, only bend the knees as much as is comfortable for your most limited knee. Tuck your chin in toward the top of your throat and legthen the back of your neck until you can feel that the head is not at all tilting backwards. If you find it difficult to keep the chin in, place a folded blanket under the base of the skull to increase the height of the head. Make the blanket high enough that it removes any posterior tilt from the skull.
Place a standard size yoga block in between your knees and hold it. Without dropping the block, slowly lift the pelvis up off the floor and place a second block on its side under your pelvis. If you cannot lift the pelvis high enough to fit a standard size block without dropping the block between your knees then a standard size block is too hight for you. Use a half block or some equivalent height instead. You should feel absolutely no pain in your back! If you do feel pain in your back, decrease the height until you no longer feel back pain. If you cannot lie this way with the pelvis elevated and without back pain seek help from an experienced teacher.
Once you have the pelvis elevated and supported, making sure the support is only under the pelvis and not under the lumbar spine, remove the block from between your knees. Then notice the way the pelvis automatically rolls back a little toward the rib cage. This keeps your lumbar and thoracic spine neutral. Avoid actively rolling the pelvis back (i.e. tucking the pelvis). Simply allow the pelvis to roll back to the extent that it is naturally inclined. If the pelvis doesn’t roll back this way at all, try moving the support under the pelvis a little closer to your feet.
Next, keeping your foot in contact with the floor, move your left foot gradually out away from the support, keeping it in line with the hip. Remain aware of the position of the pelvis relative to the rib cage and notice if at any point moving the leg starts to pull the pelvis out of its position. When you reach such a point, pause there and let the weight of your leg gently pull on the hip flexors. In the beginning you may not feel much. As you practice more your sensitivity will increase and you will perceive the sensation of loading on the hip flexors in the groin and in front of your hip. You will also being to perceive the sensation of these musles letting go. This is your cue to start gradually moving your foot further away from your hip.
Stay for 20-30 seconds. Then bring the foot back to its original position and try this with the right leg. After you’ve done each leg once, lift the pelvis up remove the block under it and come down. If you feel any pain in your back upon lifting the pelvis up off the block it is telling you that you have used too much height. Try decreasing the height and repeating the sequence described in the preious 2 paragraphs.
When you’ve found a height you can use to do one repetition without experiencing any pain after, then you’re ready to begin more repetitions and with longer holds times. Repeat the above 2-3 times on each leg, first for 20-30 seconds and then over the course of a couple of weeks working up to a minute on each leg.
Eventually you’ll reach a point where you’ll be able to stretch each leg all the way out without any response from the pelvis. When you reach this point the next step is to increase the height of the block under the pelvis. When you feel you’re ready to do this, increase the height by turning the block on its side. Avoid placing the block on its end or making the block so high that you are forced to arch your lower back. Using too much height may lead to a back injury and will not be as effective in increasing your hip extension as will extending the hip while maintaining a neutral spine.
Conisider doing this passive hip extension in combination with active hip extension to see how one improves the other. You may also enjoy combining these hip extension postures with the standing forward bend described in “What is a Hip Opener, Part 1” to see how increasing the length of the hip flexors with hip extension helps them to contribute more to your hip flexion. However you use these postures, enjoy the increase in ease and freedom of movement these postures give to your hips!
What is a Hip Opener? (part 2)
A hip opener is a posture meant to increase a particular range of motion or multiple ranges of motion in the hip joint. The most important aspect of such a posture is that the hip be targeted and that the force applied to the hip to create the opening not be diverted into the lower back or the knee. Hip extension is one ROM of the hip that often gets neglected because of the ease with which many of us use the joints in the lower spine to do motions that would otherwise be done from the hip. Working on hip extension is therefore extrememly hepful and important not only for health and function of the hips but also that of the lower back.
Improving hip extension will help prepare the body for backbends as well as help to support healthy gait mechanics. The simplest way to work on hip extension is from a prone position. Lie face down on the floor and find a comfortable position for you head, perhaps resting your forehead on a blanket or on your forearm. Check and see if the pubic bone and the frontal most aspect of the 2 ilium (the A.S.I.S. or anterior superior iliac spine) are resting on the floor. If the pubic bone doesn’t easily rest on the floor, try placing a folded blanket just above it on the 2 A.S.I.S.. The idea is to tilt the pelvis back a bit to bring the pubic bone in contact with the floor (see figure 1).
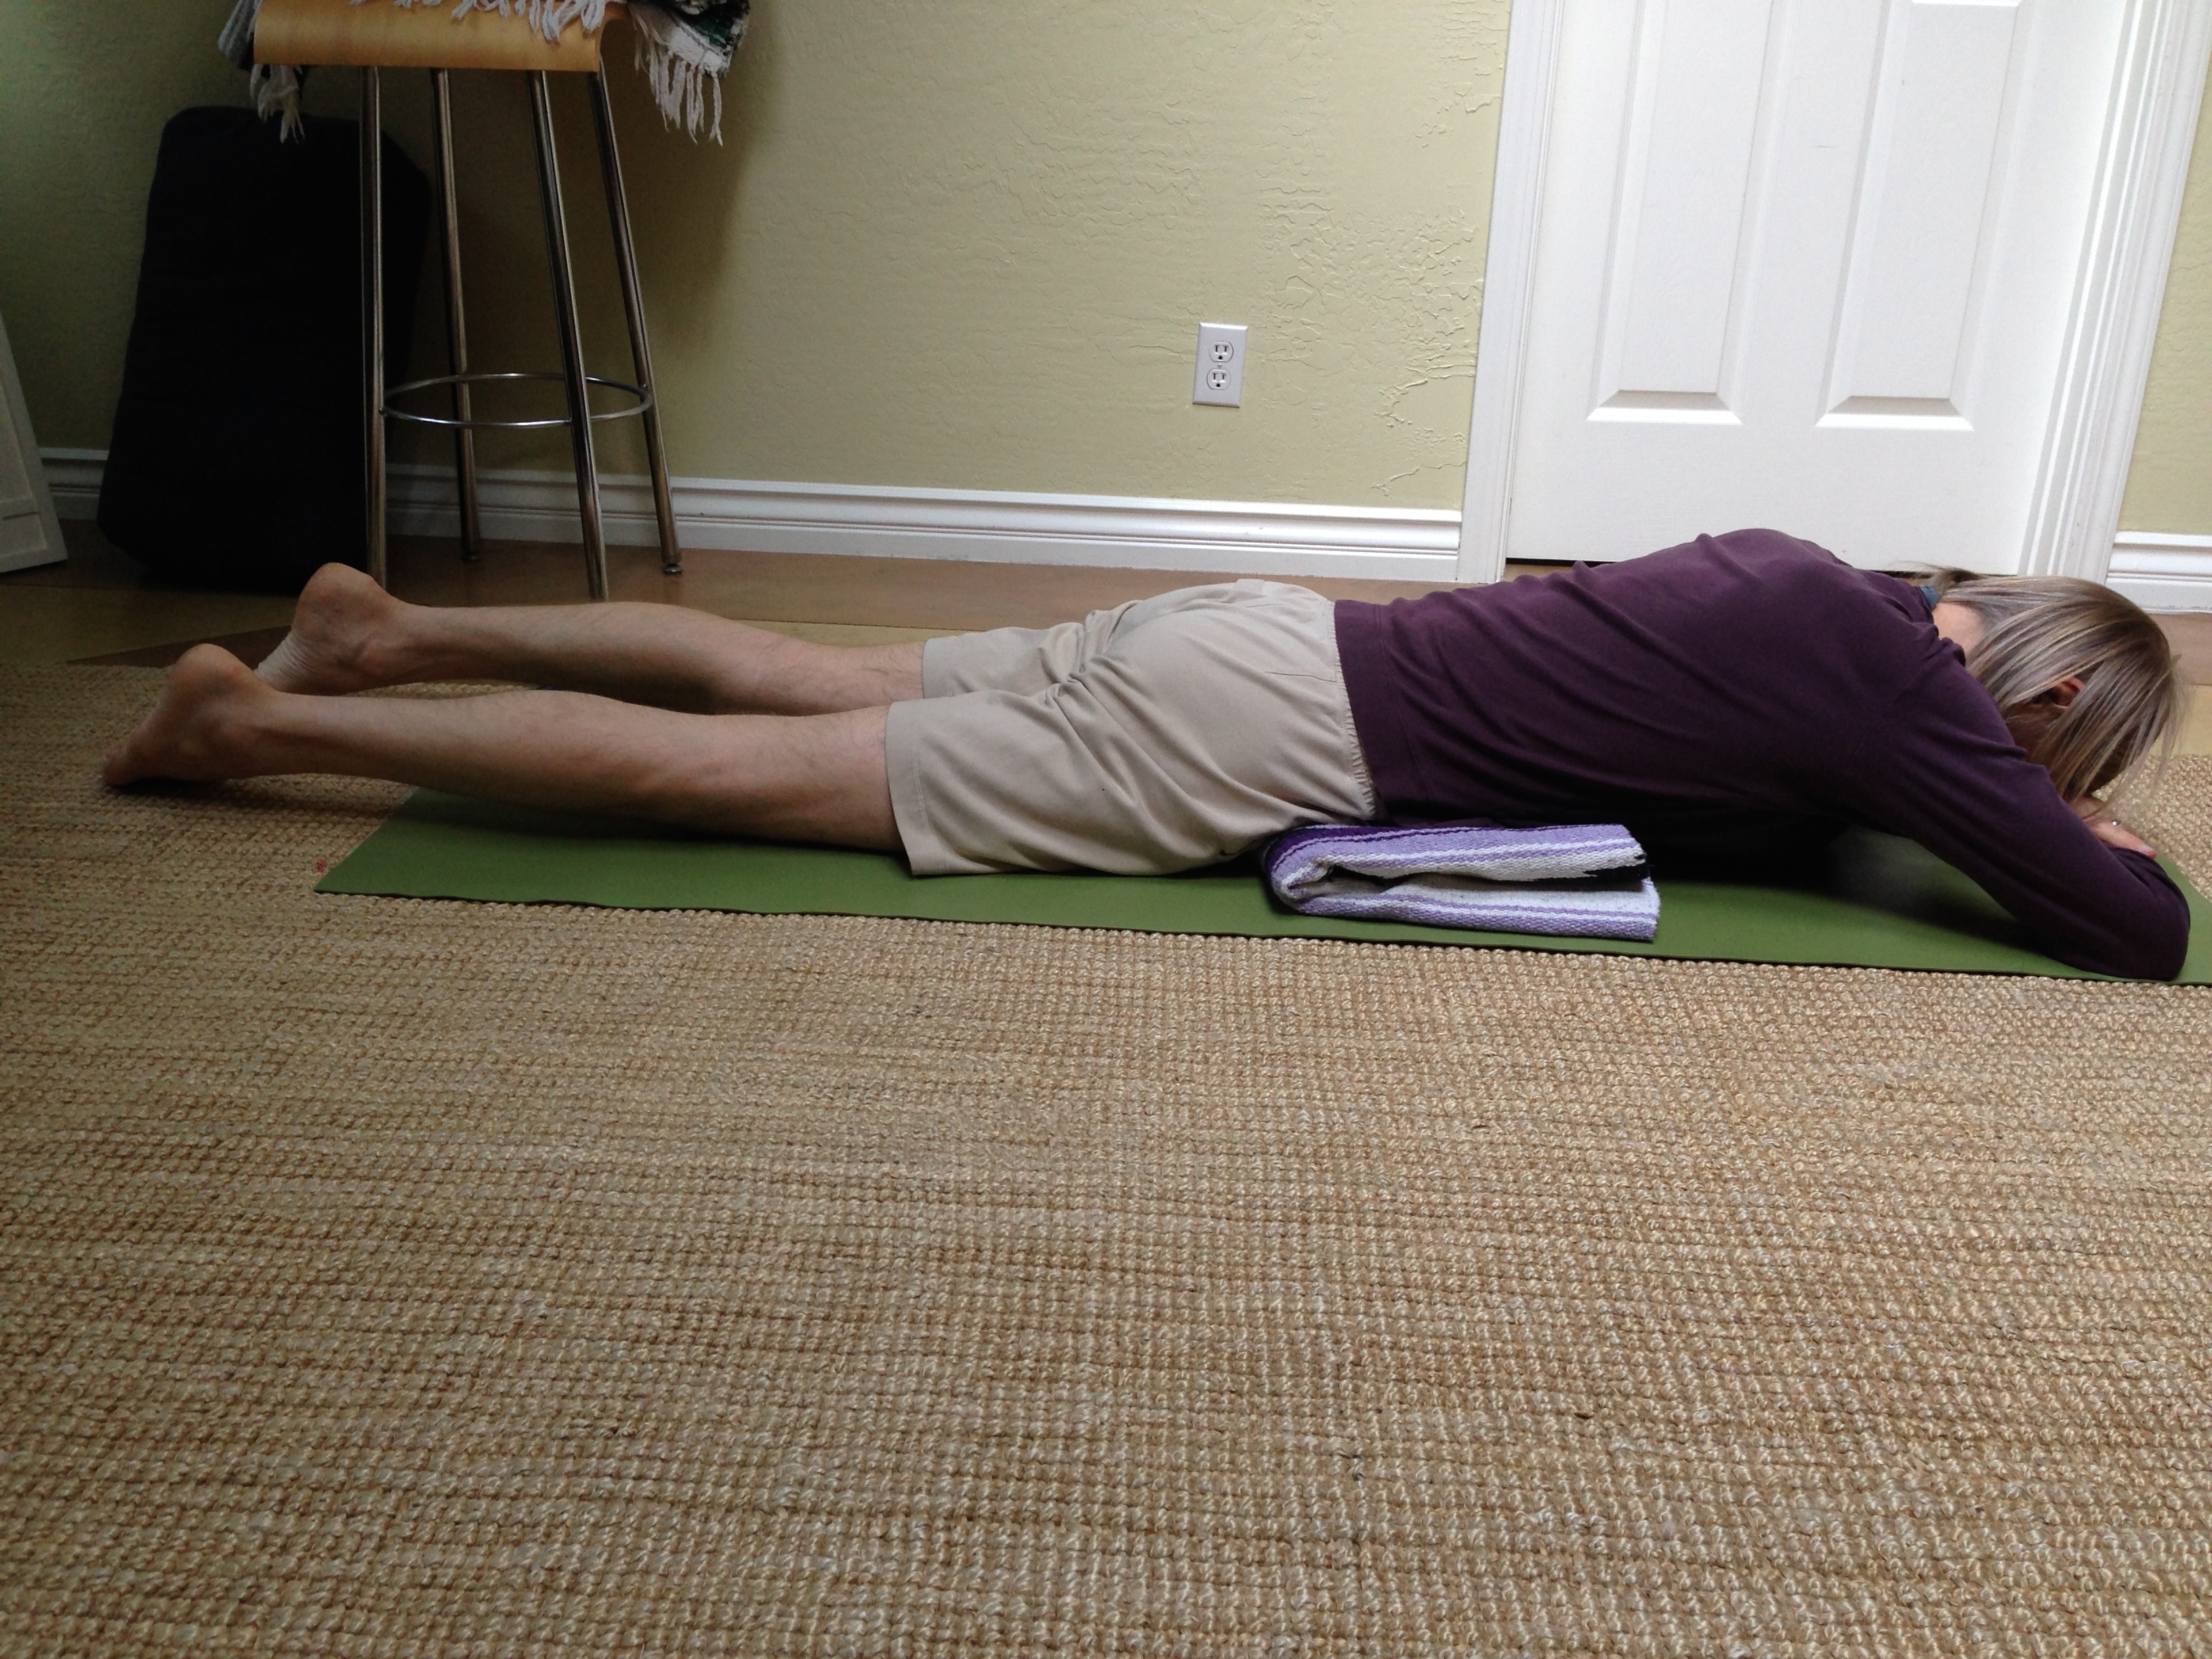
figure 1
If the 2 A.S.I.S. are not able to rest on the floor when the pubic bone is in contact with the floor the blanket support will offer something for the 2 A.S.I.S. to rest against. Whatever the case, getting the pubic bone in contact with the floor is crucial. Once you have it down, then lift your right leg off the floor while keeping the knee straight. Make sure the pubic bone stays in contact with the floor. This is hip extension (see figure 2).

figure 2
Hold the position for a few seconds, making sure that the pelvis doesn’t roll to one side when the leg is lifted. Lower the right leg and try it with the left leg. If your feel pain in your back and/or on either side of the sacrum (on the back of the pelvis) when doing hip extension as described above, try pushing the pubic bone down into the floor with moderate force and then lifting the leg again. If this doesn’t at least reduce if not resolve the pain then suspend working on hip extension this way and move on to the next option (see figures 3-5 below). If you can lift each leg with your pubic bone remaining in contact with the floor and without pain in your back, then try doing this in front of a mirror so you can see how much hip extension you actually have. How high does the leg lift before your pubic bone starts to lift as well? 6 inches? 10 inches? 1 inch? See what you’ve got currently so you have a baseline from with to assess progress.
Repeat this method of extending the hip 3-4 times on each leg, feeling the muscles in the back of the hip and thigh working to lift the leg. Continue to keep the knee straight and the pubic bone in contact with the floor. If your low back starts to hurt as you’re holding the leg up, decrease the height of the leg until the pain goes away and continue. As long as you’re not experiencing back pain, begin increasing the time of hold to 20-30 seconds. Then rest a few breaths and come up.
If your back hurts when you try the above, no matter how high or low you lift the leg, then try the following instead. Come to your hands and knees with your fingers and thumbs spread, your wrists directly over your hands and your knees directly under your hips. If you knee caps are sensitive to pressure, have your knees on a blanket for more cushion. Allow the pelvis to rotate forward and your back to arch as much as is comfortable. Try not to actively arch the back but let the arch happen by relaxing the abdomen toward the floor (see figure 3). Then, using your abdominal muscles, lift your lower front ribs up away from the floor and pull them in toward the spine until you feel the middle of your spine round out slightly. Be careful not to tuck your pelvis when you do this.
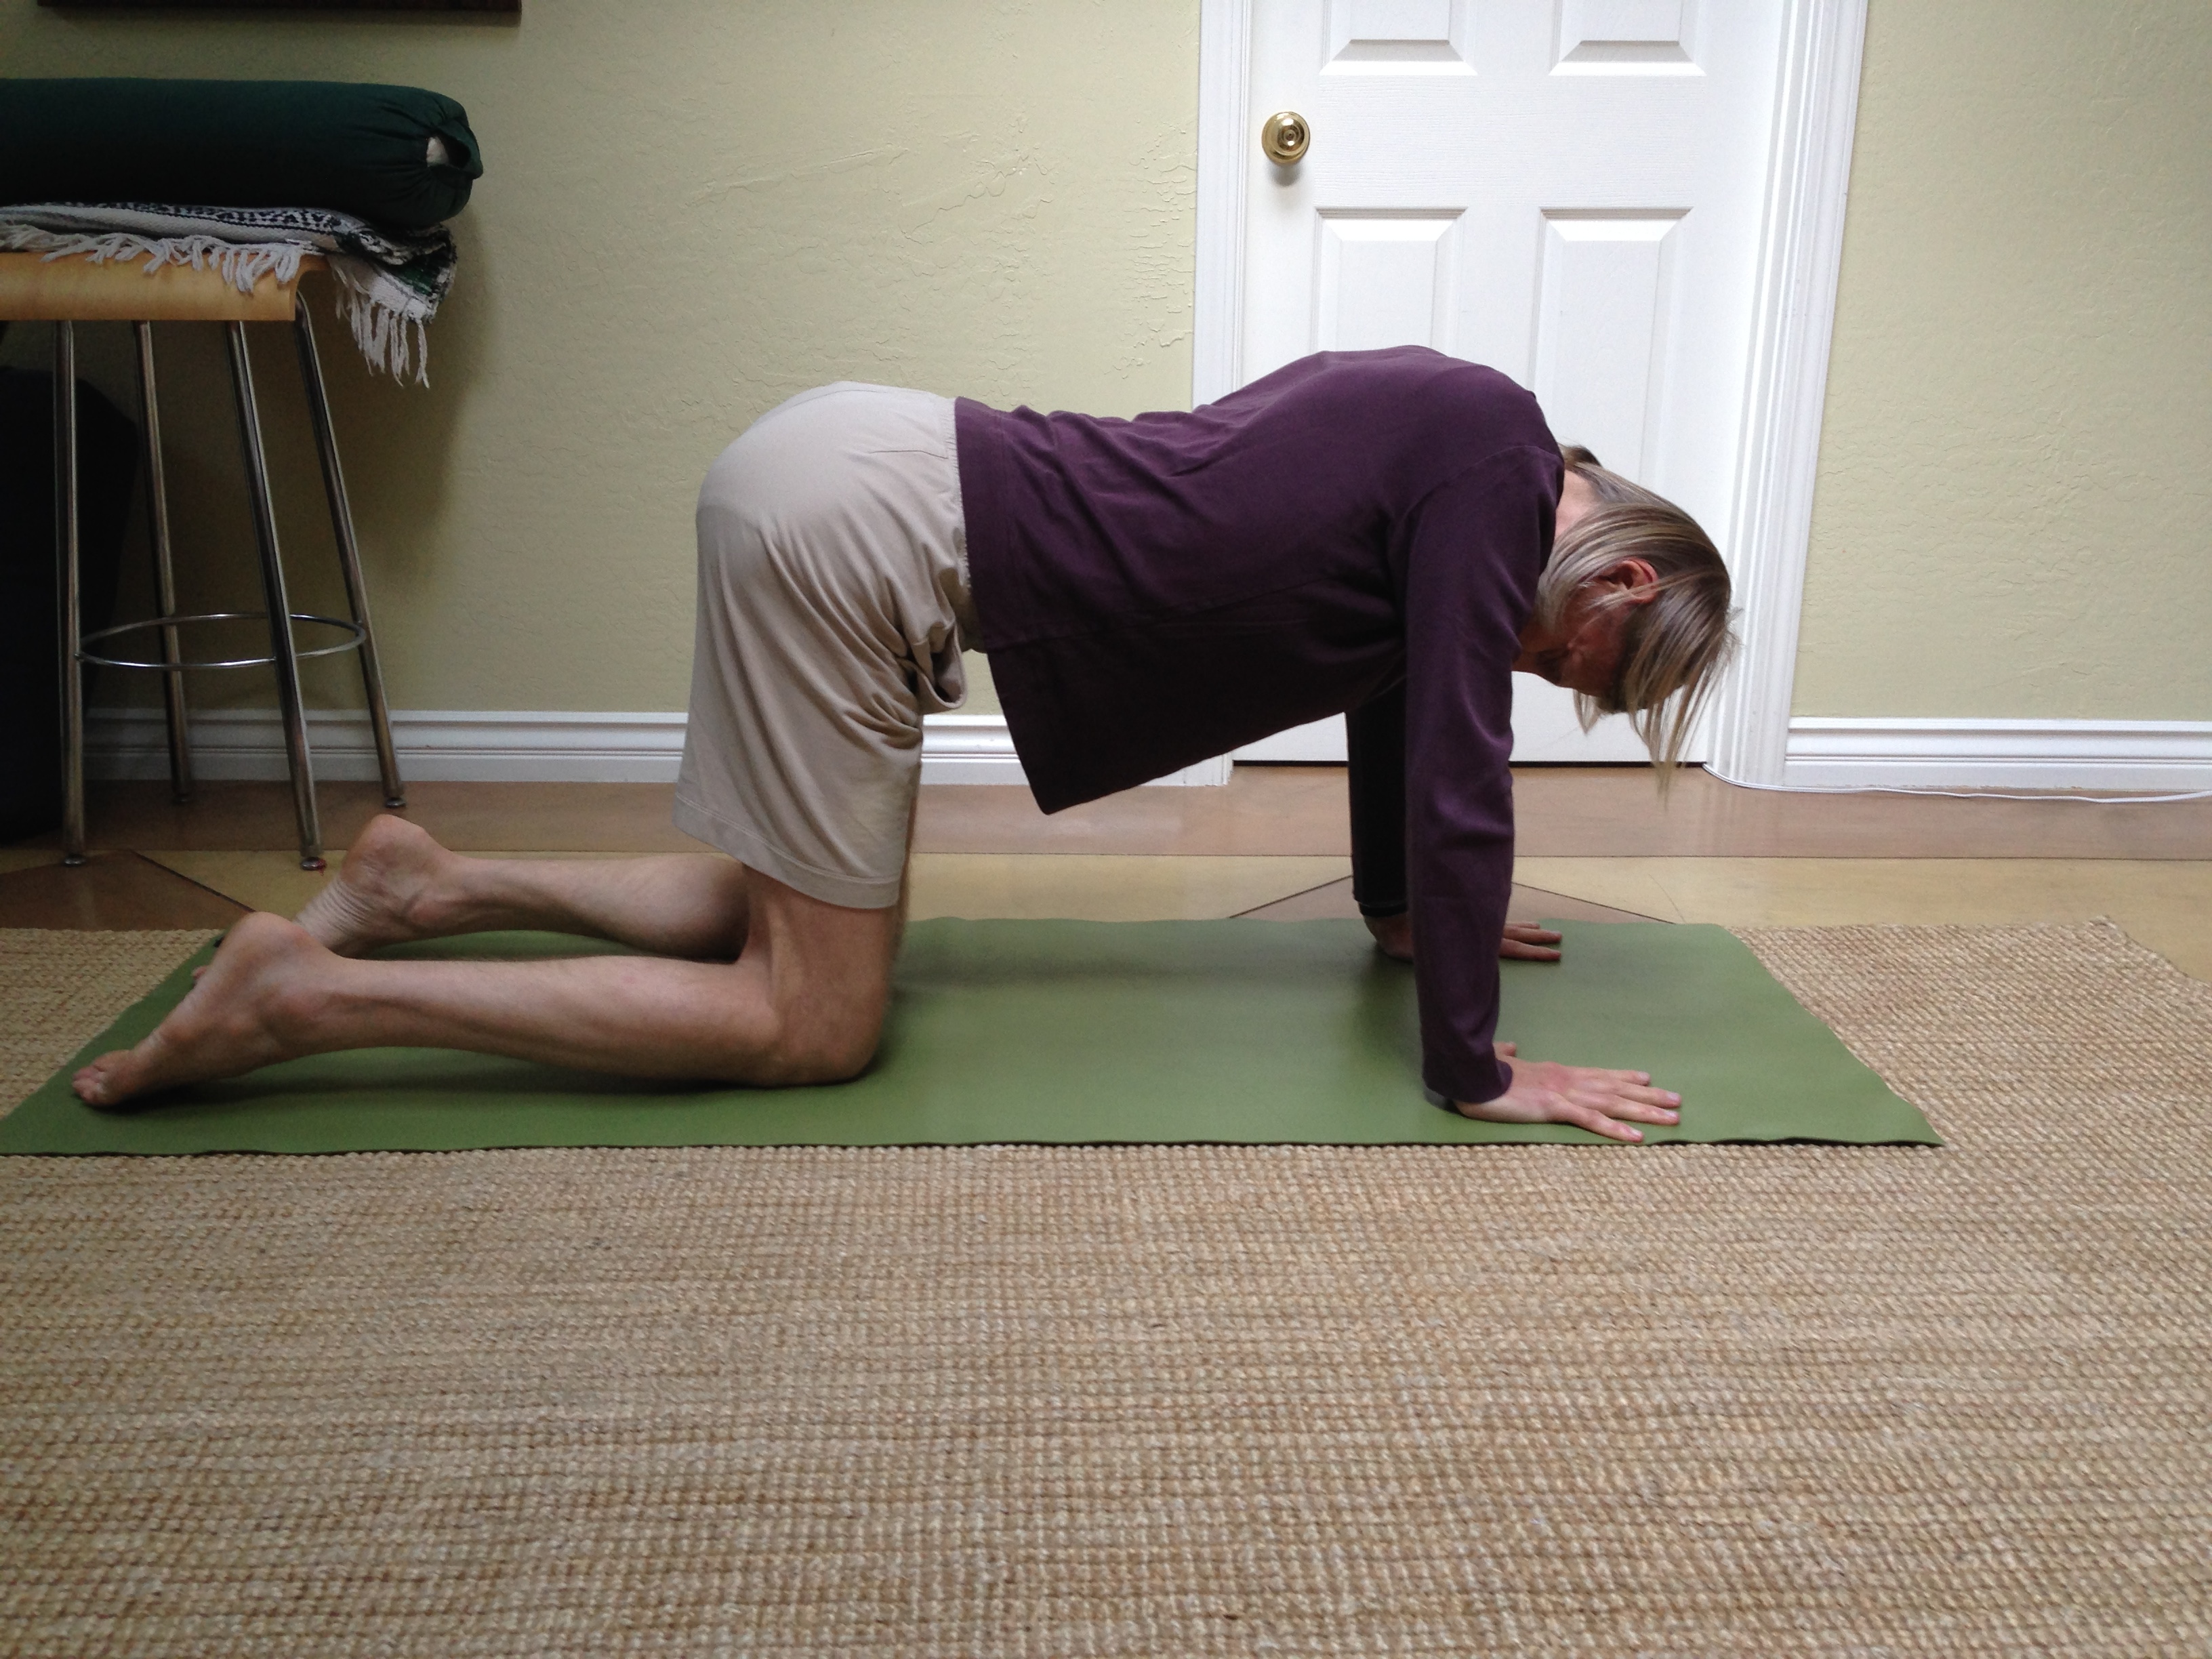
figure 3
You can use a mirror to get feedback. You should see a clearly concave lumbar spine and a clearly convex thoracic spine. If upon looking at your image in the mirror you find it’s hard to tell where the lumbar ends and the thoracic begins, continue to lift the lower ribs up and in toward the spine until you can begin to see the junction of lumbar and thoracic. Then lift up the portion of the thoracic spine in between the shoulder blades by pushing your palms into the floor with your arms held straight. Try to feel the rhomboids, the muscles that connect your shoulder blades to your spine, becoming longer and more active(figure 4).
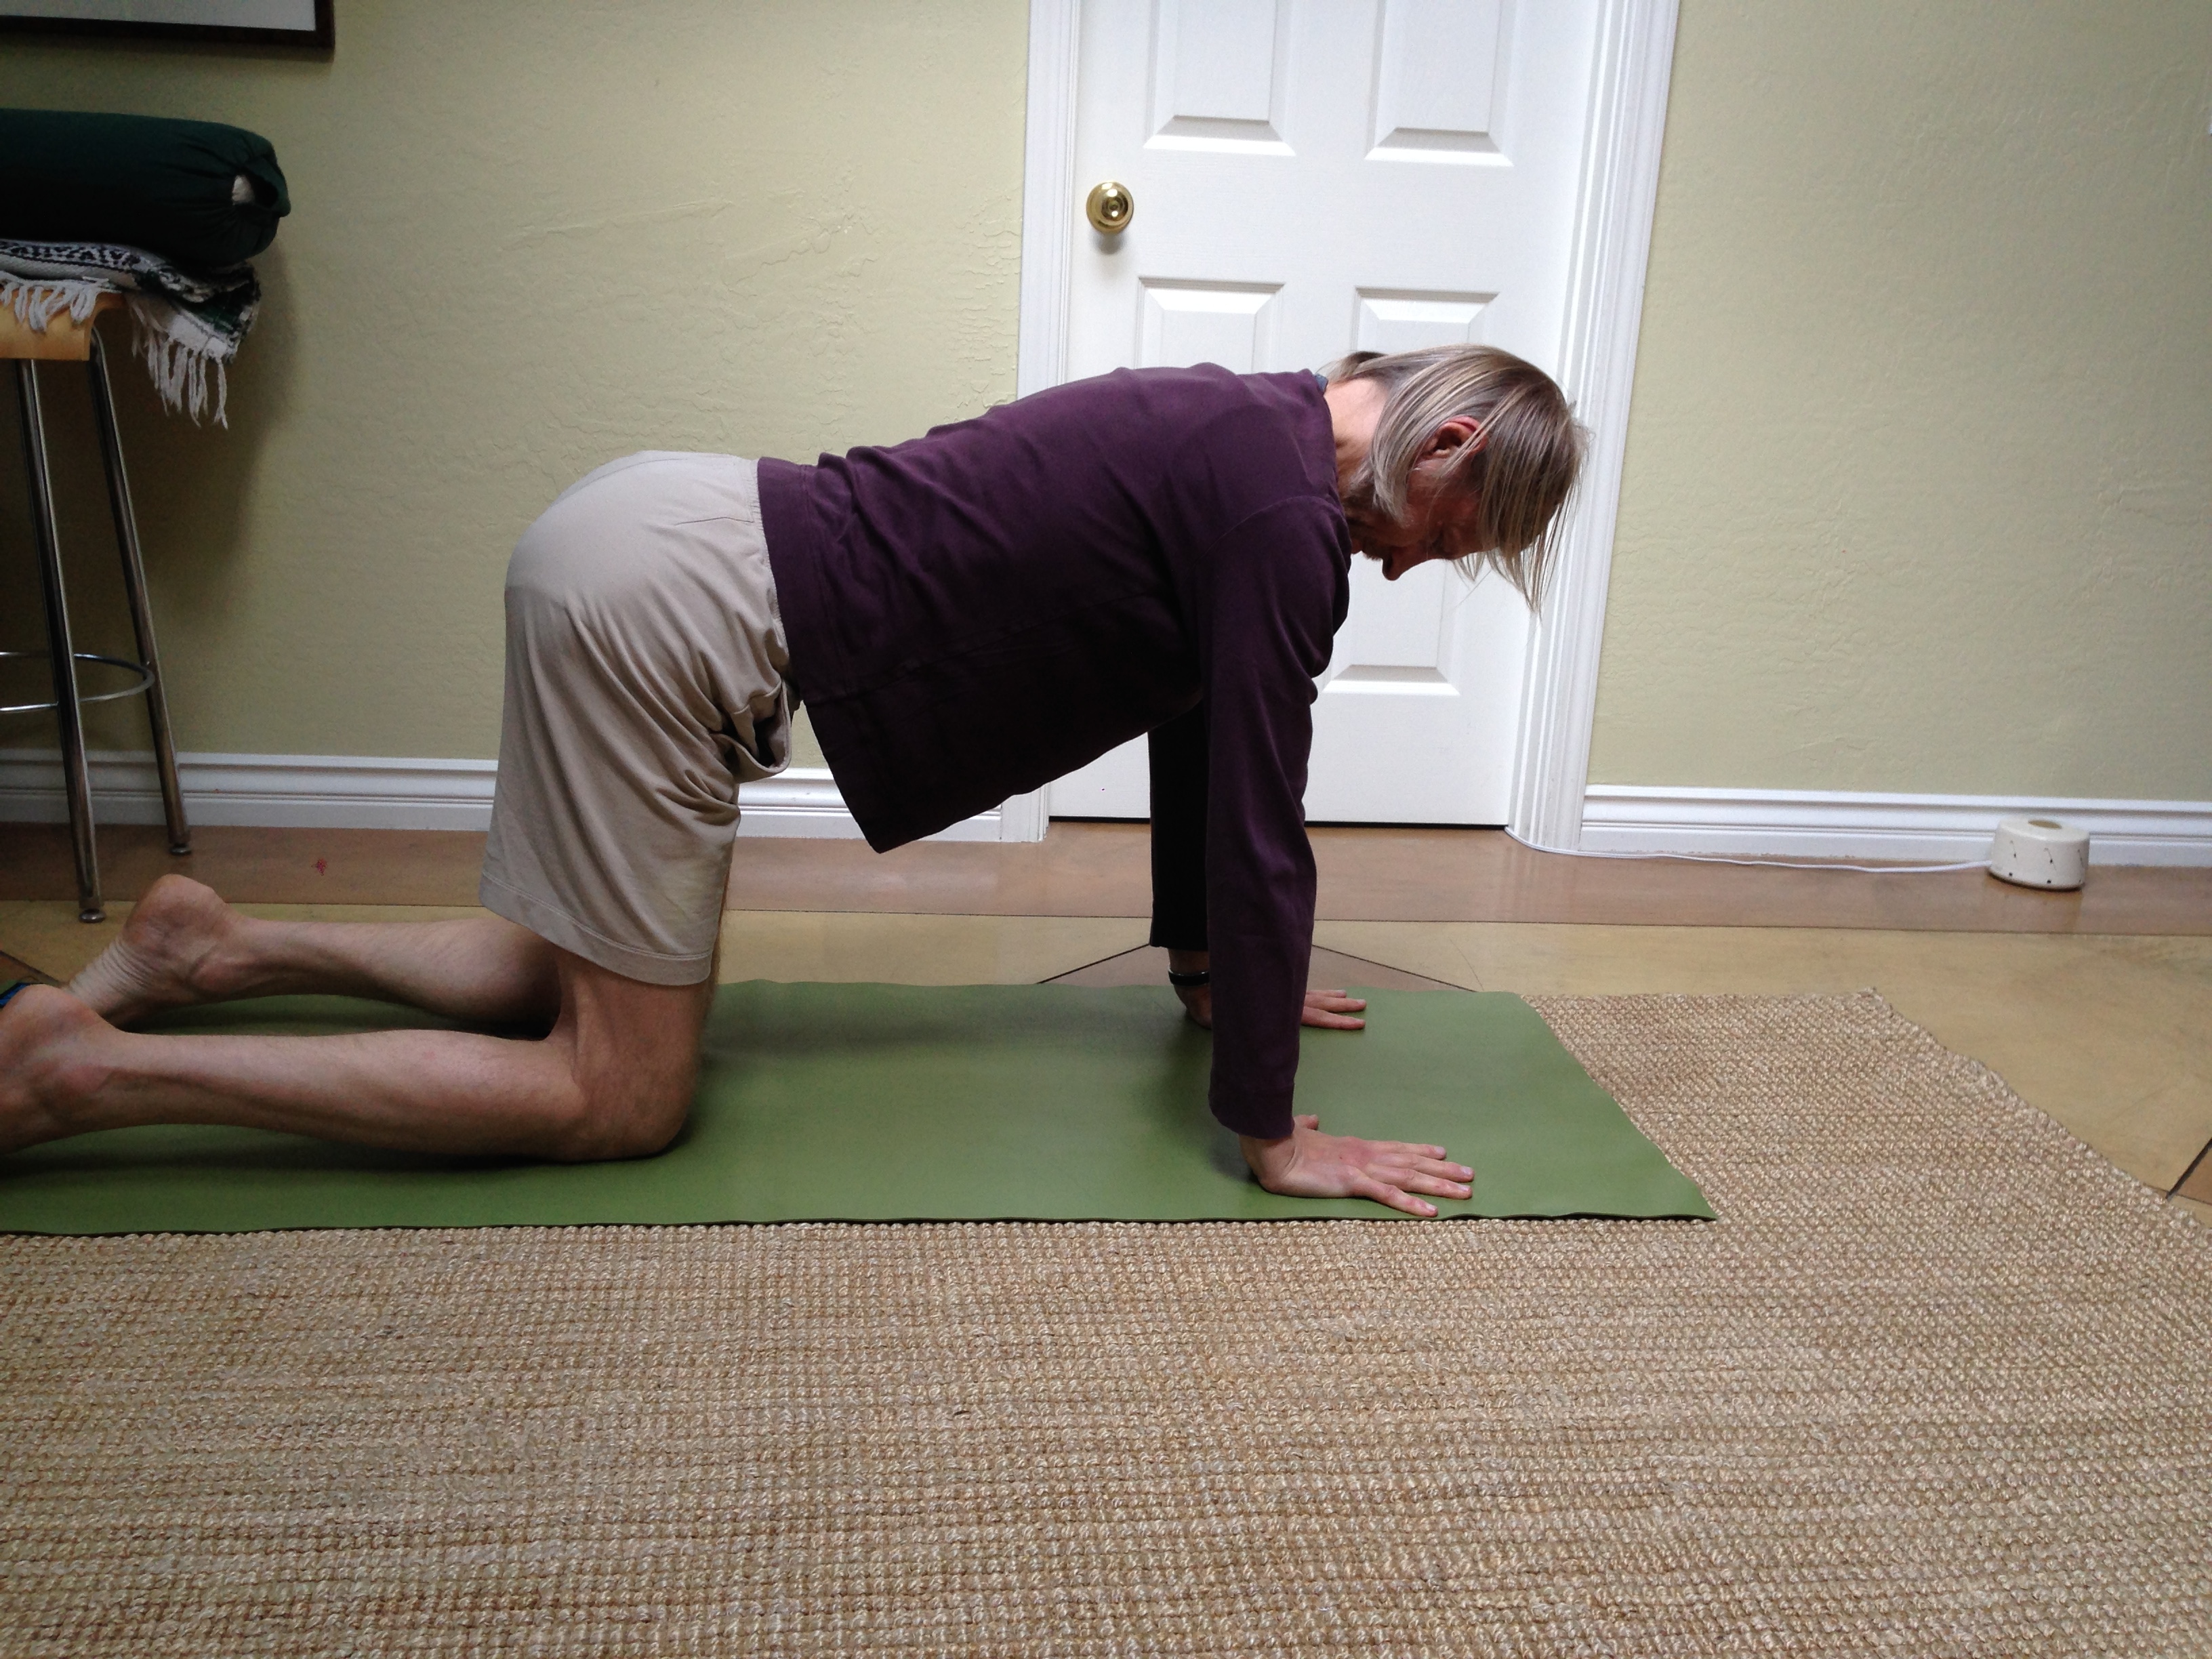
figure 4
Now push down through your left knee until your left hip engages and your right knee begins to lift off the floor. Be conscious of lifting the right knee up by using the left hip and not by using the muscles in your lower back. Once the right knee is lifted, stretch the leg out behind you until the knee is straight. Keeping the left hip active and the right knee straight, gradually lift your right thigh toward the ceiling (figure 5). Avoid arching your back and dropping your lower ribs toward the floor. Also be sure to keep the upper thoracic spine lifted and the shoulder blades wide. Hold the leg up for 10-15 seconds, then lower the leg and repeat on the opposite leg. Repeat each side 3 times.
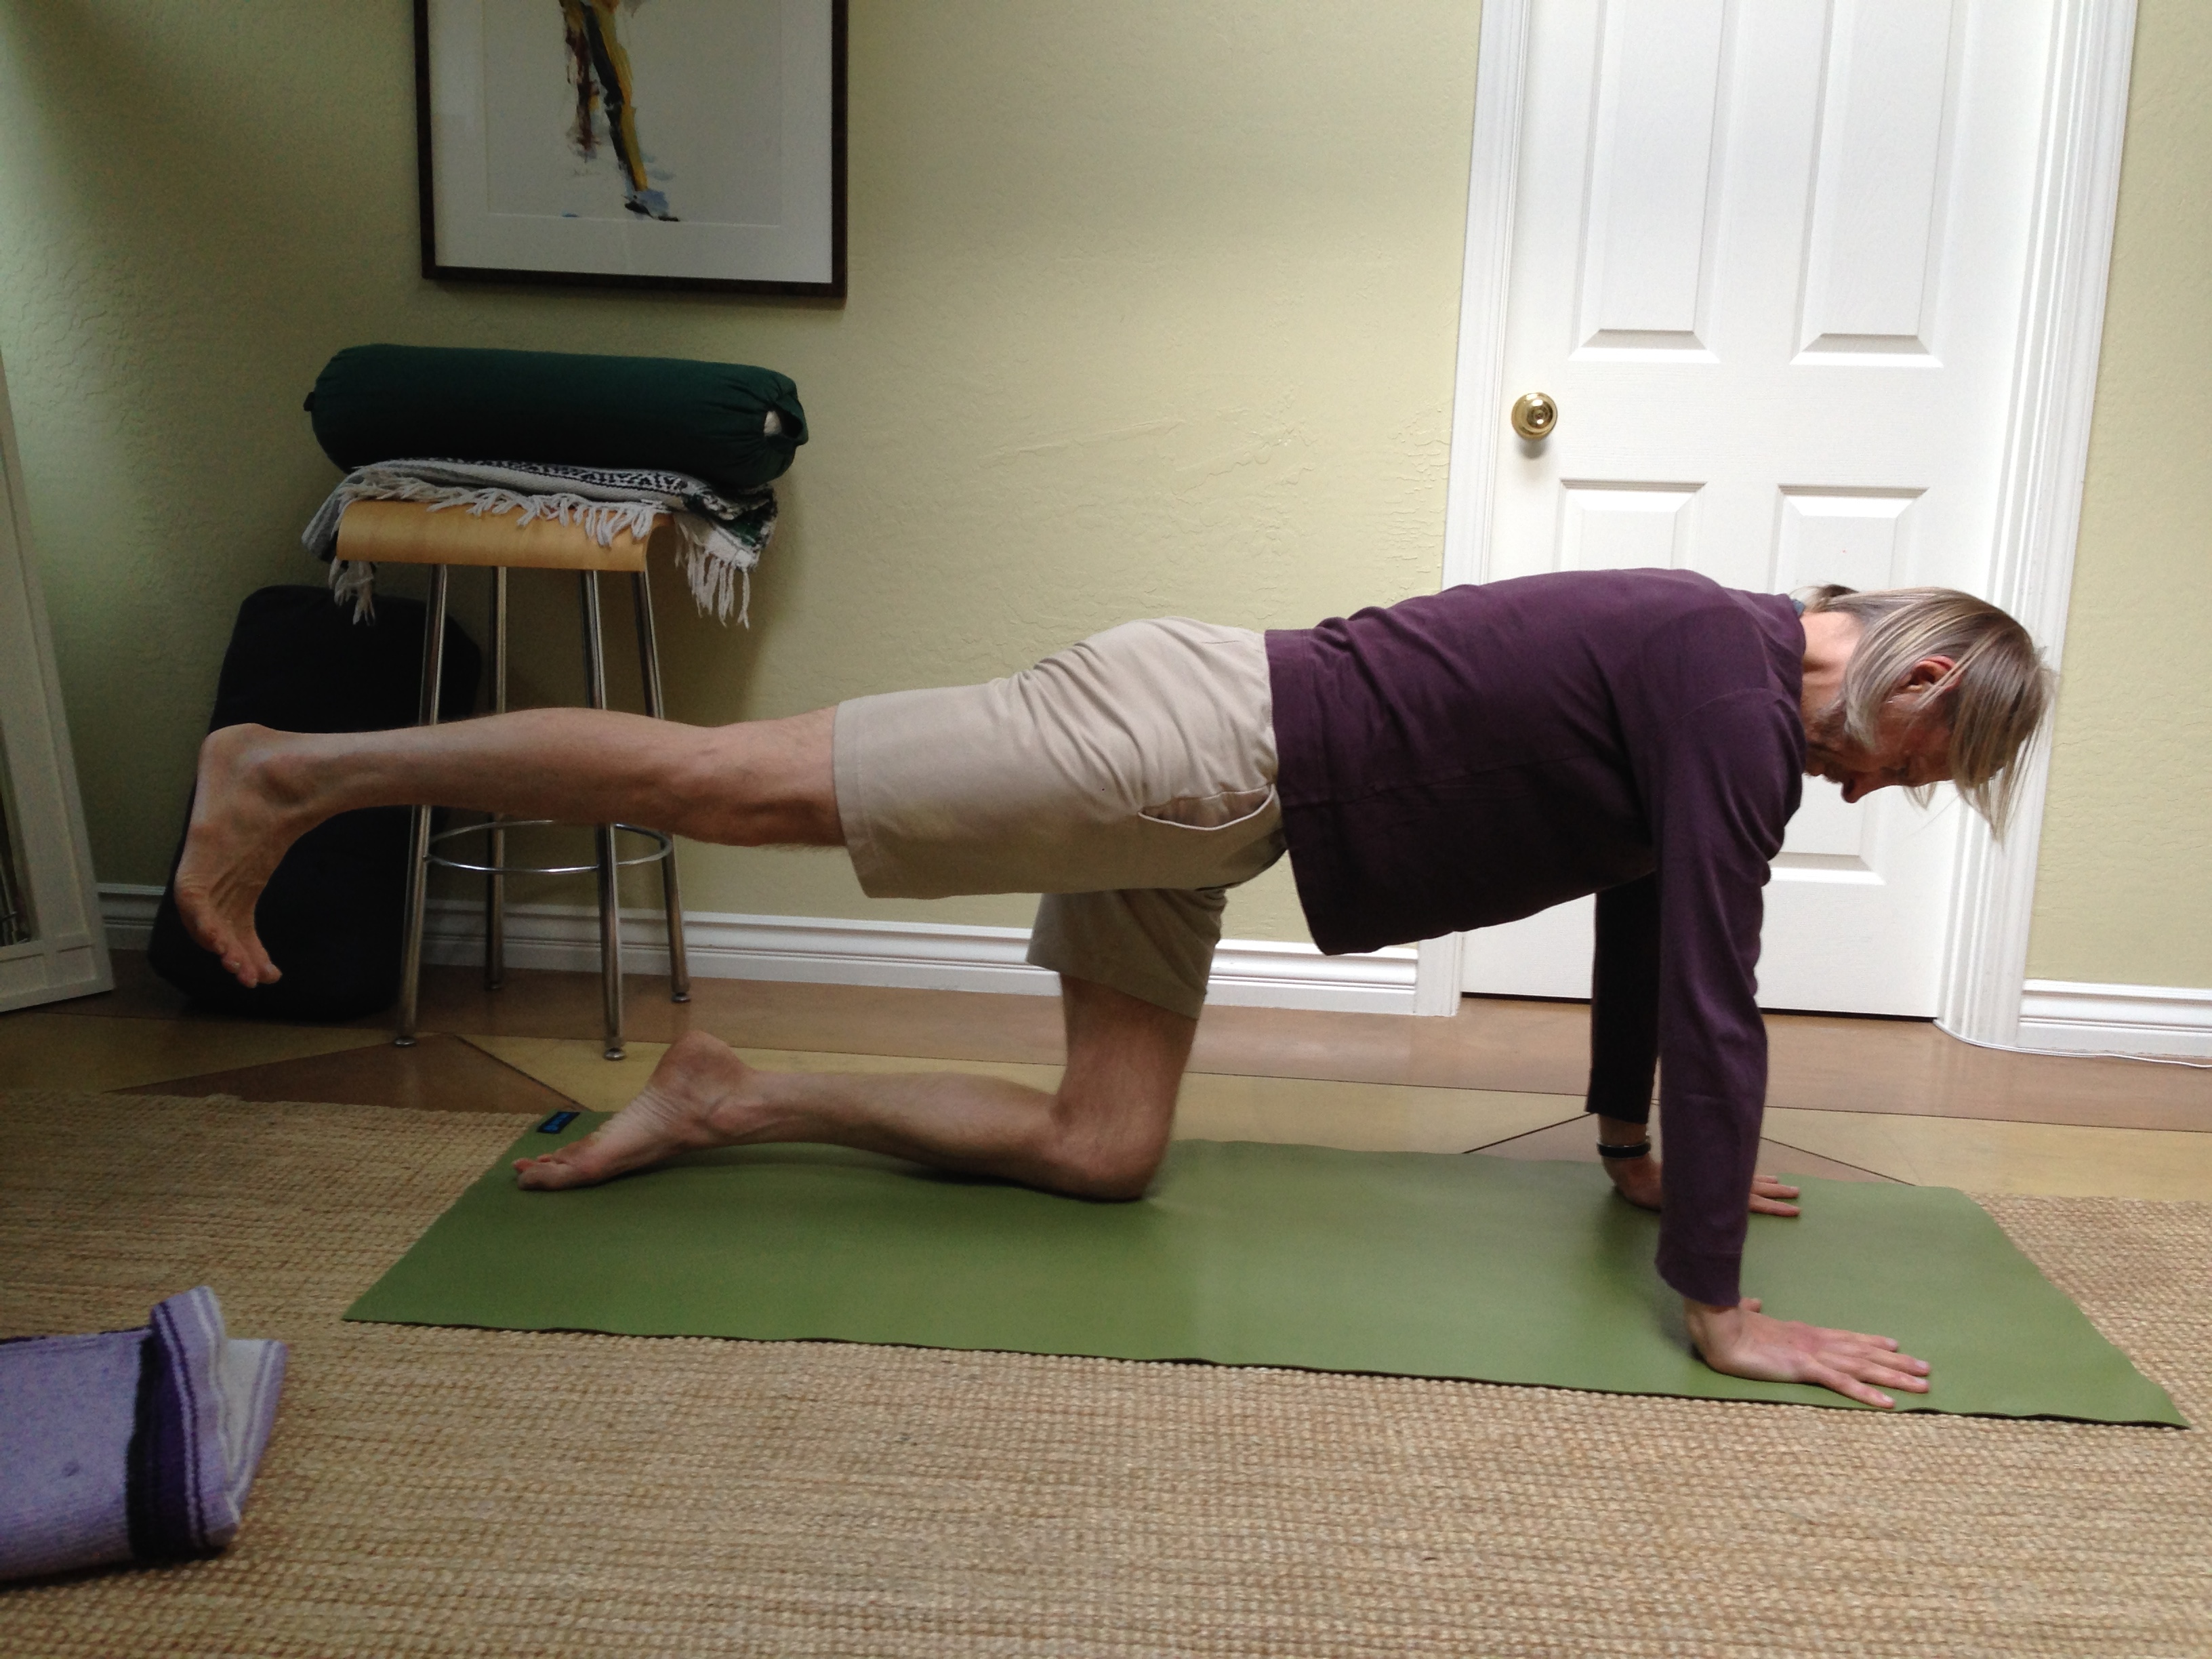
figure 5
This is also hip extension and this version will typically work for everyone and is particularly helpful for those who’s hip extension is limited. The exception is anyone who cannot bear weight on their hands this way. If this includes you then seek help from an experienced teacher to work on your hip extension. There are many postures that can be used to increase hip extension in addition to the above. In the part 3 I will discuss another of my favorites!
What is a Hip Opener? (part 1)
Considering how often they are requested, “hip openers” have to be one of the more desirable categories of postures offered at any yoga class, and for good reason. Any student of yoga wants more open hips as the benefits of increasing the mobility of the hip joints are numerous. Increased mobility of the hips can relieve hip, low back and knee pain, as well as improve leg strength, balance and pelvic floor function, to name just a few. More mobile hips are also essential for performing more advanced postures.
But common approaches to opening the hips taught in yoga classes frequently range from ineffective to downright injurious. Considering the fact that hip replacement surgery is becoming commonplace in the western world, the dubiousness of the “hip opening” often offered to yoga students is unfortunate to say the least. Especially when, as you’ll see here, a little knowledge and a bit of know how is enough to allow anyone who’s interested to increase the mobility of their hips safely and effectively.
So what is a safe and effective way of hip opening? It starts with seeing where our body is actually at and understanding where we want it to go and how to get it there. So first we need to look objectively at the range of motion our hips currently have. Next we need to learn to see what is a movement of the hip joint and what is a movement of some other part of the body. Finally, we need to learn ways of increasing our range of motion (ROM) that maintain the integrity of the hip joints and do not place inappropriate loads on the spine or the knee.
The hip joint has 6 different ranges of motion. These are flexion, extension, external rotation, internal rotation, adduction and abduction. Flexion involves the thigh bone or femur moving toward the front of the pelvis or the pelvis rotating toward the front of the femur. This is the ROM that is most crucial for doing a forward bend. Extension is the opposite of flexion. In hip extension the femur moves toward the back of the pelvis. Extension is the ROM used primarily in back bends, but it is also important for walking.
External and internal rotation are the femur rotating away from or toward the opposite leg respectively. Adduction and abduction are the femur moving laterally (as opposed to rotating) towards and away from the opposite leg respectively. Adduction also describes when the femur moves across the midline of the body and beyond the the opposite leg and hip. All of these ROM’s are important in both standing and seated postures.
Of all of the ROM’s of the hip I mentioned above, flexion is the movement our hips do most often. Flexion is the primary movement done in forward bends, but it’s also the hip motion we do every time we sit and we should but don’t necessarily do every time we reach forward to pick something up or use the sink or the toilet (we often bend the spine instead of the hip). Therefore improving our hip flexion will not only help our forward bends in yoga but also help us with the everyday activities that, when our hip ROM is limited, put constant stress on our knees and lower backs.
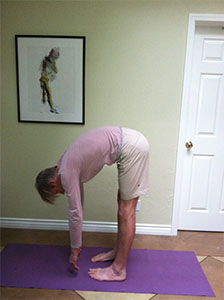
Let’s start by looking at how much hip flexion we have. Stand with your feet separated about 5-6 inches and parallel. If possible, stand profile to a mirror so that you can see the shape of your spine. If you tend to get lower back pain when bending forward, put a chair or stool in front of you so you can take some support from it. Next, move your hips back just a little, that is, just until you begin to perceive the pelvis tilting forward (see figure 1). Now look at the shape of your back in the mirror. The lower part of the spine or lumbar spine should be somewhat concave. If you don’t have a mirror, you can try feeling the shape of your spine with your finger tips(see figure 2). If the lumbar does not curve in but rather rounds out, lift your sit bones and your tailbone up away from your feet until you’ve restored the concave shape. This is hip flexion.

figure 1
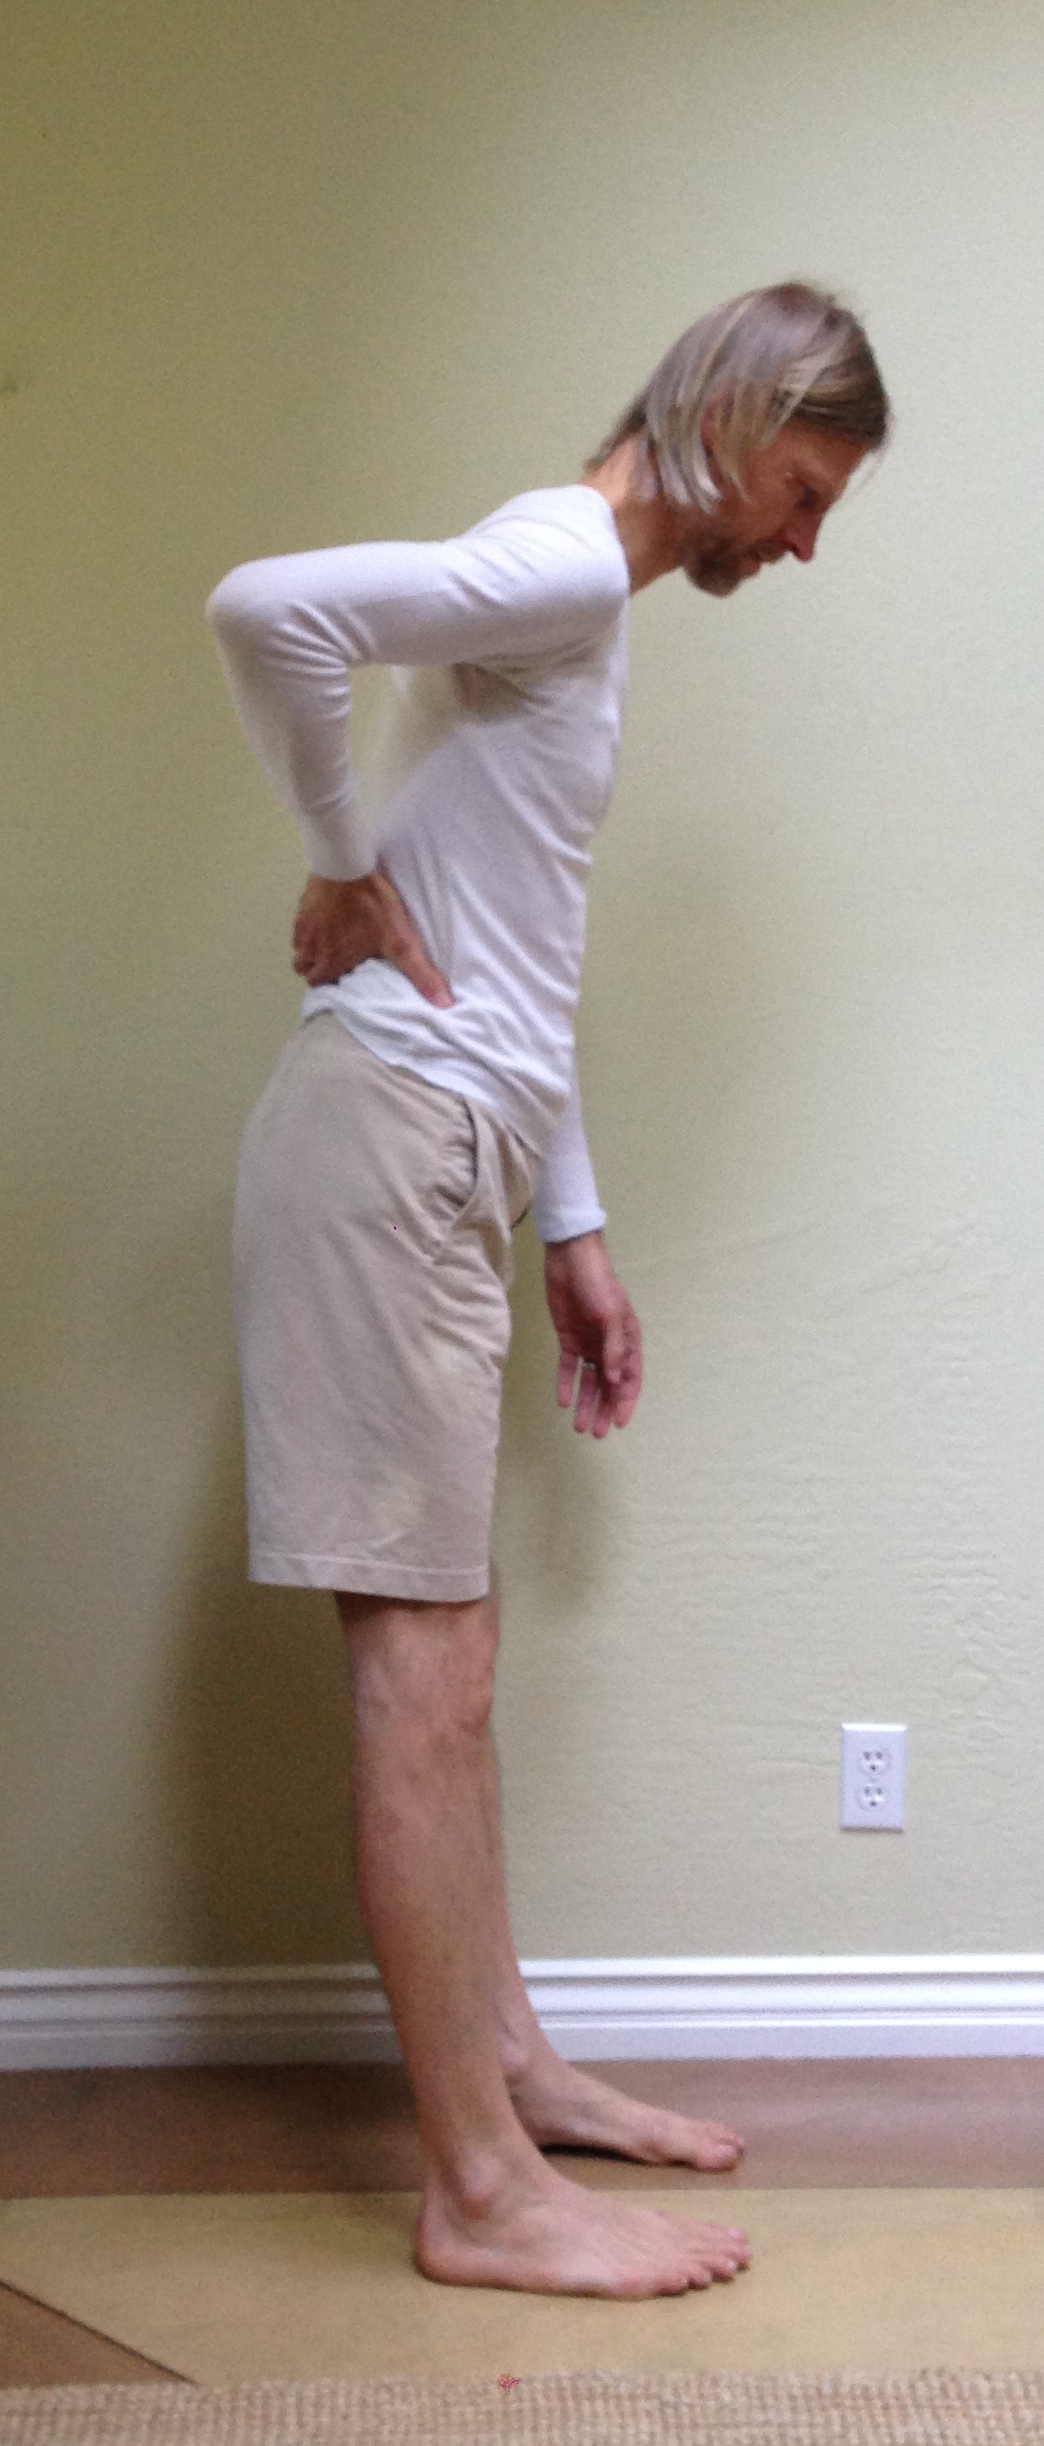
figure 2
Once you have established a concave lumber position in this very modest forward bend, continue to move your hips back and lift your sit bones up to increase hip flexion. Still using the mirror or your finger tips, notice when your pelvis can no longer tilt forward and the shape of your lower back starts to change. When it does you have reached the end of your ROM of hip flexion and have begun flexing your lumbar spine instead (see Figure 3). If you do this enough it will eventually cause back pain and may compromise the integrity of the spinal joints. Conversely, if you can learn to maintain your lumbar curve more often it will help develop the ROM in your hips you need to do deep forward bends safely.
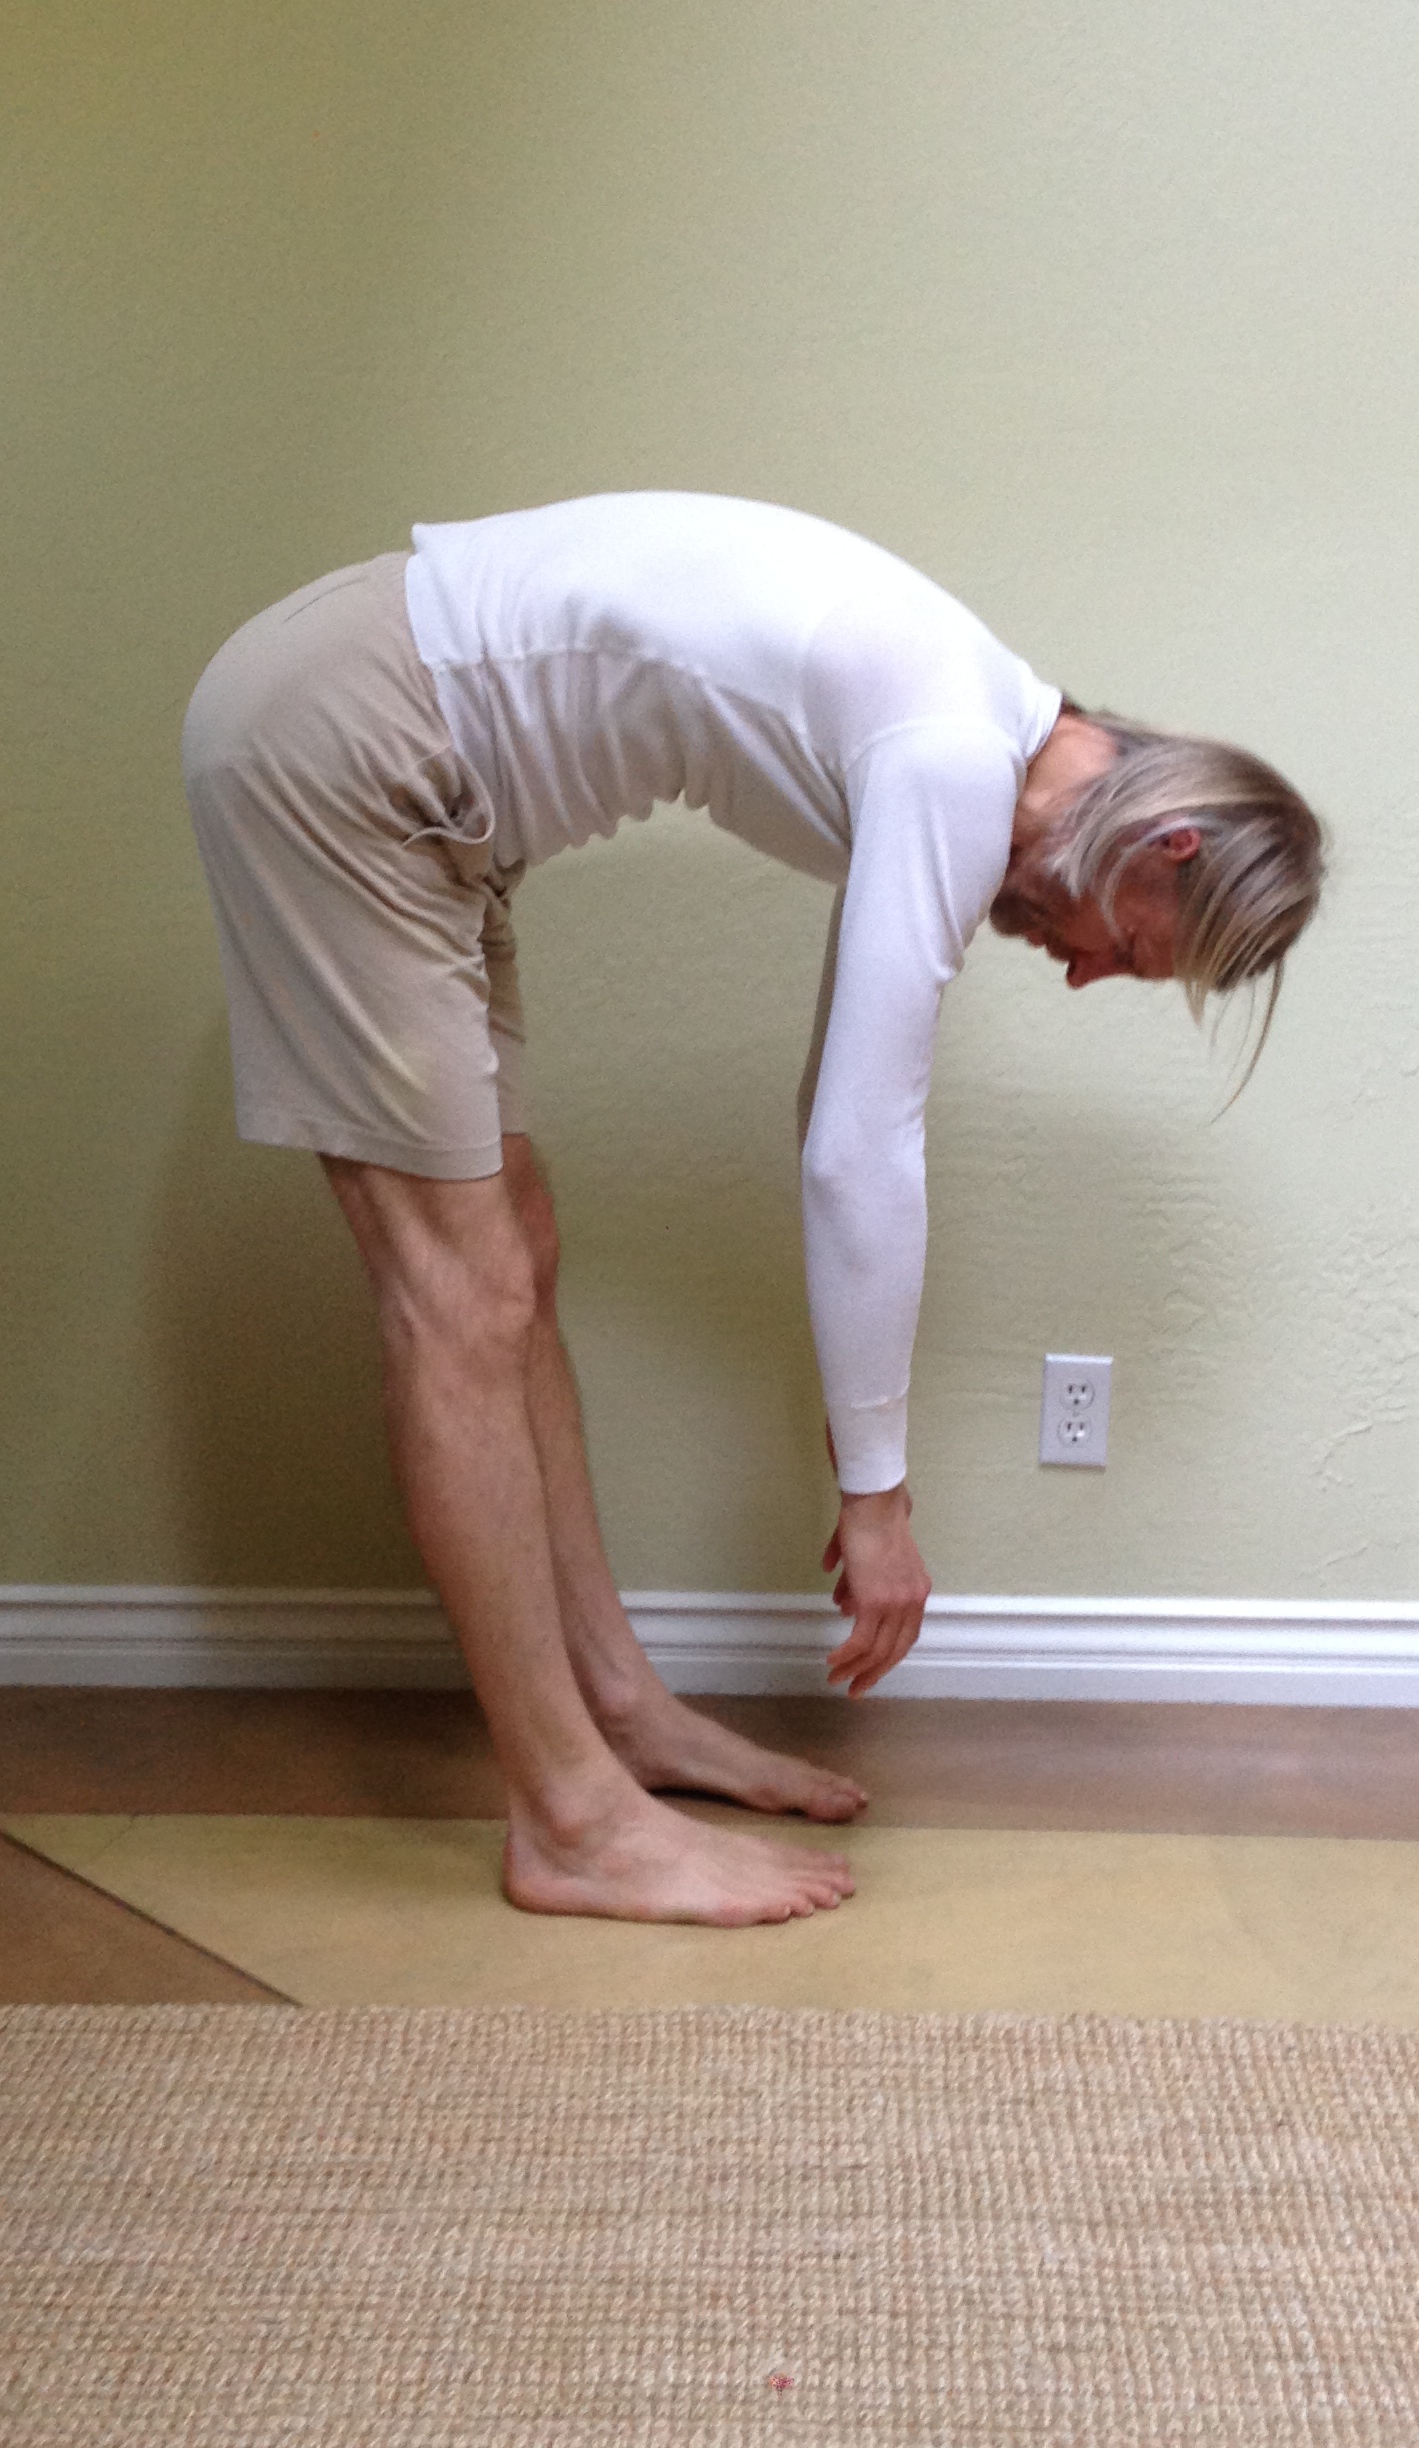
figure 3
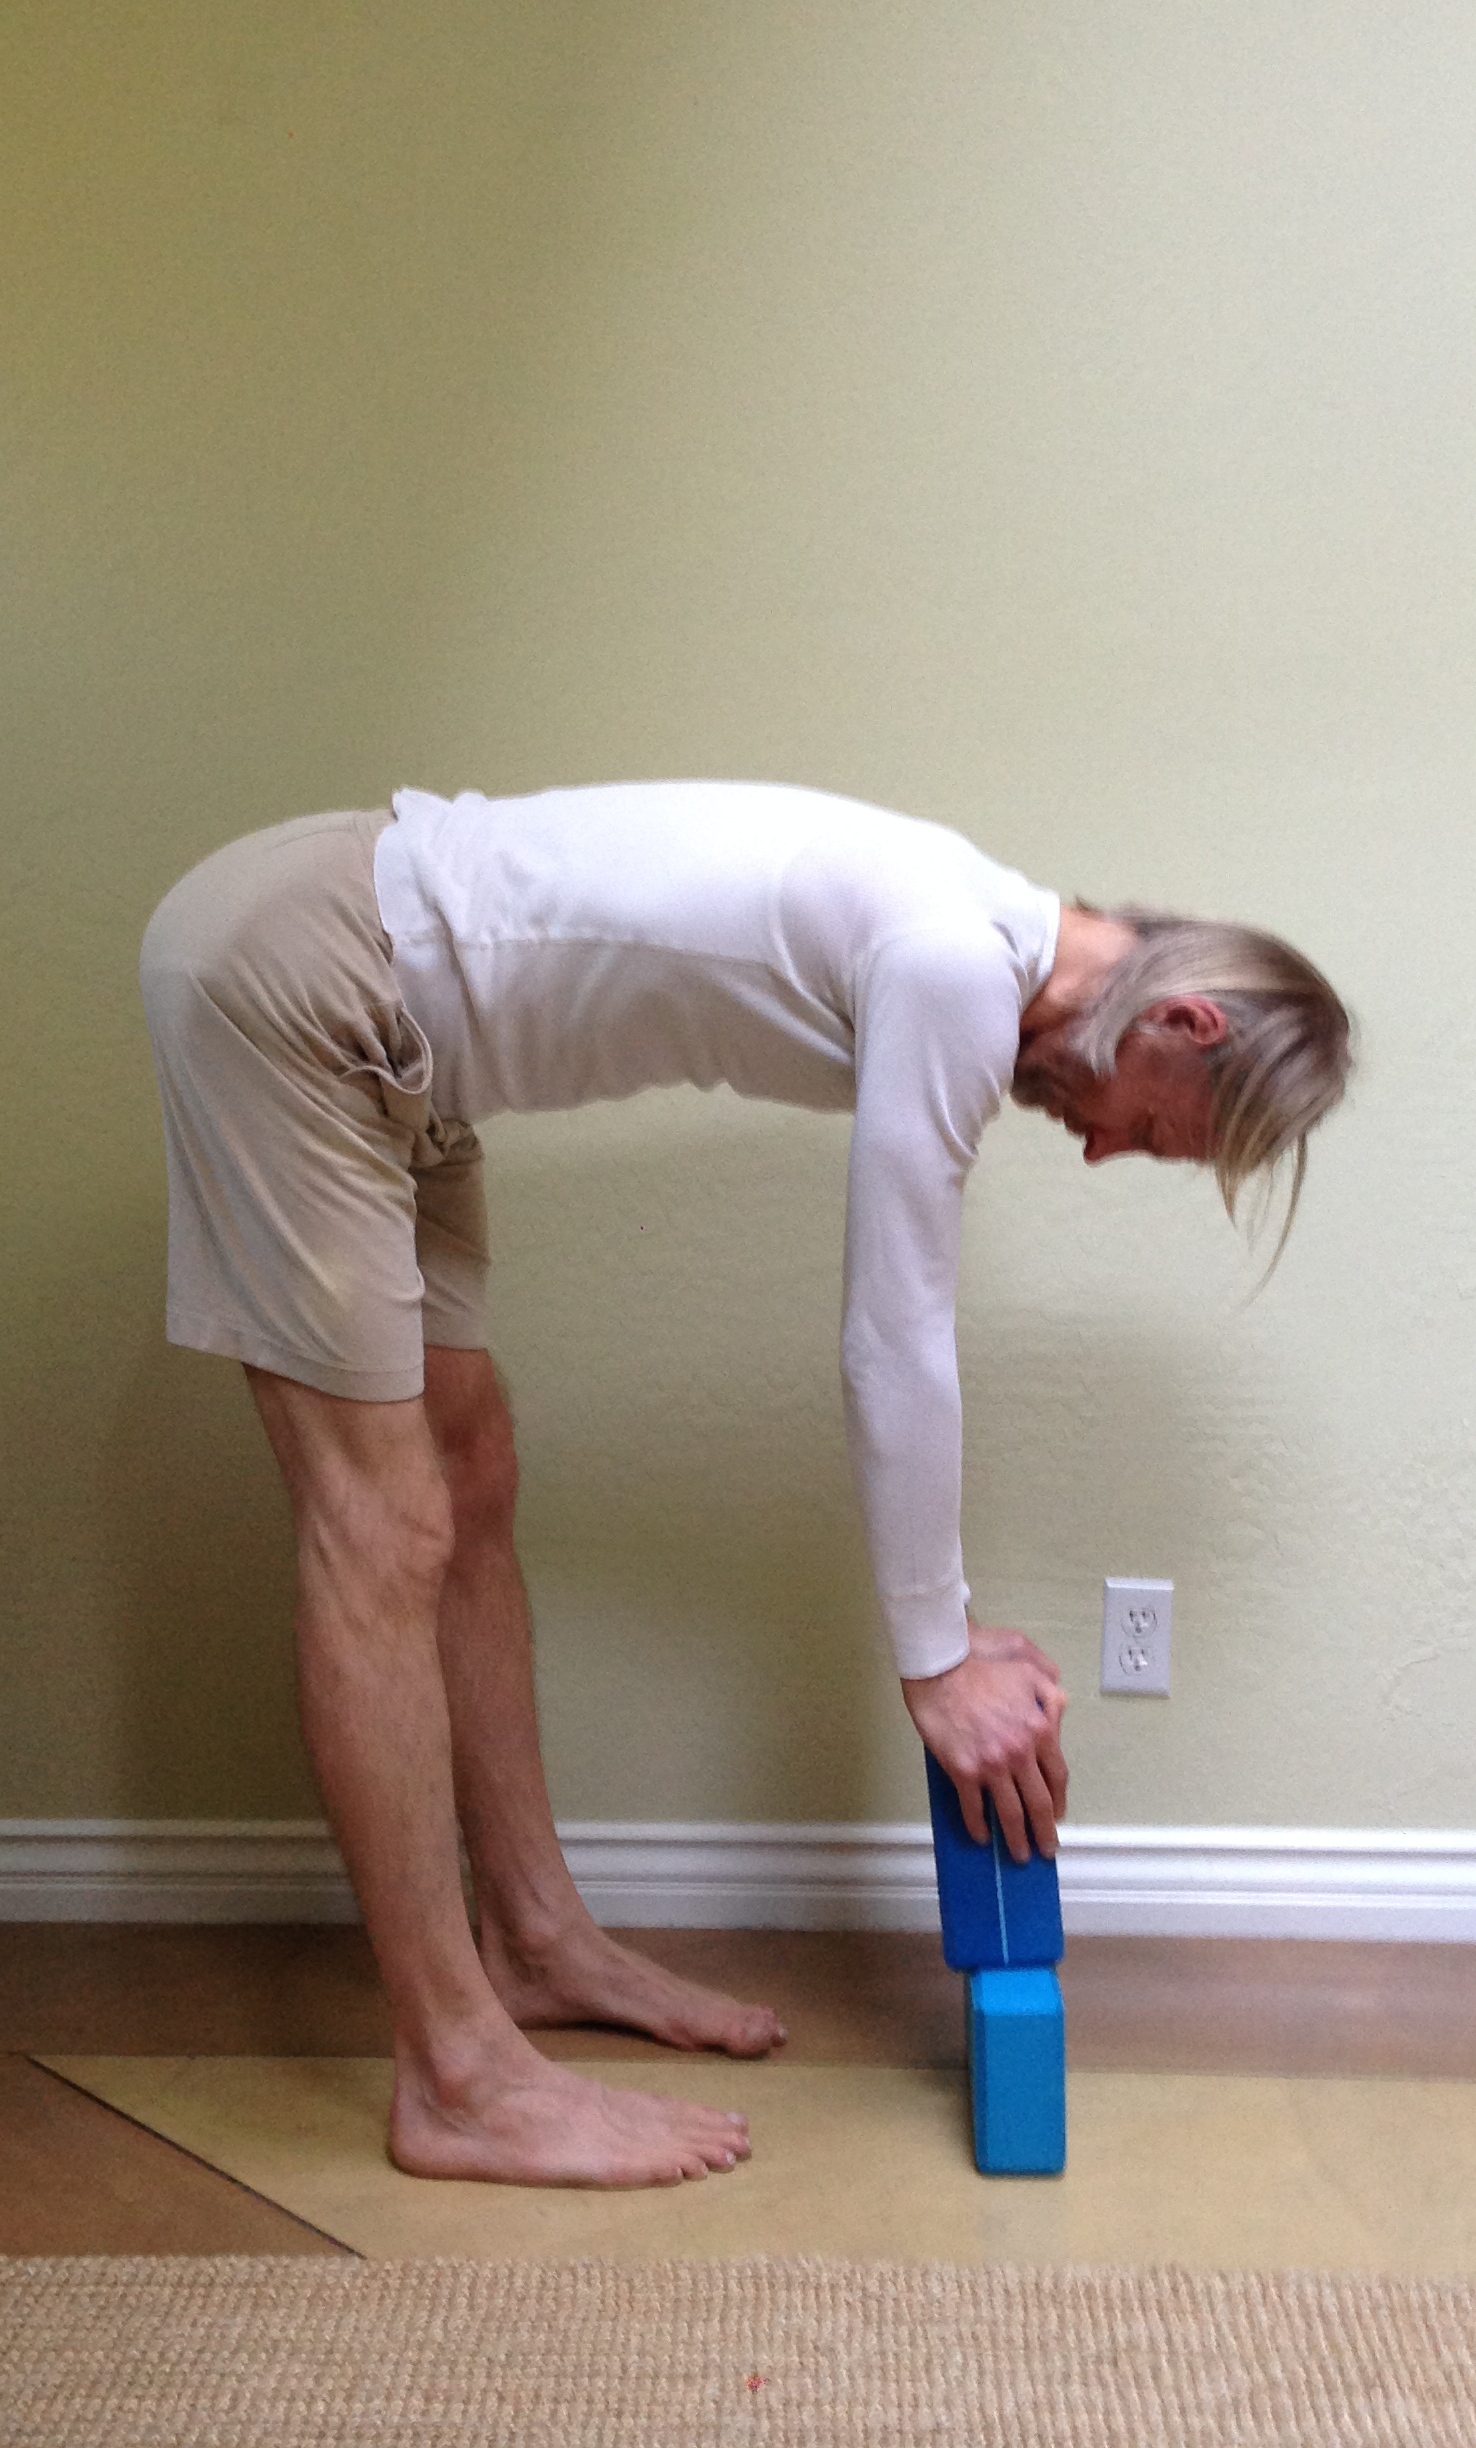
Now lift your trunk slightly back up until you have restored the concave lumbar position. To establish a marker, see how far your hands are from the floor. You might use yoga blocks, for example, to see how far you are. Are you one block? Two blocks? A block and a half? Get an objective measure you can use as a baseline you can refer to later and evaluate progress (See Figure 4). Then come up from your forward bend, preferably with your knees straight. If your back hurts coming up with the knees straight then bend your knees to come out. As you hip ROM improves and your legs get stronger you will gradually find it easier to come out of this forward bend without bending your knees. This is another measure you can use to monitor your progress.
figure 4
To work on increasing your ROM of hip flexion, repeat the above but begin to hold the position for a period of time. Start with holding the fully hip flexed position with your still concave lumbar for 20-30 seconds. Repeat it 3-4 times. In time you’ll find you can increase your time in the posture and with increased time you’ll see progress. Your hip flexion with increase and your forward bends will improve!
Stay tuned! Next we’ll look at hip extension.