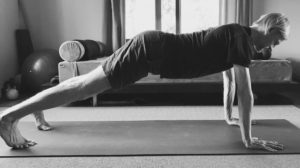
“3 Months Prone” posture
You’ll see in this video my tendency to use the buttocks to stabilize my pelvis. This tendency should really be minimized or eliminated all together. Give it a try!
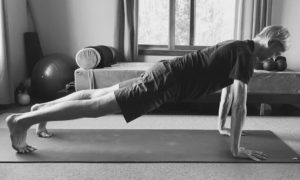
You’ll see in this video my tendency to use the buttocks to stabilize my pelvis. This tendency should really be minimized or eliminated all together. Give it a try!
If the hip flexors are active, they tend to tilt the pelvis forward (anteriorly), relative to the rib cage. This results in a mis-alignment between the pelvis and the rib cage and inhibits the deep abdominal and pelvic floor muscles, severely compromising pelvic and trunk stability and placing much more of the load on the shoulder girdle and lower back.
When the hip flexors are relaxed, it allows the pelvis to align with the rib cage in a way that allows the deep abdominal and pelvic floor muscles to respond to the weight of the pelvis and lower trunk. With the help of the quadriceps and toes, the total weight of the body is then distributed evenly between the feet, legs, pelvis, trunk and shoulder girdle.
In an earlier post I offered some thoughts on communication, specifically communication between ourselves and our bodies. That post emphasized how our muscles respond differently depending on what we’re telling them, and it highlighted the fact that we can solicit the response we want, muscularly, when we’re clear about our intentions and effective in communicating our message.
Now this topic is coming up again and I find myself talking about it frequently with my students. The difference is that I’m talking more about the ways our bodies seek to communicate with us, how we sometimes fail to listen and how this typically leads to a smaller, more manageable problem becoming a bigger one.
Yoga teachers will often speak of listening to our bodies for guidance. This is in part because a failure to listen to what our bodies are telling us inevitably leads to injury. I have asked my students to pay attention to what their bodies are trying to communicate. I have also mistakenly assumed that a student who is clearly not paying attention to their body’s message, or mine as the inststructor, is doing so intentionally.
I have made this extremely unfortuate and damaging mistake more than once and I aspire to never do it again. It’s the rare occasion when a student deliberately ignores their body’s message. The fact is, listening to our bodies for guidance is very difficult and actually following that guidance, should we hear it, even tougher. Therefore we need to be generous with ourselves as we practice and as teachers we need to be generous with our students and assume they are doing their best, even when they appear not to be listening.
We also need to remain vigilant when it comes to fostering this type of communication. In his final book, Light On Life, B.K.S. says:
“Overstretching occurs when one loses contact with one’s center, with the divine core. Instead, the ego wants simply to stretch further, to reach the floor, regardless of its ability, rather that extending gradually from the center. Each movement must be an art. It is an art in which the Self is the only specatator. Keep your attention internal, not external, not worrying about what others see but what the Self sees.”
Iyengar’s statement reveals how the highest aspiration in yoga, to know the Self, is undermined by our most pedestrian of limitations, the ego. The ego,which we all have and must have to be well functioning human beings, runs interference between ourselves and the messages our body conveys. Iyenger illustrates here why the ego must be addressed if we’re to succeed in yoga.
I believe that most of my students aspire more to use yoga and/or movement to keep themselves out of pain and to function better and managing the ego may not be primary among their ambitions. My view is that these aspirations are not at odds with self knowledge but, on the contrary, are a necessary part of it. To resolve pain and improve movement we must be able to pay attention and hear the messages our body and mind are communicating to our intelligence, and this is also an essential skill for Self knowledge.
When two people are trying to communicate and they are having difficulty, often a moderator of some kind is helpful. Married couples might use a marriage counselor, for example, whose job it is to hear what a person is trying to say and then to convey that message to his or her spouse in a way that he/she will hear it. When we’re having difficulty communicating a message to our body, or hearing the message that our body is sending back, a moderator of a different sort can also be useful. The best moderator I’ve found in this instance is the breath.
When I use the word “breath” in teaching, as in the cue “use your breath,” I basically mean the mechanism by which the act of breathing relates to the body structurally and pschologically. When we inhale, for example, our diaphragm moves downward and increases pressure in the abdominal and pelvic cavities. This intra-abdominal pressure or IAP, as its known, is a powerul stablizing force that can be used to maintain functional alignment both in static postures and during motion. The IAP keeps our abdominal muscles and the pelvic floor working the right amount and at the appropriate times. The resulting trunk and pelvic stabilization facilitates greater mobility in our hips and shoulders and allows for freer movement.
These physical affects of IAP are also extremely reinforcing psychologically. When my IAP is working well, or said a different way, when my breath is working well, I feel stronger, more relaxed, more free in my movement and overall more at ease. In other words, when my breath is better I just plain feel better. Conversely, if my breath is not working well I don’t feel as good and it is likely an indication that my alignment is also not good.
This illustrates how my breath acts as a moderator to help me hear the messages my body sends and how it provides a powerful mechanism for responding to these messages when necessary. Even if I’m not quite sure what the source of my misalignment is, I can still make a correction by observing how the change affects my breath. And perhaps more importantly, even if I can’t improve my breath at that moment, at least I can use it to recognize that I need to come out of the posture or suspend my movement so that I don’t risk injury.
In Iyengar’s words, the breath can serve as “one’s center,” one’s “divine core,” and when he describes “extending gradually from the center” as opposed to an ego driven “overstretching” he alludes to how the breath can serve as the foundation for our postures and our momement. For this to happen we must recognize the difference between what “the ego wants” and what our body is telling us, and this requires that we “keep (y)our attention internal.” It requires that we remain in constant communication with the body and are not drawn away from its message by ego driven thoughts.
It is so important in yoga and movement that we don’t work at cross purposes. We need to keep asking ourselves the questions “why am I doing this” and “is this serving my primary interest.” If my answers are “to punish myself with exercise” and “yes but it’s not quite painful enough yet,” this is perfectly fine but then we need to recognize that my ego is the source of my motivation and not the needs of the body and mind I’m tasked with looking after. If we do recognize this and decide to move forward with the work anyway, at least we’re clear about why we’re doing it.
If on the other hand we see that the ego is driving the conversation then we have an opportunity to reevaluate our approach and seek other input. Our bodies are extremely good at giving feedback. Let’s strive to learn their language and hear their message.
I think we can all agree that staying hydrated is a good thing and becoming dehydrated is not. To hydrate our body we tend to think first of drinking more water, and while drinking enough water is obviously necessary and important for our health, keeping all of our tissues well hydrated, particularly our connective tissue, benefits from a more nuanced approach.
To understand tissue hydration better it helps to understand a bit more about the tissue we’re hydrating. Connective tissue, which includes our ligaments, tendons and fascia, is a tissue framework that supports and connects, you could say holds together, other tissues in the body. Our connective tissue plays an extremely important role in human movement. When connective tissue is healthy and well hydrated, it allow our bodies to move in a wide variety of ways. Conversely, if our connective tissue is not well hydrated it tends to limit our mobility, adversely affecting the health many other tissues in the body.
Connective tissue is composed of cells, fibers and ground substance. Understanding ground substance, our connective tissue’s liquid component, is the key to understanding how to keep our connective tissue well hydrated .Ground substance is a clear, viscous fluid that is 70 percent water. It can vary in consistency from relatively thin and water like to thicker and more gel like. What gives ground substance this variability in consistency is the 30% non-water component, the glycoamindoglycans or GAG’s. GAGs act like a binding agent that draws water into the tissue and keeps it there. GAG’s therefore play an important role in keeping our connective tissue well hydrated.
In addition to its role in tissue hydration, ground substance also:
In short, ground substance keeps our tissues fed, clean and lubricated while playing a key role in our movement. The ground substance can transform from gel to liquid, a quality called Thixotropy, and it’s this quality that explains in part why it is so important for human movement. Thixotropic fluids change when our environment and our movement changes, providing more support when we need it and less when we don’t.
This is something we can all feel. We recognize for example that our bodies feels stiffer when cold and looser when warm and that taking a hot bath or warming up the body with movement can help a stiff and sore back. But will drinking more water also help with a stiff and sore back? The answer is more complicated. Drinking more water can make more water available to our tissue, but it doesn’t necessarily translate into keeping our ground substance more fluid and our connective tissue better hydrated.
When addressing the health of our connective tissues it is important to understand that drinking more water only goes so far. We also need to move. Movement is essential for keeping our tissues mobile and hydrated, especially our connective tissue, and the fluidity of all of our tissue is compromised when we don’t move enough or with enough variety and frequency.
One reason movement is so important for tissue hydration is because it is needed to facilitate the feeding and cleansing functions of the ground substance, and this is especially important as we get older. As we age, the areas in our bodies where tissues become adhesive and stiff tend to increase. Past injuries, acute and chronic, along with the cumulative effect of poor and/or infrequent movement habits can lead to dried out tissue fibers. These fibers tend to stick to one another, causing the ground substance to decrease proportionally and the connective tissues to get less nutrition while allowing more waste products to accumulate.
This scenario can contribute to pain and tension patterns that limit our mobility further and before you know it, we feel old. Meanwhile, connective tissue that doesn’t move well limits the movement of the muscle tissue it supports. This makes it difficult to generate new muscle in these areas, contributing to a weakening body.
The good news is that this trend can be reversed! Movement always remains available to us, no matter our age. So it’s always a good idea to try to increase the quantity and quality and regularity of our movements.
Here are some suggestions that will, when done with regularity, promote hydration of all of the tissues, help maintain strength and promote good muscle tone and function:
Stretching: When done with good alignment and stable joints, stretching can help to increase the normal gliding of the connective tissue, allowing for greater range of motion for our muscles. Muscles with more range make it easier to move our joints and help to keep fluid in the joint capsules, maintaining their suppleness.
*Research has shown that while stretching initially decreases the water content of the tissue, after 30 minutes of rest, the water content increases beyond the pre-stretch quantity and remains higher for up to 3 hours afterwards!
Natural Human Movement: This is movement that takes joints through a wide range of motions. Walking is a great example of a natural human movement that can take a wide variety of our joints through a wide range of motion. In fact, did you know that walking can mobilize more joints in your body than running?
*Moving your joints to maintain health need not be done with strenuous activities!
Orthopedic Massage: Orthopedic massage was designed specifically to reintroduce motion into connective tissues to decrease pain. This technique involves sliding the fibers of connective tissue across each other to create friction that increases fluidity. This along with the gentle rocking motion of Orthopedic Massage and its passive joint mobilization help to increase fluid uptake in our tissues.
*Massage is a must if you are dealing with injuries that are keeping you from moving as freely as you could because of pain!
Personal Alignment Training and Re-education: If our joints do not line up well we will have a greater tendency toward tissue tension, tightness, stiffness and weakness, and these issues can lead to chronic movement pattern disorders and decreased mobility. Over time, decreased mobility can promote adhesions in the tissues fibers. Personal Alignment Training helps re-educate you on how to hold yourself in proper alignment, reducing pain due to poor movement habits and improving mobility. Ultimately this keeps your tissues better hydrated.
*Remember, adhesions are effectively dehydrated tissue. That is, tissue where the connective tissue fibers have dried out and become stuck to each other.
Staying properly hydrated is important at any age, but becomes more important as we get older. Hydration is not simply a matter of drinking more water, but to be more proactive about tissue hydration. As we age we tend to move less and develop more movement habits that cause or maintain chronic pain and injures. This leads to more adhesions, causing more pain and discomfort and decreasing our mobility. This in turn can cause us to move even less.
Keeping our tissues young, supple and hydrated need not be strenuous, it simply requires more varied and biomechanically sound human movement. Movement is the key to staying youthful and well hydrated.
As the variety and number of classical yoga postures that I continue to teach and practice has decreased, my interest and enthusiasm for certain postures has only increased. Utthita Trikonasana or Extended Triangle Posture is a great example of this. I keep coming back to it and it keeps giving, providing countless opportunities for insight and reflection.
As any student of yoga knows there are as many ways to teach Trikonasana as there are teachers who teach it. This can present a challenge for the student practicing it. What should I focus on? What are the keys to this posture? What should I be doing (or not doing) to prevent injury?
Trikonasa can serve as a litmus test for low back pain and when certain mistakes are made doing it the asana can increase low back issues and even create them when they didn’t exist before. This is espeically a pitfall for yoga teachers and more experienced students who have the strength and stamina to sustain misaligned postures for longer periods. Therefore it is essential that the posture not bring up any existing pain in students who have it and that all students are attentive to executing the posture in a way that doesn’t excessively load the lumbar spine and sacroiliac joints.
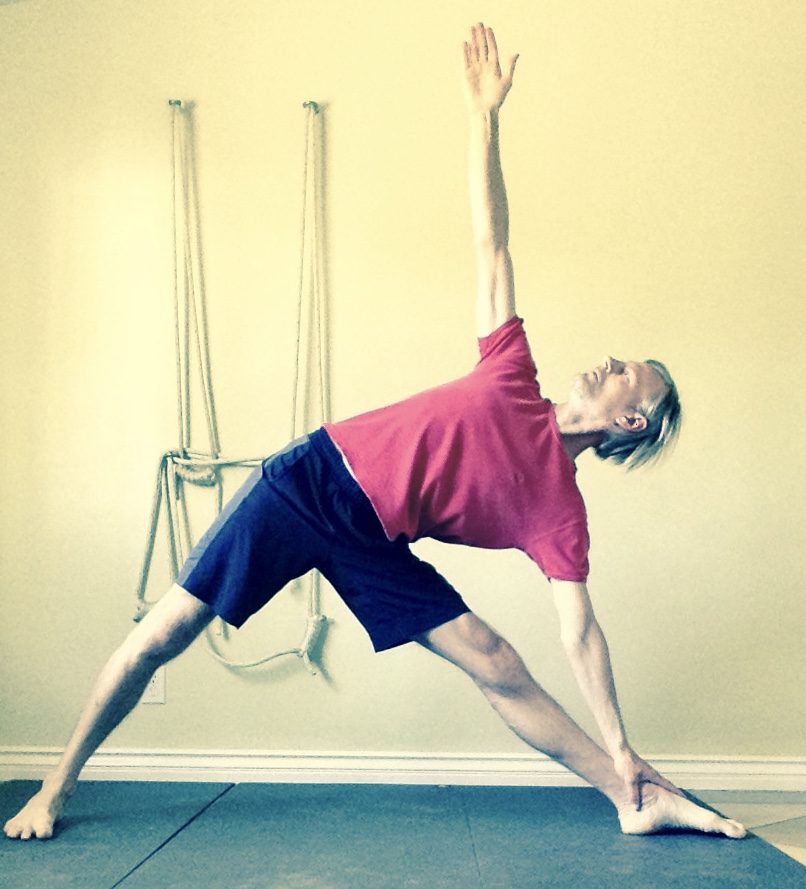
I’ve discovered that a single, key early step in this posture will dramatically reduce the tendency to manifest the various problems that this posture can bring up, including low back issues, and it will greatly increase the chances of success in the posture. Basically, this step involves getting the lateral hip aligned vertically with the outer ankle bone.
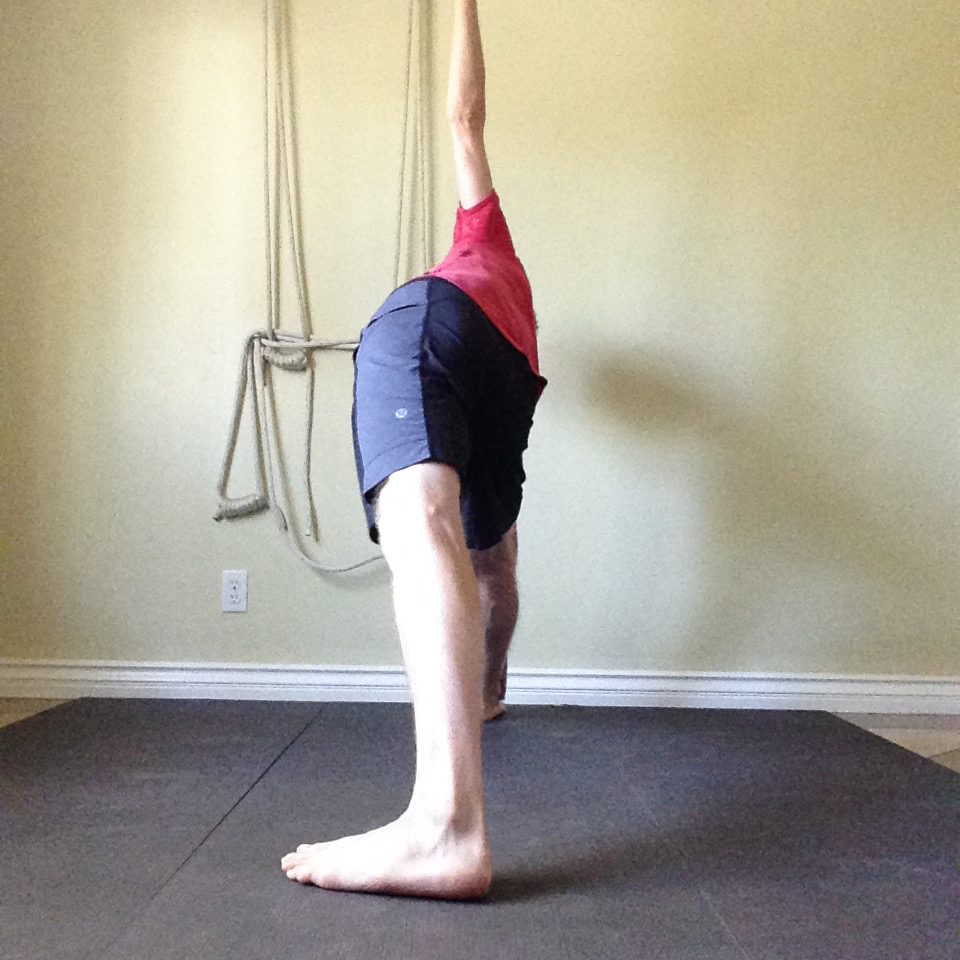
Figure 1
Notice in the photo to the left (Figure 1) how the my left hip joint (both hips really) is pushed forward of my ankle. This results in a laxity of the muscles in the lateral hip, leaving the muscular support of this hip much to the quadriceps and the forefoot and results in excessive load on the hip and knee joints and a significant misalignment of my spine.
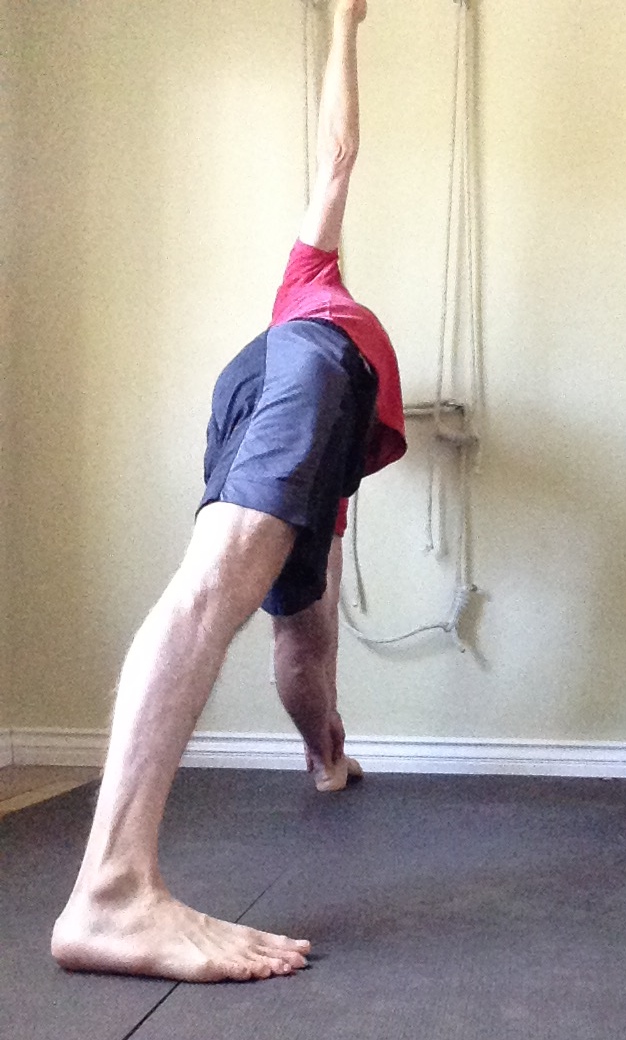
Figure 2
Often accompanying the hip forward is the lower ribcage which tends to shear forward of the lumbar spine (Figure 2). When the ribs shear forward this way, any turn of the rib cage and chest must come primarily from the lumbar spine and will tend to accelerate the hips even more forward, excessively loading the lower back and increasing the load on the hip even further.
Look at how my rib cage in the photo below (Figure 3) reveals the excessive arch in my low back. As I twist to the left, the arching of the back will only increase along with the load on the spine.

Figure 3
Bringing my hip back in line with my ankle bone, or at least closer to it, will go a long way toward resolving these issues.
First, it immediately reduces load on the quadriceps and the anterior hip, reducing stress on the hip and knee joints.
Second, it allows me to relax the gluteus maximus of my front leg hip, making it easier to upright the pelvis and give greater space to the lower lumbar vertebra and sacroiliac joints.
Third, with the added length in the lower back it’s now possible for me to release the rib cage back into a more optimal alignment with the pelvis, further reducing stress on the back. You can see these changes on my Trikonasana in the photo below (Figure 4).
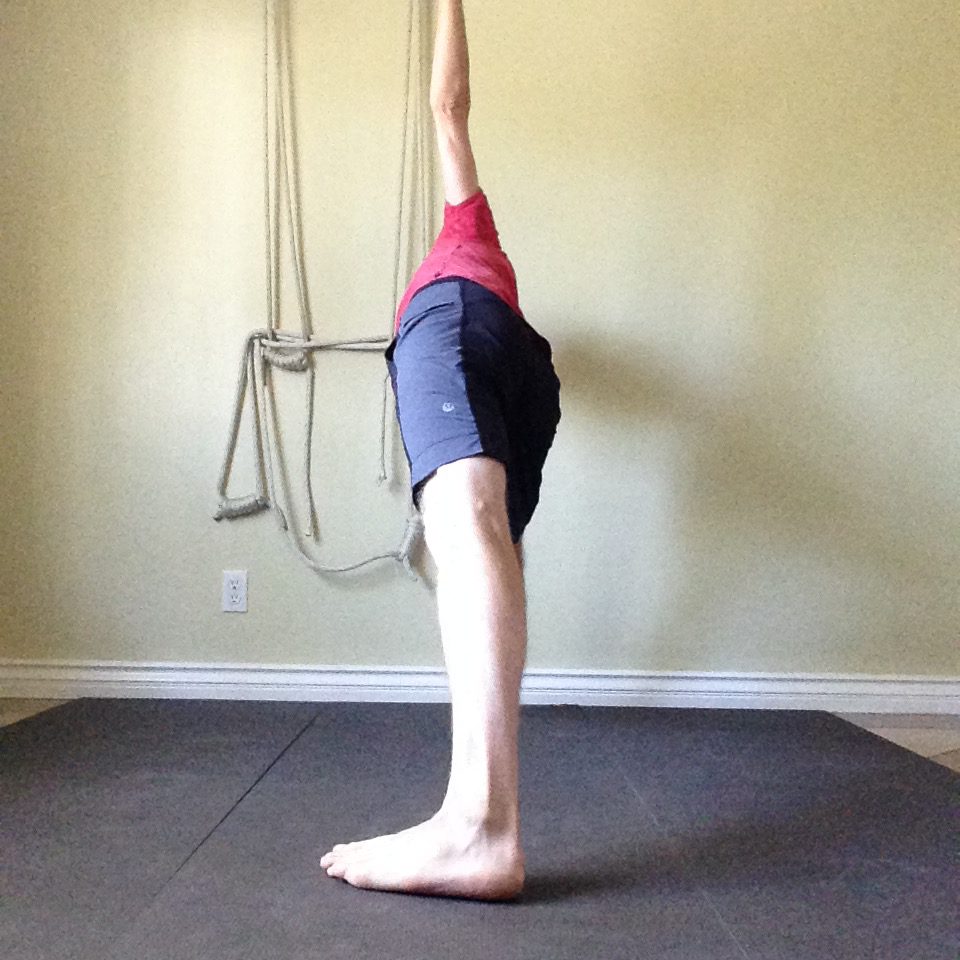
Figure 4
With the hip back in alignment I can initiate the twisting action in the posture from the pelvis, incorporate more abduction in my front hip and reduce the demand on my spine for providing the bulk of the rotation. This alignment will also help to involve my front leg more in the twist for better distribution of loads between the two legs.
Along with optimizing the alignment of the ribcage with the pelvis I have reduced a lot of the load to my lower back and SI joints in this posture and redistributed it into my pelvic floor and legs. Now with the spine communicating directly with my legs I can generate more length through the whole spine and up into the chest and arms and really bring the pose to life!
Overall, bringing my hip back distributes more of the loads in this posture into more places. This improved load distribution serves to strengthen and increase blood and lymph flow to tissues throughout the body and contrasts starkly with a posture that simply overloads the hips, knees and lower back. That’s the difference between a posture that brings health to the body and one that only serves to wear it down.
I think we can all agree that exercise is a good thing, regardless of how motivated we may or may not be to do it. The questions that remains are whether a particular activity can be called “exercise” and whether one type of exercise is better than another. Sports are a great example of this. I love basketball! I don’t play it anymore but I find it really fun to watch and can appreciate that it’s even more fun to play. Is playing basketball exercise? If so, is it good exercise? This depends on what you mean by good exercise.
What is good exercise?
If a client of mine asks me my opinion about an activity they engage in from the standpoint of it being good or bad, I always ask first what is the primary reason they are doing that activity. Recently I had been working with a client who had been running for exercise in the past but had stopped because it was impacting his health in negative ways. After a few sessions he was feeling much better and he asked me if I thought he should go back to running. I asked him “do you like running?” His answer was an unqualified “No”. I then told him that I would not recommend he start running again.
Now I know an awful lot of people LOVE to run and to anyone who loves to run I would say this – if you love it and it’s not impacting your health in ways that are interferring with other important activities or responsibilities in your life then absolutely you should run. But if you don’t love it, then I really don’t recommend it as I belive it puts too much stress on the body in a variety of ways to really be healthful. Frankly I don’t think running is “good exercise.” And I would say the same thing about a lot of what serves as exercise in the fitness realm these days.
Why are we exercising?
This brings up an important point. We don’t always exercise for health reasons. Or, we place our psychological health ahead of our physical health, if those can really be separated. By this I mean many people enjoy and hugely benefit from the satisfaction that an intense, demanding workout brings. It’s reinforcing to work hard and feel like we’ve accomplished something physically challenging. And there’s absolutely nothing wrong with doing this.
But if I am running a lot and I’m having joint pain that is affecting my ability to move in other ways and this pain is getting worse and I am experiencing some level of debilitation as a result or I see debilitation looming on the horizon then I need to reasses whether running is really the form of exercise I ought to be doing and start considering other options.
What is fitness?
Exercise done for reasons OTHER than promoting health I would generally categorize as a fitness activity. Fitness activities are a type of training used to become proficient at or “fit for” that same activity or a related one. If I want to be good at basketball then I should practice things that will improve my game and make me more “fit” as a basketball player. Will those same activities make me a healthy person? In some ways maybe, but in many ways clearly not. Just look at the athetes who play basketball professionally for a long time. They are frequently hobbled. Kobe Bryant and his knees come to mind.
Movement and Exercise
On the most fundamental level human beings thrive on movement. The better we move and the greater variety of movements we’re able to execute the greater potential we have for health and longevity. Movement is not sexy, but it is essential. Elderly people who fall down and break their hip often decline very quickly, even if they were functioning pretty well beforehand. Once our movement becomes very limited then our health immediately suffers. If you’ve ever suffered a serious injury that severly curtails your activity you know exactly what I’m talking about.
Exercising for health
Exercise that is done for health reasons is also a type of fitness activity in that it makes us more “fit” for fullfilling our human needs. On the most basic level our human needs consist of eating, sleeping and procreation with most of the fitness requirements related to eating in the form of food gathering and preparation. To eat a varied diet, our hunter gatherer ancestors needed to move and move in a lot of different ways from squatting to digging to climbing to chopping to grinding.
The what and why of exercise
Now that we have outsourced so much of the movement in our diet we don’t even think about all of the work that went into bringing our farro, arugula, beet and goat cheese salad to the table. The substiute for all of the digging, fertilizing, harvesting, picking, feeding, milking, processing, packaging and shipping that went into our salad has become exercise. Therefore if we wish to replace these outsourced movements with exercise, that exercise should have a significant variety of postures and movements. A single activity with a repetitive and limited movement profile like running won’t provide the variety of movements that will make us “fit” for the variety of human activities that keep us healthy. Again if you love running (or some other limited movement profile fitness activity) do it, but see if for what it is and what it isn’t. It IS going to make you very fit for running but it ISN’T going to make you fit for meeting your human needs.
Haven’t we adapted to modern life?
I suppose there’s an argument to be made that as our lifestyles have changed our needs have changed with them. Haven’t we as human beings adapted to the more sedentary lifestyle we now lead? Certainly we have. After all our bodies and our minds are extremely efficient in adapting to change. I can train myself to sit at a desk for 8 hours a day and have lunch delivered to my office. But is that what I want to be fit for? Sitting and eating takeout? Are those adaptations manifesting health?
Our bodies and minds adapt to the input they are given and therefore it’s the things we do most often that have the biggest impact on our health and function. It is this fact that we need to consider when making choices about exercise because ultimately it won’t be the 1 hour per day of exercise that has the greatest impact on our health but rather what we’re doing for the other 23 hours. How does the activity we’re spending an hour doing affect us during the rest of our day? Is our 1 hour of exercise making us more fit for enjoying a high quality of life? Or are we simply making ourselves fit for a single activity that may or may not be good for us in the long run?
At my Restorative Exercise certification training in spring of 2014, Katy Bowman, the founder of R.E. posed a question to our group – “What do muscles do?” Her answer – “they respond.” To be honest I didn’t give her comment much thought at the time, but since that day her words have come back to me time and time again and the truth of them has been born out of my experiences working with clients and in my own body.
What do we typically think of when we want to affect a muscle? Generally either stretching it or strengthening it. If I want to stretch a muscle, what do I really want to happen? I want that muscle to change it’s length. Specifically, I want that muscle to be longer that it currently is.
Let’s say I find out I have tight hamstrings and that having tight hamstrings is not a good thing so I decide I’m going to stretch them. I stand and bend forward and try to reach the floor, pulling strongly on the muscles in the backs of my legs. It certainly feels like I am stretching my hamstrings, but usually I am stretching the muscles in my back even more. In fact, because of the difference in the way these 2 groups of muscles are meant to function, the way that the hamstring muscles and the muscles in my lower back “respond” in this scenario can be very different than I intend.
Bending from the lower back
The hamstrings consist of three muscles located on the back of the thigh which are called the semimembranosus, the semitendinosus, and the biceps femoris. The primary job of the hamstrings collectively is to extend the hip joint (pull the femur back relative to the pelvis) and flex (bend) the knee. When the knees are kept straight and the hips are flexed as in a standing forward bend, the hamstrings do the job of hip extension by acting as the main muscles that support the weight of my upper body as it moves forward and down. In other words, as I flex my hips to bend forward the hamstrings apply a counter force in the opposite direction, that of hip extension, to help carry the weight of my pelvis, trunk and head.
In this example, the muscles in my lower back have a job to do as well, particular the erector spinae whose job it is to help stabilize my spine and prevent it from distorting to the point that it puts undue stress on the spinal joints. These muscles work in combination with my hamstrings and my gluteal (buttock) muscles to enable me to bend forward without damaging the very important and essential tissue contained within my spinal column, namely the spinal cord.
Thus the job of my hamstrings in a forward bend, as well as those of the lower back, is to “respond” to that movement by acting as a kind of breaking mechanism, carrying the load of my trunk. Of the two muscle groups, the hamstrings are the bigger and stronger and therefore should be encouraged to do more of the work in a forward bend. For the hamstrings to respond this way I need to emphasize bending more from my hips and minimize the bend from my lower back. When the hamstrings are tight they don’t allow for much movement from the hips before they can no longer respond to my motion of bending forward.
Bending forward from the hips
If I keep bending forward, even when the hamstrings cannot respond anymore, then my lower back has to carry the load instead. My head and trunk are pretty darn heavy and therefore this puts a lot of stress on my back. If I keep doing my forward bend this way not only will I eventually hurt my back, but I will also not make much progress in increasing the length of my hamstrings. That’s because when I bend well beyond the range of my hamstring length the hamstrings cannot respond anymore and therefore will not increase their length. Meanwhile the muscles in my low back will respond, and quite appropriately, to the consistent excessive loading I’m putting on them by getting weaker less able to effectively do the job of maintaining a functional position of my lower spine that keeps the joints healthy, mobile and pain free.
This is just one of many possible examples of the way in which muscles respond to the input we give them in both helpful and not so helpful ways. Therefore when I recognize that I have a muscle that hurts or that is too tight or too week, before I go about stretching or strengthening I should consider what I may already be doing that is causing the muscle to respond as it is.
In the example of my hamstrings, I need to consider how much time I spend sitting or wearing shoes with heels or standing with my pelvis tucked. Any of these “activities” will result in shorter hamstrings because when I engage in these very common activities I am effectively telling my hamstrings to shorten. My tight hamstrings are just responding appropriately to the message I’m sending!
Standing with tucked pelvis
In the previous post we looked at hip extension from a prone position. One important feature of extending the hip this way is that it is extended with active, muscularly driven movement. Active hip extension has the important benefit of stregthening the hip extensor muslces. Another benefit to active hip extension (versus passive) is that it is somewhat safer because we have to use whatever strength our hip extensors have to overcome the tension in the antagonist hip flexors. This avoids overstretching the hip flexors and minimizes stress on the lower back. Finally, doing active hip extension allows us to better assess the ROM of our hips and therefore establish a more accurate baseline from which to make progress.
Active hip extension does, however, have one major disadvantage, and if you’ve worked on either or both of the postures I presented in part 2 you would have noticed this rather quickly. It is difficult to hold these postures long enough to facilitate rapid progress. Therefore I’d like offer a way of increasing hip extension passively that is both safe and effective as well as somewhat pleasurable to do.
The posture below is demonstrated in the video you see above. I recommend reading the description first and then watching the video after for clarification.
Lie down on your back with your knees bent and your feet on the floor. Place your feet pelvis width apart (about 6 inches) with the shin bones vertical and the knees directly over the ankles. If either or both of your knees don’t bend this much, only bend the knees as much as is comfortable for your most limited knee. Tuck your chin in toward the top of your throat and legthen the back of your neck until you can feel that the head is not at all tilting backwards. If you find it difficult to keep the chin in, place a folded blanket under the base of the skull to increase the height of the head. Make the blanket high enough that it removes any posterior tilt from the skull.
Place a standard size yoga block in between your knees and hold it. Without dropping the block, slowly lift the pelvis up off the floor and place a second block on its side under your pelvis. If you cannot lift the pelvis high enough to fit a standard size block without dropping the block between your knees then a standard size block is too hight for you. Use a half block or some equivalent height instead. You should feel absolutely no pain in your back! If you do feel pain in your back, decrease the height until you no longer feel back pain. If you cannot lie this way with the pelvis elevated and without back pain seek help from an experienced teacher.
Once you have the pelvis elevated and supported, making sure the support is only under the pelvis and not under the lumbar spine, remove the block from between your knees. Then notice the way the pelvis automatically rolls back a little toward the rib cage. This keeps your lumbar and thoracic spine neutral. Avoid actively rolling the pelvis back (i.e. tucking the pelvis). Simply allow the pelvis to roll back to the extent that it is naturally inclined. If the pelvis doesn’t roll back this way at all, try moving the support under the pelvis a little closer to your feet.
Next, keeping your foot in contact with the floor, move your left foot gradually out away from the support, keeping it in line with the hip. Remain aware of the position of the pelvis relative to the rib cage and notice if at any point moving the leg starts to pull the pelvis out of its position. When you reach such a point, pause there and let the weight of your leg gently pull on the hip flexors. In the beginning you may not feel much. As you practice more your sensitivity will increase and you will perceive the sensation of loading on the hip flexors in the groin and in front of your hip. You will also being to perceive the sensation of these musles letting go. This is your cue to start gradually moving your foot further away from your hip.
Stay for 20-30 seconds. Then bring the foot back to its original position and try this with the right leg. After you’ve done each leg once, lift the pelvis up remove the block under it and come down. If you feel any pain in your back upon lifting the pelvis up off the block it is telling you that you have used too much height. Try decreasing the height and repeating the sequence described in the preious 2 paragraphs.
When you’ve found a height you can use to do one repetition without experiencing any pain after, then you’re ready to begin more repetitions and with longer holds times. Repeat the above 2-3 times on each leg, first for 20-30 seconds and then over the course of a couple of weeks working up to a minute on each leg.
Eventually you’ll reach a point where you’ll be able to stretch each leg all the way out without any response from the pelvis. When you reach this point the next step is to increase the height of the block under the pelvis. When you feel you’re ready to do this, increase the height by turning the block on its side. Avoid placing the block on its end or making the block so high that you are forced to arch your lower back. Using too much height may lead to a back injury and will not be as effective in increasing your hip extension as will extending the hip while maintaining a neutral spine.
Conisider doing this passive hip extension in combination with active hip extension to see how one improves the other. You may also enjoy combining these hip extension postures with the standing forward bend described in “What is a Hip Opener, Part 1” to see how increasing the length of the hip flexors with hip extension helps them to contribute more to your hip flexion. However you use these postures, enjoy the increase in ease and freedom of movement these postures give to your hips!
A hip opener is a posture meant to increase a particular range of motion or multiple ranges of motion in the hip joint. The most important aspect of such a posture is that the hip be targeted and that the force applied to the hip to create the opening not be diverted into the lower back or the knee. Hip extension is one ROM of the hip that often gets neglected because of the ease with which many of us use the joints in the lower spine to do motions that would otherwise be done from the hip. Working on hip extension is therefore extrememly hepful and important not only for health and function of the hips but also that of the lower back.
Improving hip extension will help prepare the body for backbends as well as help to support healthy gait mechanics. The simplest way to work on hip extension is from a prone position. Lie face down on the floor and find a comfortable position for you head, perhaps resting your forehead on a blanket or on your forearm. Check and see if the pubic bone and the frontal most aspect of the 2 ilium (the A.S.I.S. or anterior superior iliac spine) are resting on the floor. If the pubic bone doesn’t easily rest on the floor, try placing a folded blanket just above it on the 2 A.S.I.S.. The idea is to tilt the pelvis back a bit to bring the pubic bone in contact with the floor (see figure 1).
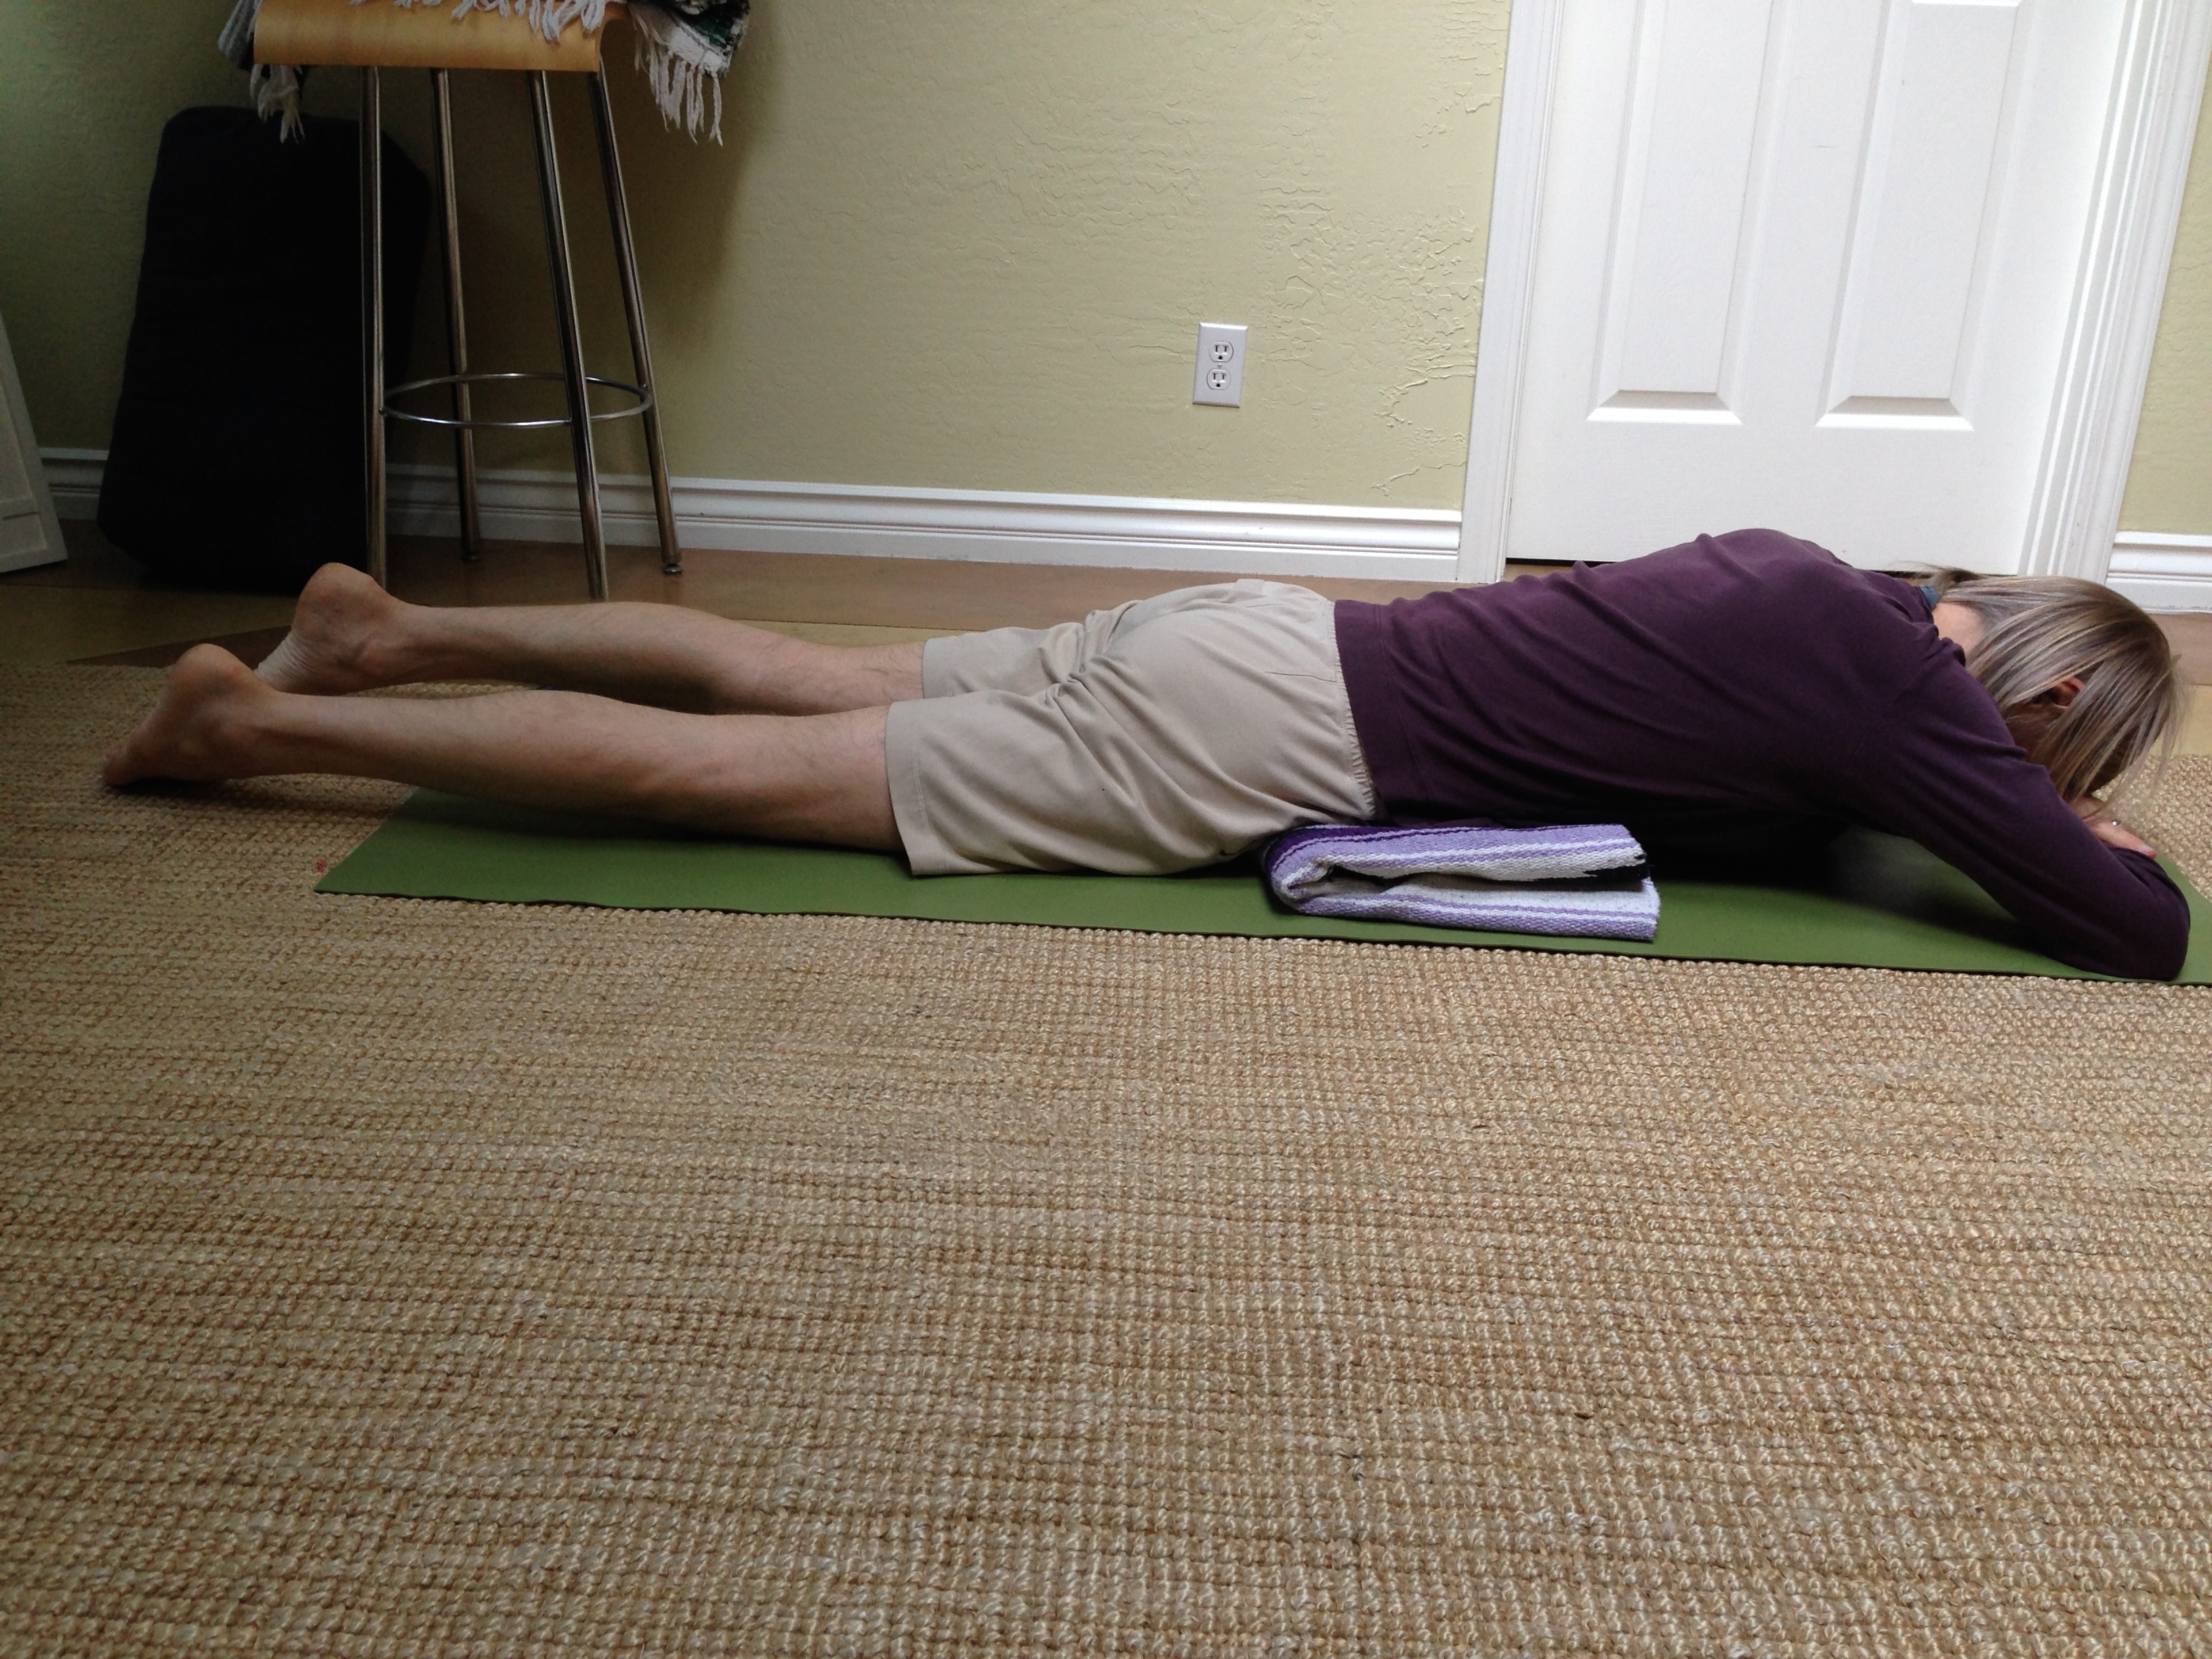
figure 1
If the 2 A.S.I.S. are not able to rest on the floor when the pubic bone is in contact with the floor the blanket support will offer something for the 2 A.S.I.S. to rest against. Whatever the case, getting the pubic bone in contact with the floor is crucial. Once you have it down, then lift your right leg off the floor while keeping the knee straight. Make sure the pubic bone stays in contact with the floor. This is hip extension (see figure 2).

figure 2
Hold the position for a few seconds, making sure that the pelvis doesn’t roll to one side when the leg is lifted. Lower the right leg and try it with the left leg. If your feel pain in your back and/or on either side of the sacrum (on the back of the pelvis) when doing hip extension as described above, try pushing the pubic bone down into the floor with moderate force and then lifting the leg again. If this doesn’t at least reduce if not resolve the pain then suspend working on hip extension this way and move on to the next option (see figures 3-5 below). If you can lift each leg with your pubic bone remaining in contact with the floor and without pain in your back, then try doing this in front of a mirror so you can see how much hip extension you actually have. How high does the leg lift before your pubic bone starts to lift as well? 6 inches? 10 inches? 1 inch? See what you’ve got currently so you have a baseline from with to assess progress.
Repeat this method of extending the hip 3-4 times on each leg, feeling the muscles in the back of the hip and thigh working to lift the leg. Continue to keep the knee straight and the pubic bone in contact with the floor. If your low back starts to hurt as you’re holding the leg up, decrease the height of the leg until the pain goes away and continue. As long as you’re not experiencing back pain, begin increasing the time of hold to 20-30 seconds. Then rest a few breaths and come up.
If your back hurts when you try the above, no matter how high or low you lift the leg, then try the following instead. Come to your hands and knees with your fingers and thumbs spread, your wrists directly over your hands and your knees directly under your hips. If you knee caps are sensitive to pressure, have your knees on a blanket for more cushion. Allow the pelvis to rotate forward and your back to arch as much as is comfortable. Try not to actively arch the back but let the arch happen by relaxing the abdomen toward the floor (see figure 3). Then, using your abdominal muscles, lift your lower front ribs up away from the floor and pull them in toward the spine until you feel the middle of your spine round out slightly. Be careful not to tuck your pelvis when you do this.
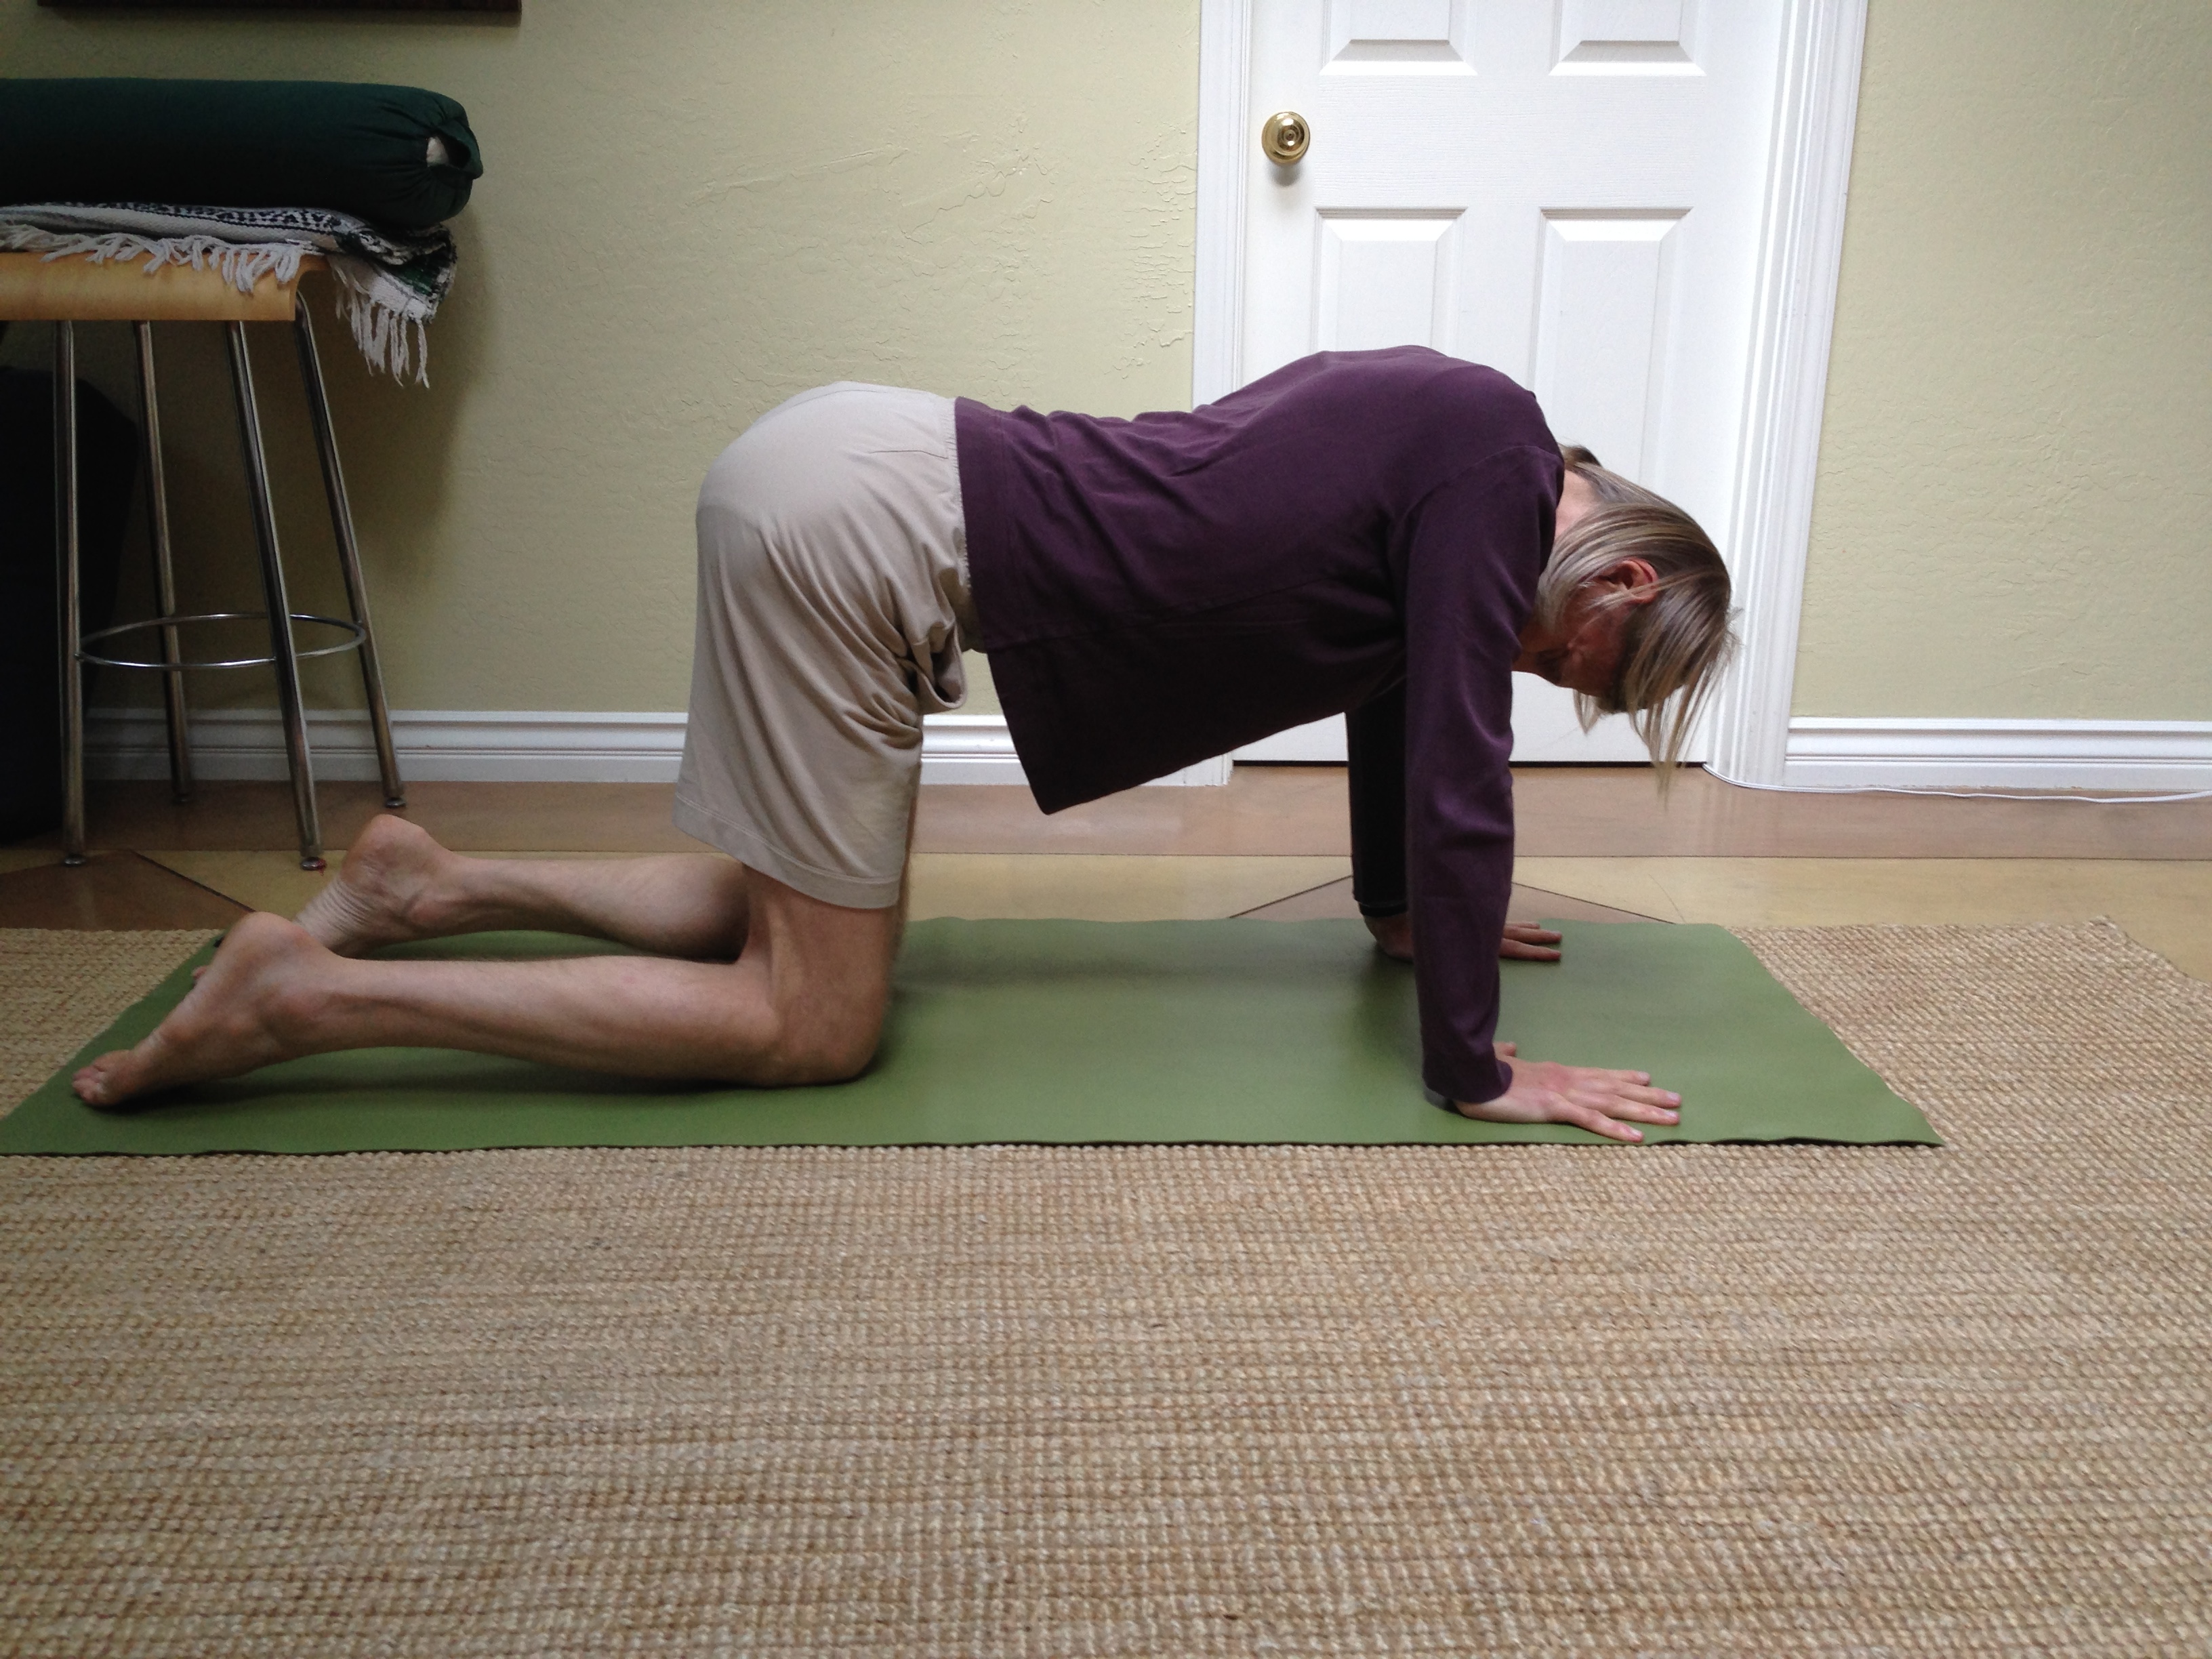
figure 3
You can use a mirror to get feedback. You should see a clearly concave lumbar spine and a clearly convex thoracic spine. If upon looking at your image in the mirror you find it’s hard to tell where the lumbar ends and the thoracic begins, continue to lift the lower ribs up and in toward the spine until you can begin to see the junction of lumbar and thoracic. Then lift up the portion of the thoracic spine in between the shoulder blades by pushing your palms into the floor with your arms held straight. Try to feel the rhomboids, the muscles that connect your shoulder blades to your spine, becoming longer and more active(figure 4).
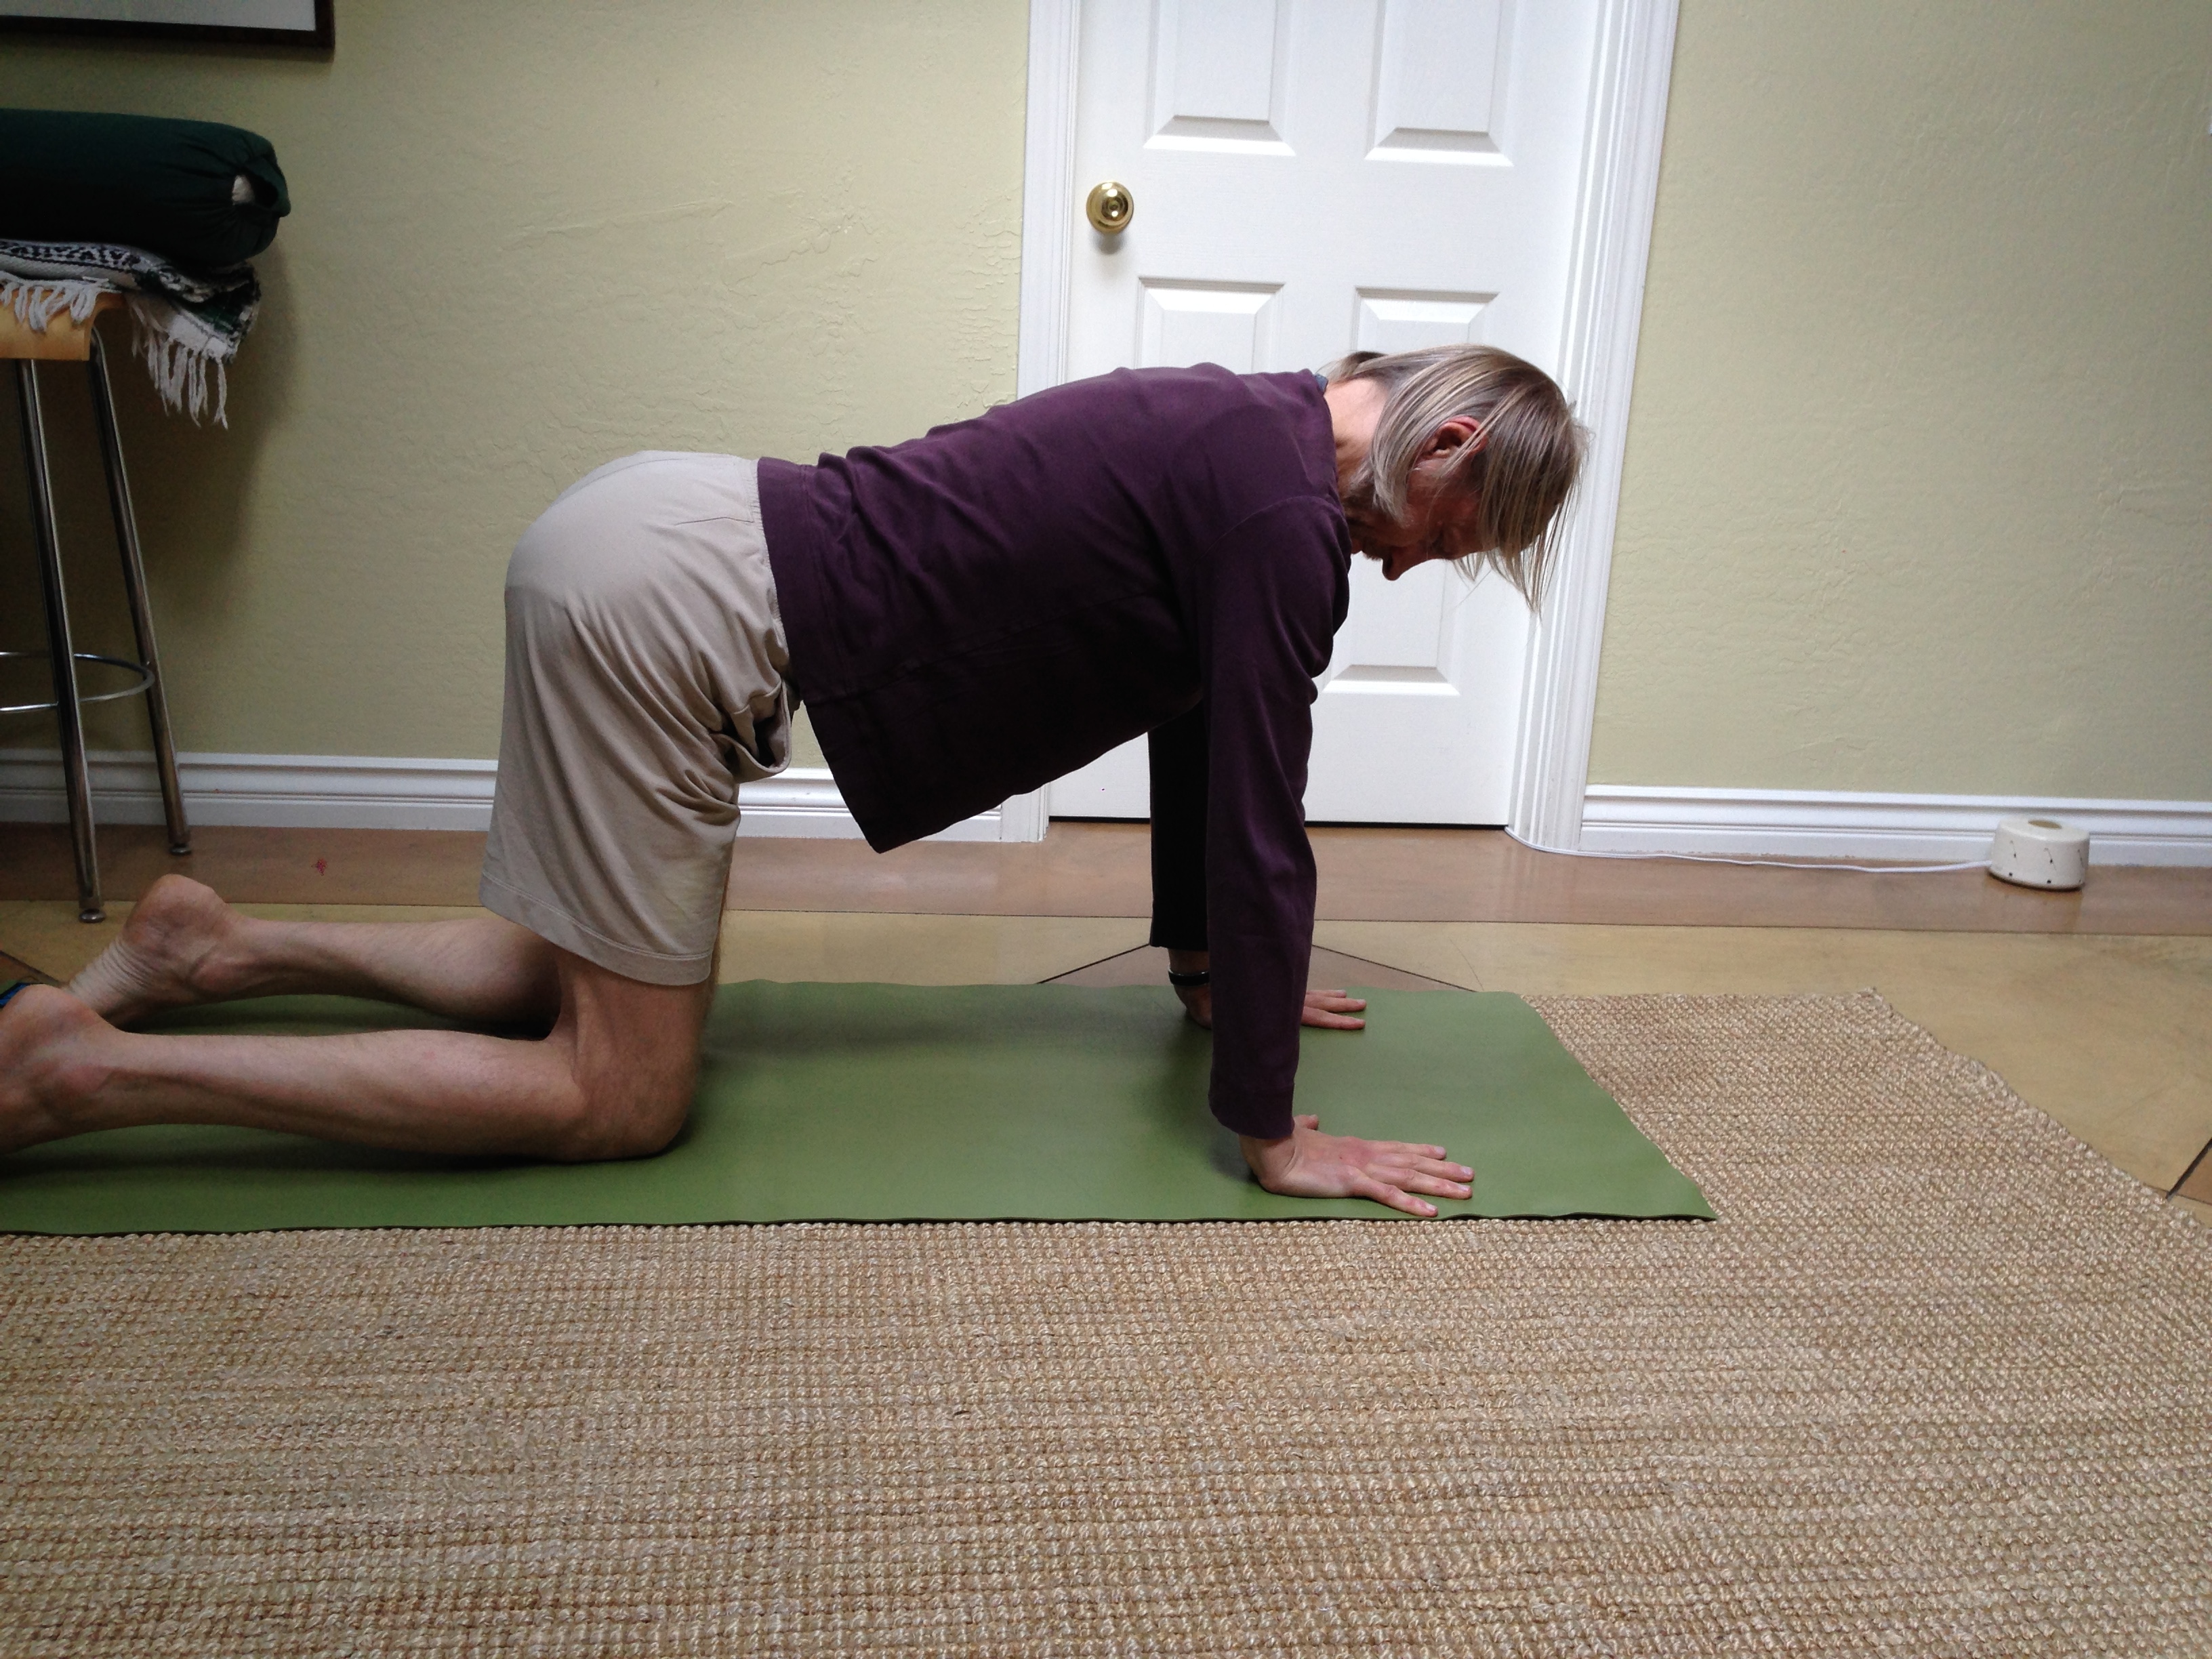
figure 4
Now push down through your left knee until your left hip engages and your right knee begins to lift off the floor. Be conscious of lifting the right knee up by using the left hip and not by using the muscles in your lower back. Once the right knee is lifted, stretch the leg out behind you until the knee is straight. Keeping the left hip active and the right knee straight, gradually lift your right thigh toward the ceiling (figure 5). Avoid arching your back and dropping your lower ribs toward the floor. Also be sure to keep the upper thoracic spine lifted and the shoulder blades wide. Hold the leg up for 10-15 seconds, then lower the leg and repeat on the opposite leg. Repeat each side 3 times.
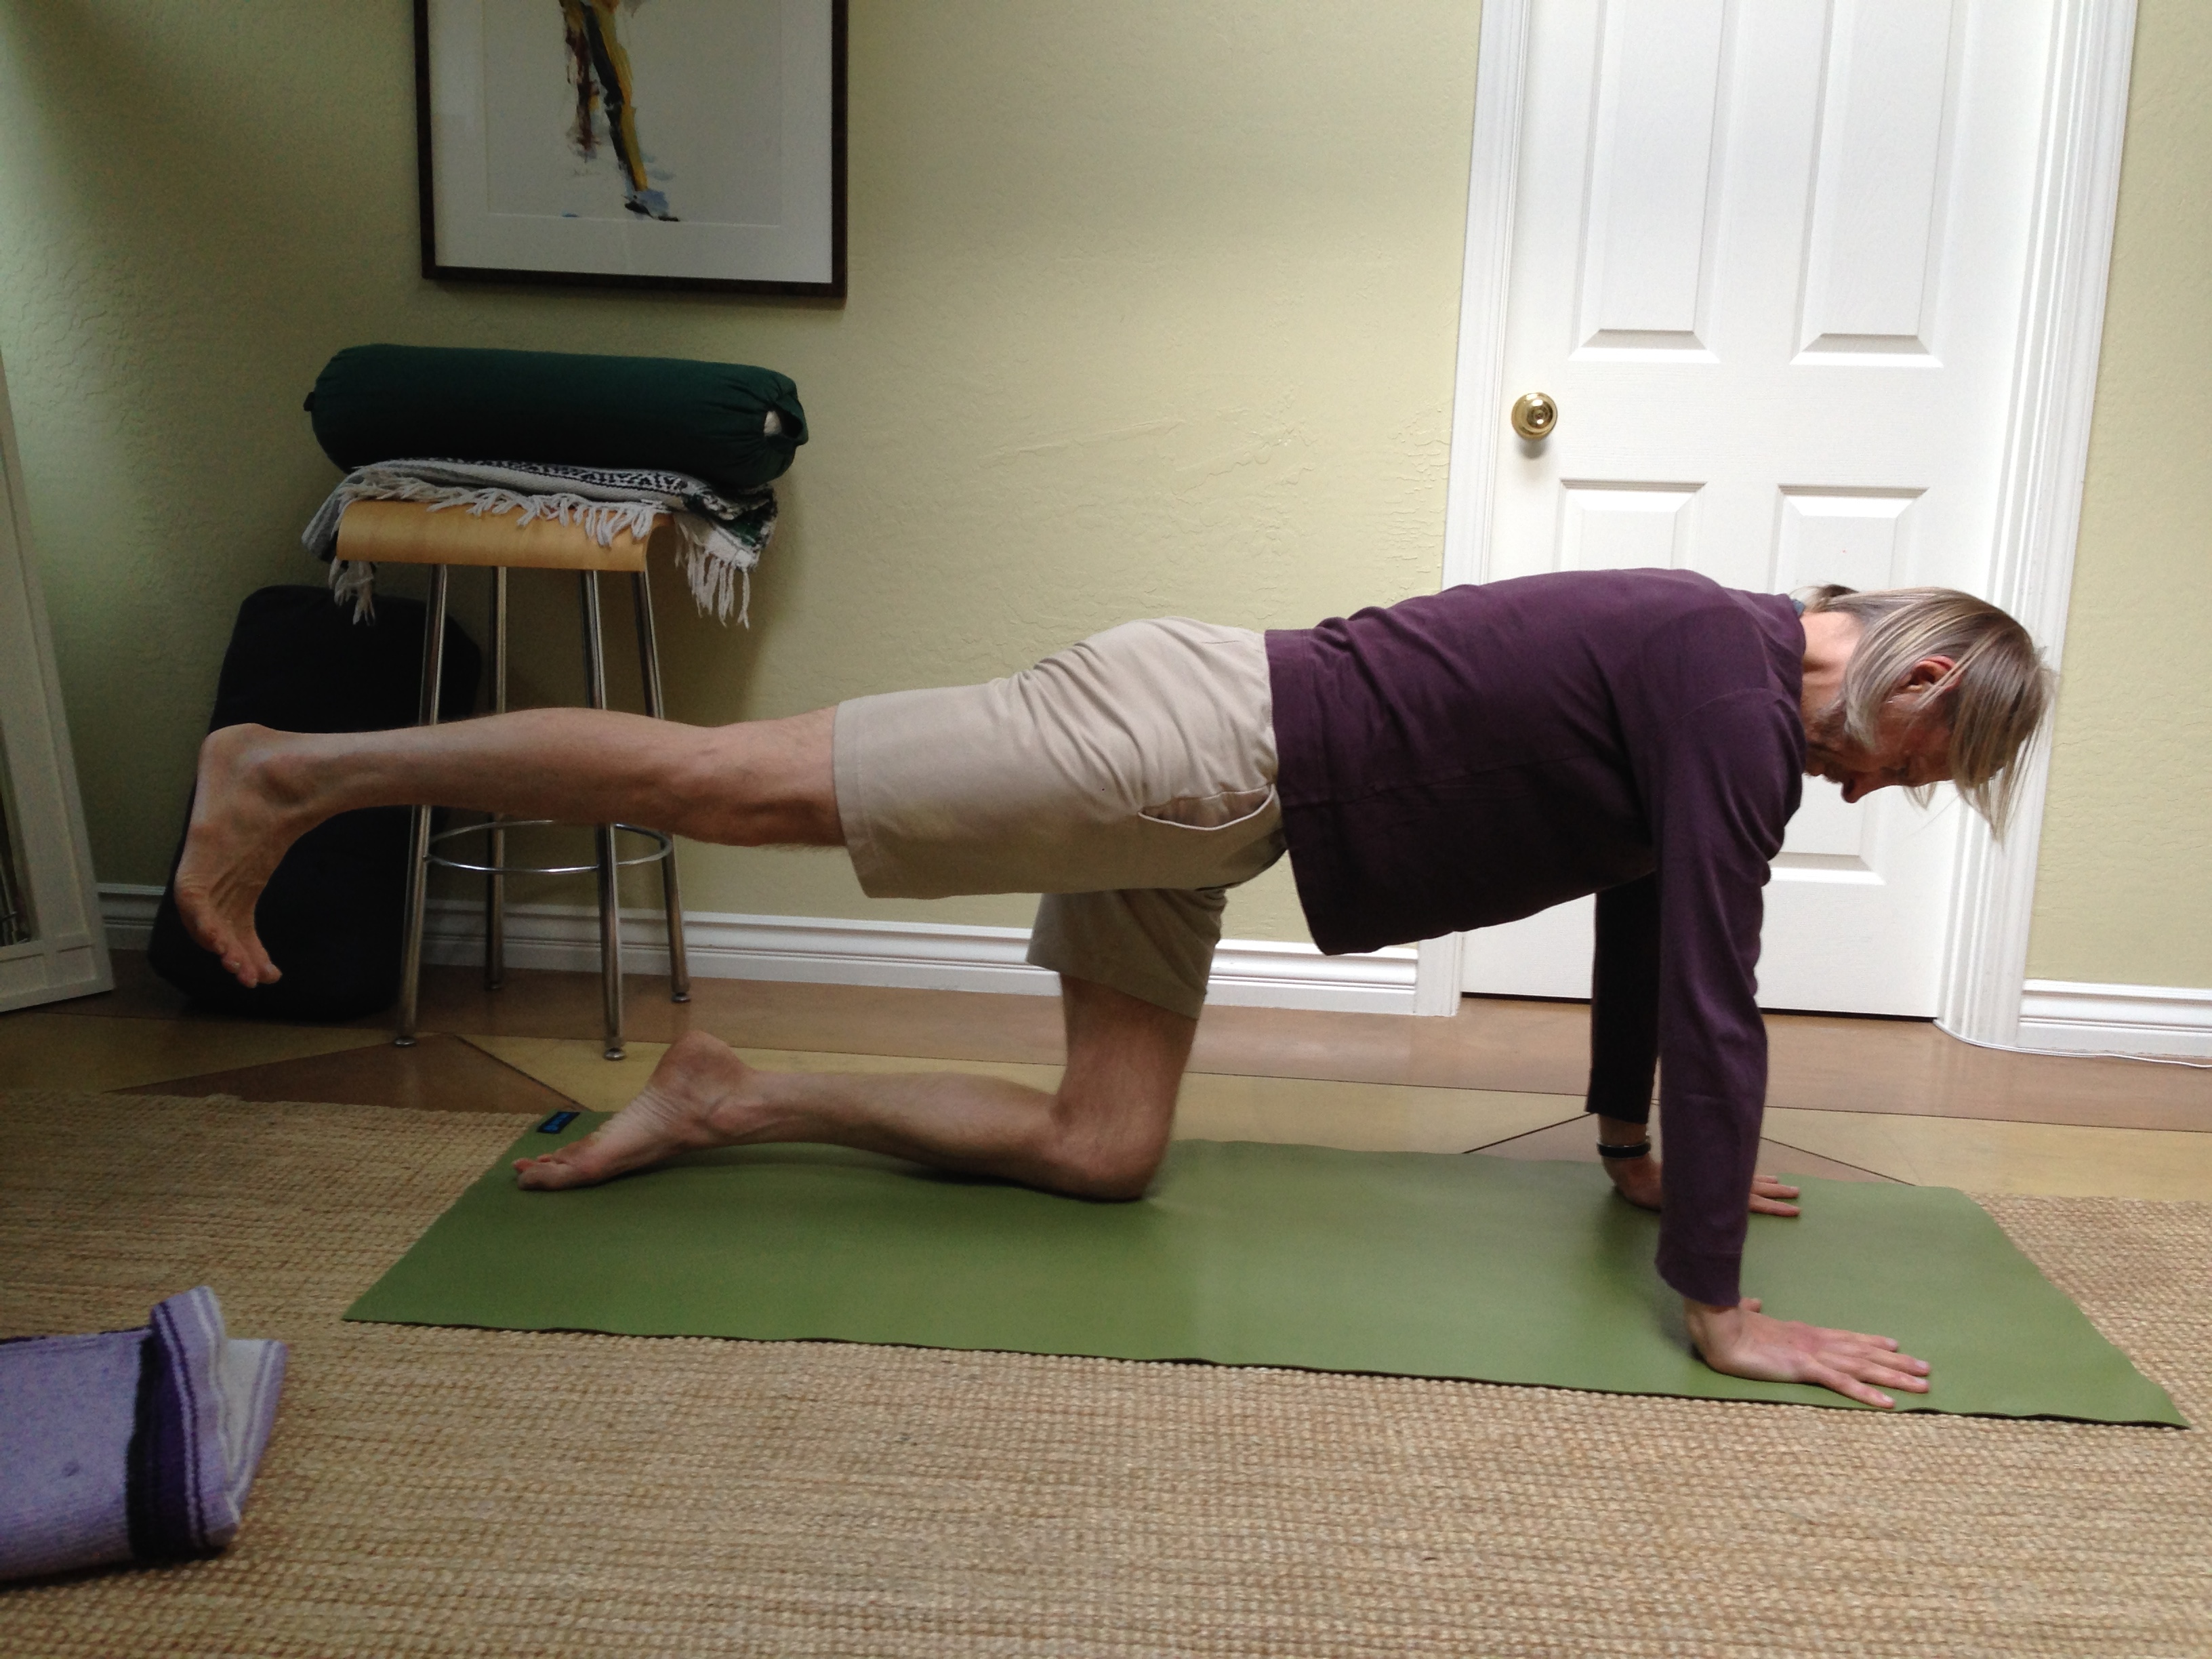
figure 5
This is also hip extension and this version will typically work for everyone and is particularly helpful for those who’s hip extension is limited. The exception is anyone who cannot bear weight on their hands this way. If this includes you then seek help from an experienced teacher to work on your hip extension. There are many postures that can be used to increase hip extension in addition to the above. In the part 3 I will discuss another of my favorites!
Considering how often they are requested, “hip openers” have to be one of the more desirable categories of postures offered at any yoga class, and for good reason. Any student of yoga wants more open hips as the benefits of increasing the mobility of the hip joints are numerous. Increased mobility of the hips can relieve hip, low back and knee pain, as well as improve leg strength, balance and pelvic floor function, to name just a few. More mobile hips are also essential for performing more advanced postures.
But common approaches to opening the hips taught in yoga classes frequently range from ineffective to downright injurious. Considering the fact that hip replacement surgery is becoming commonplace in the western world, the dubiousness of the “hip opening” often offered to yoga students is unfortunate to say the least. Especially when, as you’ll see here, a little knowledge and a bit of know how is enough to allow anyone who’s interested to increase the mobility of their hips safely and effectively.
So what is a safe and effective way of hip opening? It starts with seeing where our body is actually at and understanding where we want it to go and how to get it there. So first we need to look objectively at the range of motion our hips currently have. Next we need to learn to see what is a movement of the hip joint and what is a movement of some other part of the body. Finally, we need to learn ways of increasing our range of motion (ROM) that maintain the integrity of the hip joints and do not place inappropriate loads on the spine or the knee.
The hip joint has 6 different ranges of motion. These are flexion, extension, external rotation, internal rotation, adduction and abduction. Flexion involves the thigh bone or femur moving toward the front of the pelvis or the pelvis rotating toward the front of the femur. This is the ROM that is most crucial for doing a forward bend. Extension is the opposite of flexion. In hip extension the femur moves toward the back of the pelvis. Extension is the ROM used primarily in back bends, but it is also important for walking.
External and internal rotation are the femur rotating away from or toward the opposite leg respectively. Adduction and abduction are the femur moving laterally (as opposed to rotating) towards and away from the opposite leg respectively. Adduction also describes when the femur moves across the midline of the body and beyond the the opposite leg and hip. All of these ROM’s are important in both standing and seated postures.
Of all of the ROM’s of the hip I mentioned above, flexion is the movement our hips do most often. Flexion is the primary movement done in forward bends, but it’s also the hip motion we do every time we sit and we should but don’t necessarily do every time we reach forward to pick something up or use the sink or the toilet (we often bend the spine instead of the hip). Therefore improving our hip flexion will not only help our forward bends in yoga but also help us with the everyday activities that, when our hip ROM is limited, put constant stress on our knees and lower backs.
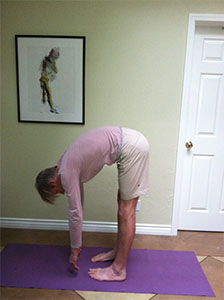
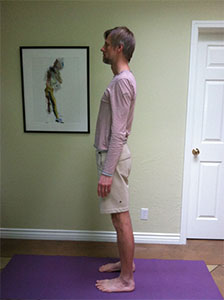
Let’s start by looking at how much hip flexion we have. Stand with your feet separated about 5-6 inches and parallel. If possible, stand profile to a mirror so that you can see the shape of your spine. If you tend to get lower back pain when bending forward, put a chair or stool in front of you so you can take some support from it. Next, move your hips back just a little, that is, just until you begin to perceive the pelvis tilting forward (see figure 1). Now look at the shape of your back in the mirror. The lower part of the spine or lumbar spine should be somewhat concave. If you don’t have a mirror, you can try feeling the shape of your spine with your finger tips(see figure 2). If the lumbar does not curve in but rather rounds out, lift your sit bones and your tailbone up away from your feet until you’ve restored the concave shape. This is hip flexion.

figure 1
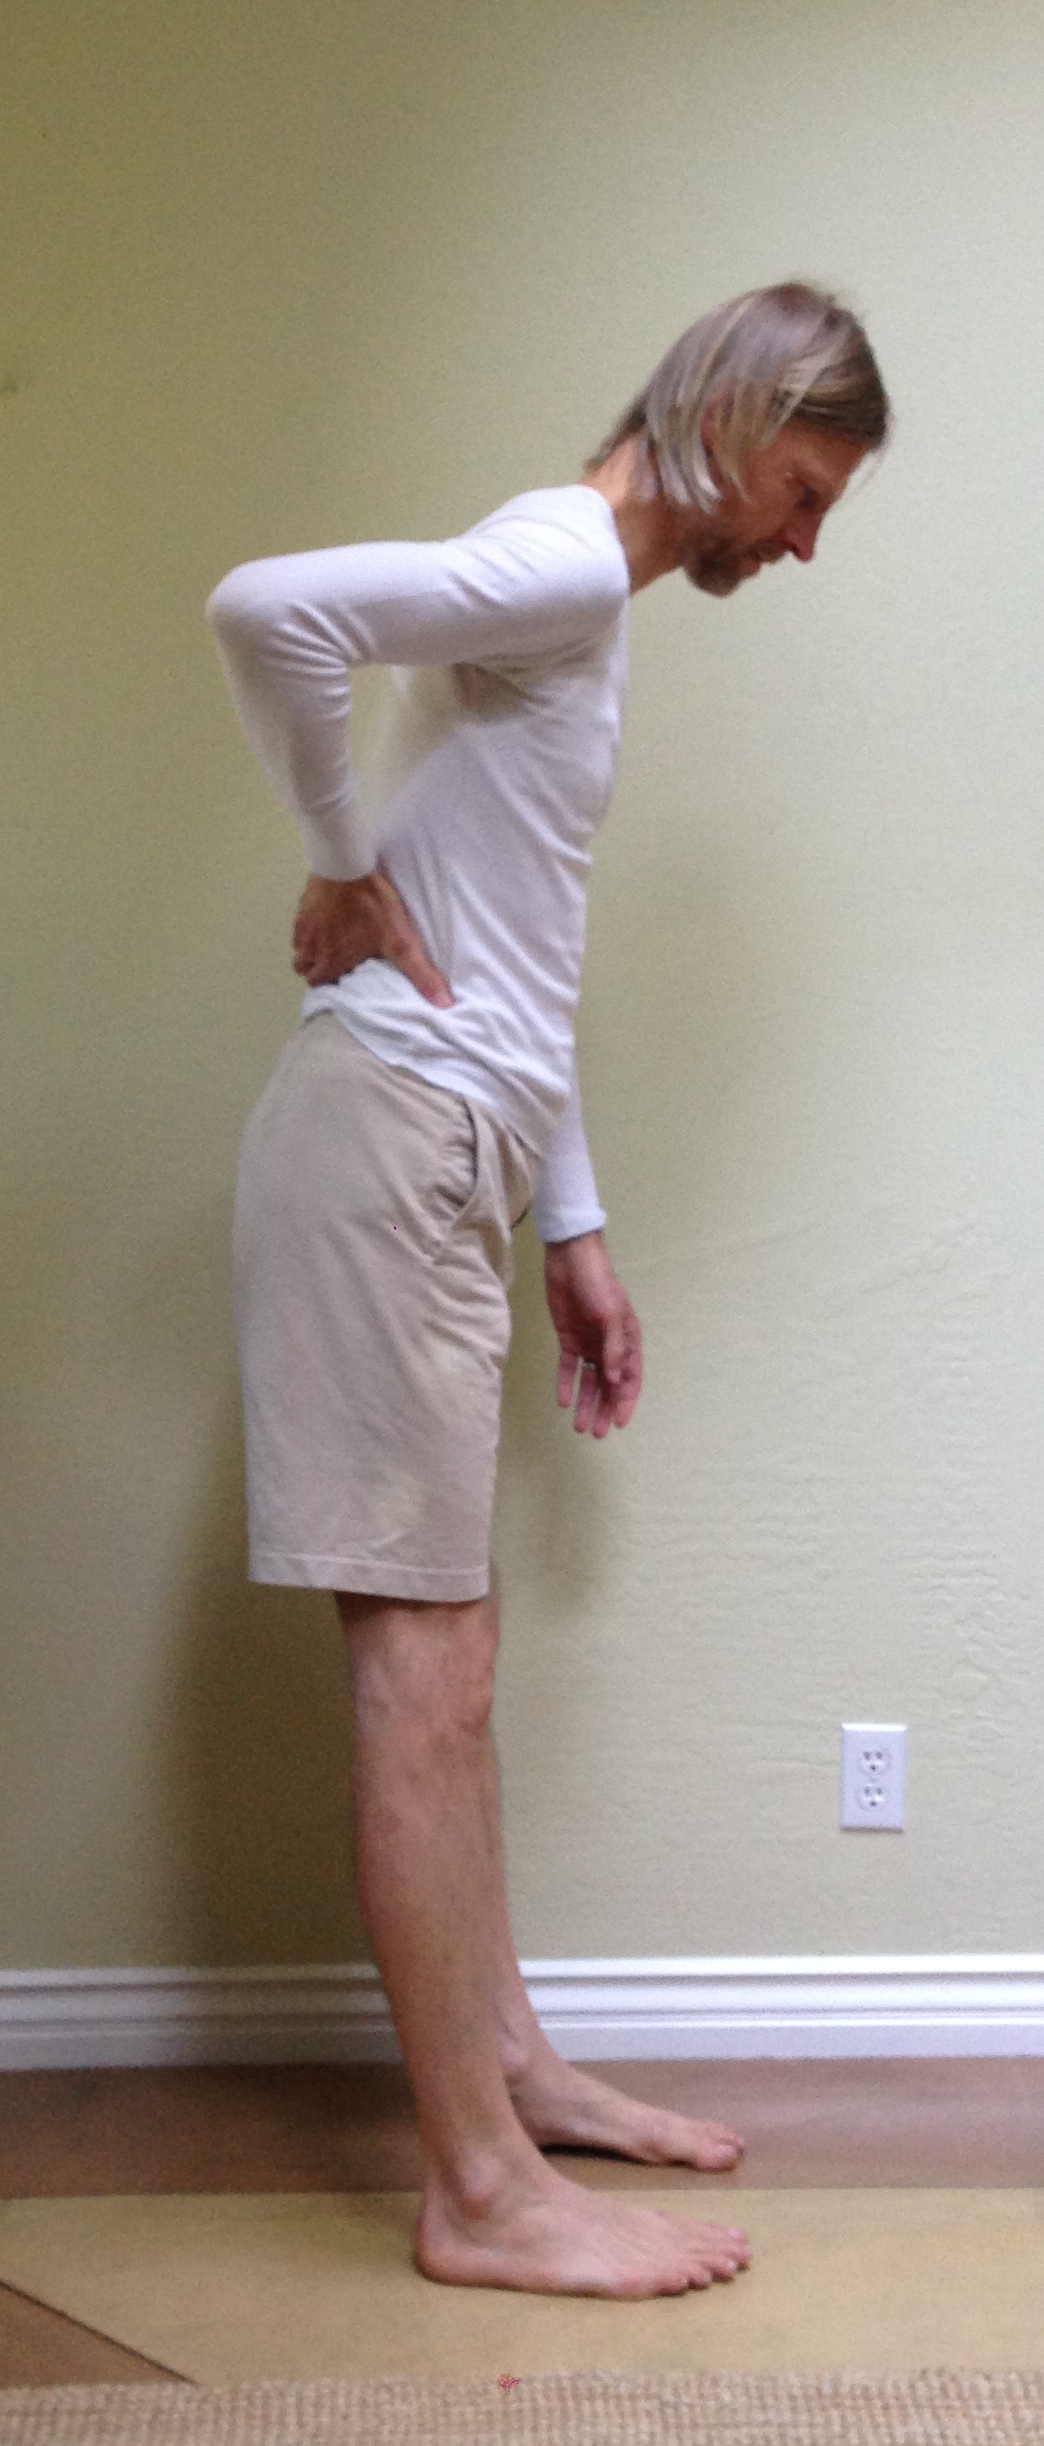
figure 2
Once you have established a concave lumber position in this very modest forward bend, continue to move your hips back and lift your sit bones up to increase hip flexion. Still using the mirror or your finger tips, notice when your pelvis can no longer tilt forward and the shape of your lower back starts to change. When it does you have reached the end of your ROM of hip flexion and have begun flexing your lumbar spine instead (see Figure 3). If you do this enough it will eventually cause back pain and may compromise the integrity of the spinal joints. Conversely, if you can learn to maintain your lumbar curve more often it will help develop the ROM in your hips you need to do deep forward bends safely.
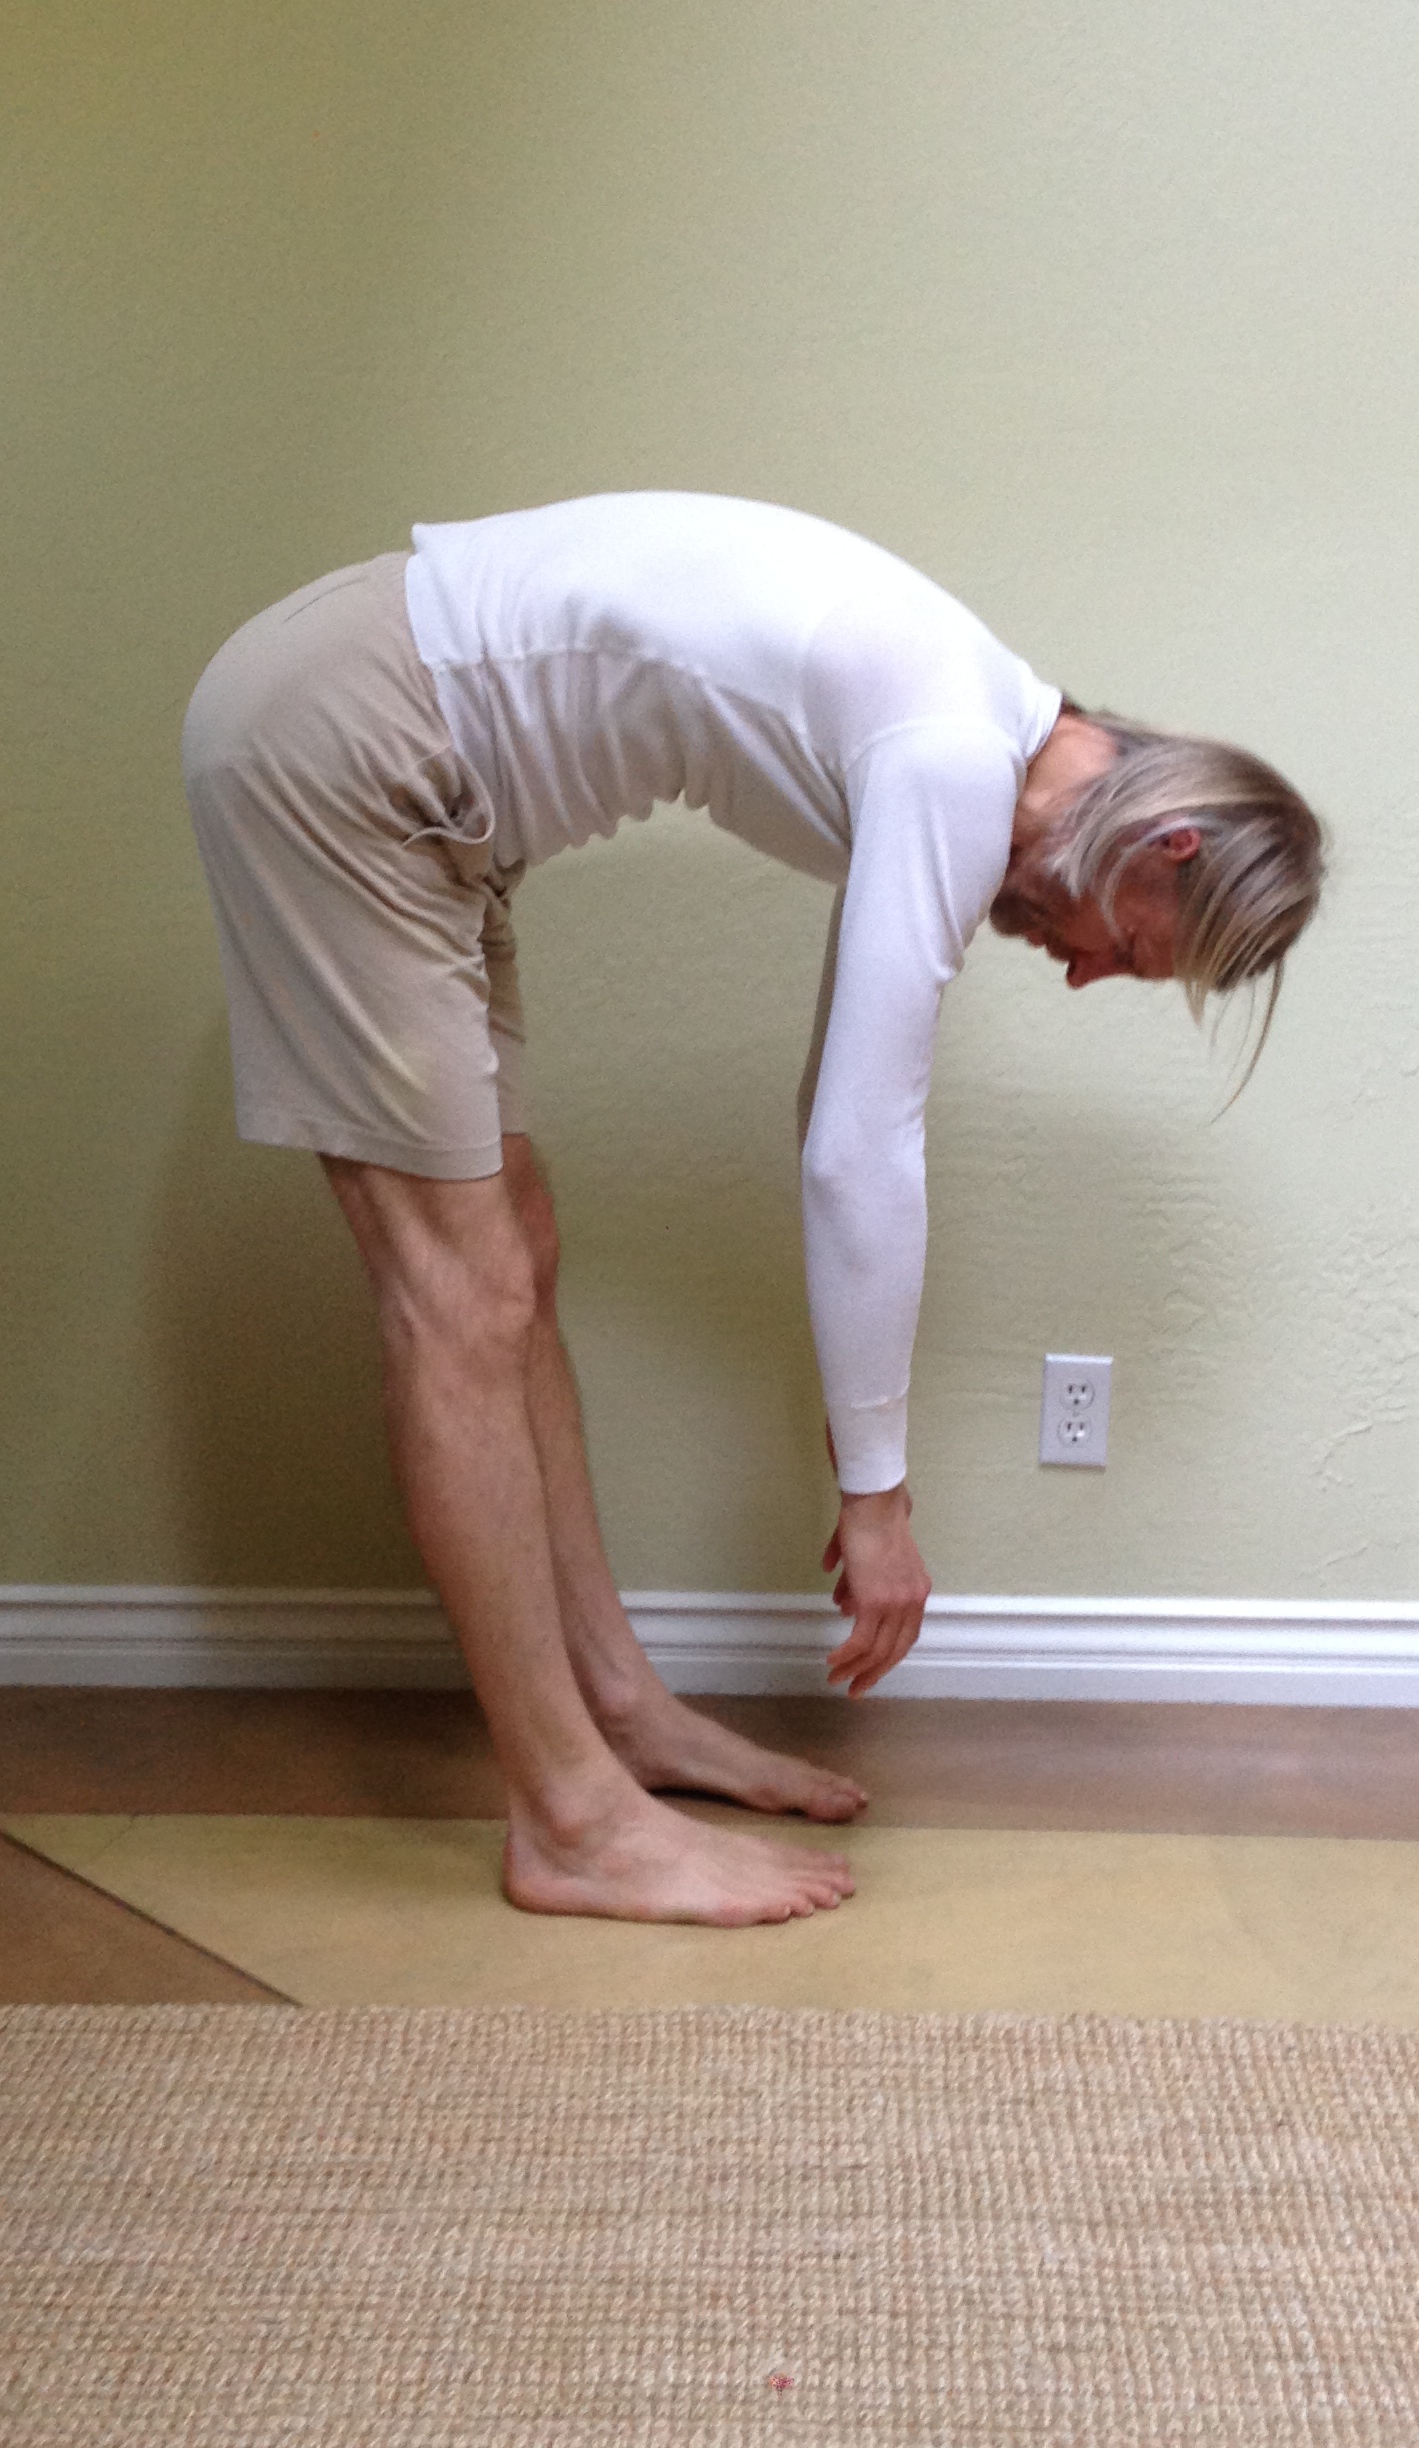
figure 3
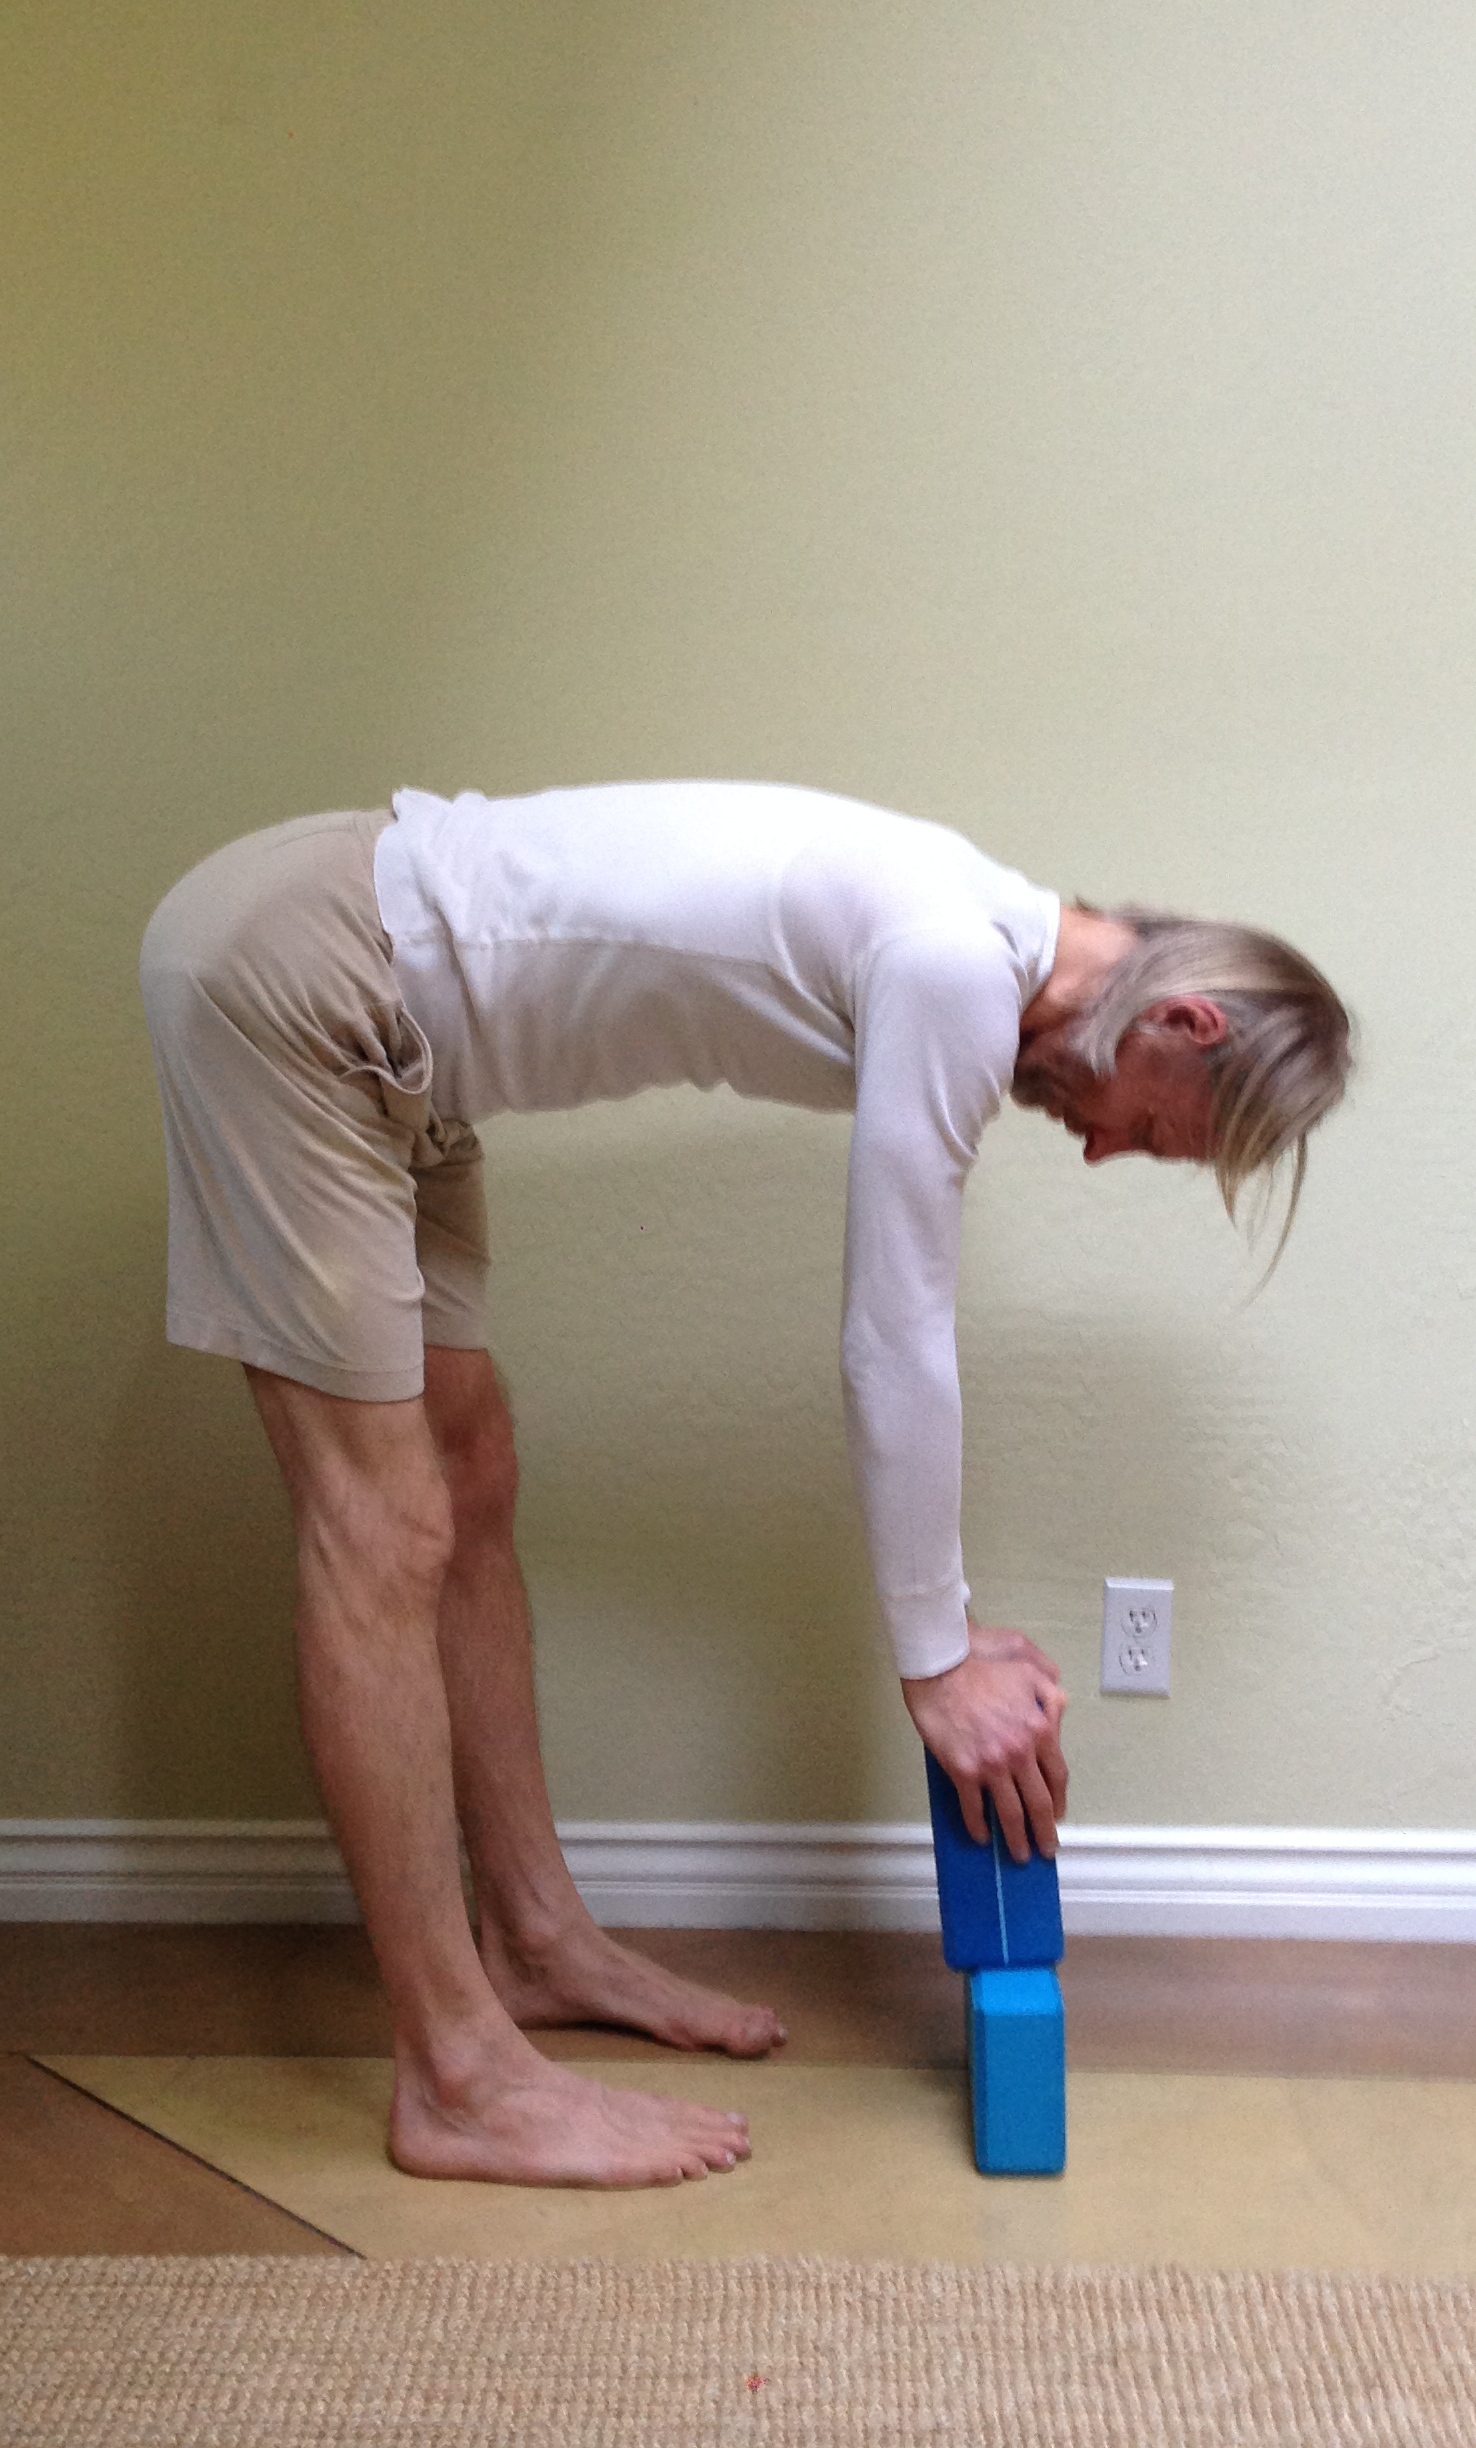
Now lift your trunk slightly back up until you have restored the concave lumbar position. To establish a marker, see how far your hands are from the floor. You might use yoga blocks, for example, to see how far you are. Are you one block? Two blocks? A block and a half? Get an objective measure you can use as a baseline you can refer to later and evaluate progress (See Figure 4). Then come up from your forward bend, preferably with your knees straight. If your back hurts coming up with the knees straight then bend your knees to come out. As you hip ROM improves and your legs get stronger you will gradually find it easier to come out of this forward bend without bending your knees. This is another measure you can use to monitor your progress.
figure 4
To work on increasing your ROM of hip flexion, repeat the above but begin to hold the position for a period of time. Start with holding the fully hip flexed position with your still concave lumbar for 20-30 seconds. Repeat it 3-4 times. In time you’ll find you can increase your time in the posture and with increased time you’ll see progress. Your hip flexion with increase and your forward bends will improve!
Stay tuned! Next we’ll look at hip extension.